
OpenClaw (née MoltBot, née ClawdBot) is taking over the world. Everyone is spinning their own, either on a VPS, or their own Mac mini.
But here's the problem: OpenClaw is brand new, and its security posture is mostly unknown. Security researchers have already found thousands of publicly available instances exposing everything from credentials to private messages.
While OpenClaw has a Gateway component — the UI and WebSocket that controls access — there are serious issues with its password/token-based authentication:
Until recently, you could skip authentication entirely on localhost.
The GET URL token authentication mechanism is questionable for such young code.
Trust needs to be earned, not assumed.
In this post, we'll secure OpenClaw using a battle-tested method with HAProxy.
The plan: implement HAProxy’s HTTP Basic Authentication
HAProxy’s HTTP Basic Authentication is a robust method for securing access to production systems with a username/password combination. In this guide, we’ll do the following:
Install HAProxy
Configure HAProxy with automatic TLS, basic auth, and rate limiting
Install OpenClaw and authenticate access using the basic auth credentials
We'll cover running OpenClaw on a VPS first. In a follow-up, we'll tackle Mac mini deployments with secure remote access (think Tailscale, but entirely self-hosted).
We'll also add smart rate limiting: anyone who sends more than 5 unauthorized requests within 120 seconds is blocked for 1 minute. The clever part? They'll see a 401 Unauthorized instead of 429 Too Many Requests, so attackers won't even know they've been rate-limited.
By rewriting headers in HAProxy, we can skip OpenClaw's device approval on first connection while keeping everything secure — you still authenticate using both your username/password and your token.
You'll need two checklist items to get started:
A VPS running anywhere with Ubuntu 24.04, and a public IP address
A domain/subdomain pointing DNS to the VPS public IP
To see everything in action, visit our live demo link and experiment.
Building it yourself
1) Install the HAProxy image
First, we'll install the high-performance HAProxy image:
| # Create directory for the GPG key | |
| sudo install -d -m 0755 /usr/share/keyrings | |
| # Download the GPG key | |
| sudo wget -qO /usr/share/keyrings/HAPROXY-key-community.asc \ | |
| https://pks.haproxy.com/linux/community/RPM-GPG-KEY-HAProxy | |
| # Add HAProxy repository for Ubuntu Noble (24.04) | |
| echo "deb [arch=amd64 signed-by=/usr/share/keyrings/HAPROXY-key-community.asc] \ | |
| https://www.haproxy.com/download/haproxy/performance/ubuntu/ha33 noble main" | \ | |
| sudo tee /etc/apt/sources.list.d/haproxy.list | |
| # Install HAProxy with AWS-LC and whois | |
| sudo apt-get update | |
| sudo apt-get install haproxy-awslc whois |
We now have HAProxy 3.3 installed, with the high-performance AWS-LC library and full ACME support for automatic TLS certificates. Now, we just need to apply the configuration to make it work.
2) Configure HAProxy
Edit /etc/haproxy/haproxy.cfg and insert the following lines into the global section. This will set us up to use automatic TLS:
| global | |
| expose-experimental-directives | |
| httpclient.resolvers.prefer ipv4 |
Now let’s add configuration for automatic TLS using Let’s Encrypt. Edit the last line for your own domain:
| acme letsencrypt | |
| directory https://acme-v02.api.letsencrypt.org/directory | |
| contact your@email.org | |
| challenge HTTP-01 | |
| keytype RSA | |
| bits 2048 | |
| map virt@acme | |
| crt-store my_files | |
| crt-base /etc/haproxy/ | |
| key-base /etc/haproxy/ | |
| load crt "subdomain.example.com.pem" acme letsencrypt domains "subdomain.example.com" alias "subdomain" |
Next, we'll take care of the basic HAProxy configuration items. Don’t forget to change the line starting with ssl-f-use to use the correct subdomain alias from the my_files section:
| frontend gw | |
| bind *:443 ssl | |
| bind *:80 | |
| # Handle Let's Encrypt challenges | |
| http-request return status 200 content-type text/plain \ | |
| lf-string "%[path,field(-1,/)].%[path,field(-1,/),map(virt@acme)]\n" \ | |
| if { path_beg '/.well-known/acme-challenge/' } | |
| # Redirect HTTP to HTTPS | |
| http-request redirect scheme https unless { ssl_fc } | |
| ssl-f-use crt "@my_files/subdomain" | |
| mode http | |
| # Authentication and rate limiting | |
| acl auth_ok http_auth(mycredentials) | |
| stick-table type ip size 64k expire 120s store gpc0 | |
| http-request track-sc0 src | |
| http-request sc-inc-gpc0 if !auth_ok | |
| # Return 401 to confuse attackers (not 429) | |
| http-request deny deny_status 401 if { sc_get_gpc0(0) ge 5 } | |
| # Require authentication | |
| http-request auth unless auth_ok | |
| backend openclaw_be | |
| server srv1 127.0.0.1:18789 | |
| userlist mycredentials | |
| user admin insecure-password change-this-password |
Change change-this-password shown in the last line to a strong password!
3) Restart HAProxy
Restart HAProxy to apply the updated configuration:
| sudo systemctl restart haproxy |
Next, edit the HAProxy systemd file to make it automatically write certificates to disk. Run the following command:
| sudo systemctl edit haproxy --full |
You're now ready to insert the following line under [Service]:
| ExecReload=/usr/sbin/haproxy-dump-certs |
Finally, reload systemd:
| sudo systemctl daemon-reload |
4) Install OpenClaw and access it securely
You're now ready to install OpenClaw:
| curl -fsSL https://openclaw.ai/install.sh | bash |
That’s it! You can now run the following command:
| openclaw dashboard |
This process will give you your personal access token. This is still needed for proper authentication inside OpenClaw itself.
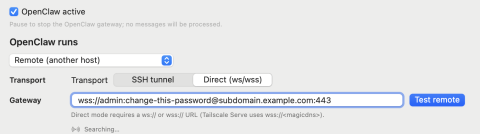
You can now visit https://subdomain.example.com/?token=<gateway token>. When doing this for the first time, you'll have to provide a username and password.
You can also configure your macOS app to talk to this OpenClaw instance. Just insert the username and password directly into the Websocket URL, as shown below:
One more thing
Check your rate limiting occasionally to see who's knocking at your door:
| echo "show table gw" | socat stdio /var/run/haproxy/admin.sock | |
| # table: gw, type: ip, size:65536, used:1 | |
| 0x72c0e2a0c6c8: key=103.40.140.18 use=1 exp=57407 shard=0 gpc0=3 |
You might be surprised how many bots are already scanning for OpenClaw instances. That 401 response is working hard. Any line item where gpc0 is higher than 5 has been limited.
What if you accidentally lock yourself out? Simply run this command, where <key> is your IP address:bash:
| echo "clear table gw key <ip>" | socat stdio /var/run/haproxy/admin.sock | |
| # table: gw, type: ip, size:65536, used:1 | |
| 0x72c0e2a0c6c8: key=103.40.140.18 use=1 exp=57407 shard=0 gpc0=3 |
Secure from the start
You now have an OpenClaw instance that's actually secure, not just "hopefully secure." Here's what's protecting you:
Defense in depth – You're not relying on OpenClaw's young authentication code. HAProxy handles the security layer with battle-tested HTTP Basic Auth that's been protecting production systems for decades.
Stealth rate limiting – Attackers hitting your instance will see authentication failures, not rate limit errors. They won't know they've been blocked, which means they'll waste time and resources before giving up.
Automatic TLS – Let's Encrypt handles your certificates with zero manual intervention. No expired certs, no security warnings, no hassle.
If you need more authentication methods or additional security layers, check out HAProxy Enterprise load balancer. When you’re ready to control your deployment at scale, using HAProxy Fusion for centralized management, observability, and automation.
Stay safe and keep learning!
Subscribe to our blog. Get the latest release updates, tutorials, and deep-dives from HAProxy experts.