Many of you use HashiCorp Consul for service discovery. It makes connecting one backend application or service to another easy: Your Consul servers store a catalog of addresses to all of your services; when an application within the network wants to discover where a service is listening, it asks Consul, which gives it the address.
Application: Consul, where is Payment Service listening?
Consul: It’s listening at 192.168.0.5 on port 3000.
Application: Got it, and where is Inventory Service listening?
Consul: It’s listening at 192.168.0.11 on port 3001.
Application: Got it, thanks!
Service discovery eliminates the need for a client application to remember where a service is located. Services register themselves with Consul and then applications can ask Consul for that information. Applications can consume service discovery information either through a direct API call or can treat Consul as a DNS server that will resolve a service’s name to an IP address. In fact, HAProxy supports DNS service discovery through Consul and the HAProxy Data Plane API introduced native support for service discovery through Consul in version 2.2.
There’s another way to run Consul though, as a service mesh.
With Consul in service mesh mode, your application assumes that the remote service that it wants to call is actually running locally, on the same node.
Application: Consul, I’m going to assume Payment Service is running at localhost:3000.
Consul: Indeed it is!
How can a service that is definitely not running at localhost be reached there? The secret is that when you enable the Consul service mesh, it uses a client-side proxy to forward your local host request to the remote server. Since Consul knows the true address of the service, it simply needs to translate the localhost request to use the real address. In fact, the ports don’t even need to match. Consul will map those too. If the client prefers to call the service on localhost port 8080, but the service is actually listening on remote port 3000, Consul will make that work.
However, you must decide which underlying proxy technology Consul uses. The built-in proxy implementation that ships with Consul might suffice in certain circumstances, but you can switch to using HAProxy, which is a high-performance proxy trusted by many organizations for its ability to scale. In this blog post, you’ll see how to select HAProxy as that proxy layer.
By enabling HAProxy in your service mesh, you’re able to use a familiar technology that you may already be using in other parts of your infrastructure. Also, HAProxy has tremendous performance. In a service mesh environment where even small amounts of latency can be amplified by the many east-west, service-to-service calls, the performance makes a big difference!
Deploy Minikube
In this post, we will create a service mesh inside Kubernetes, so you’ll need a Kubernetes cluster. An easy one to get started with is minikube. Follow the install guide to set up minikube on your workstation. Also, install Helm, which we’ll use to deploy a Consul server, and kubectl, which we’ll use to deploy other pods to the Kubernetes cluster.
Deploy the Consul Servers
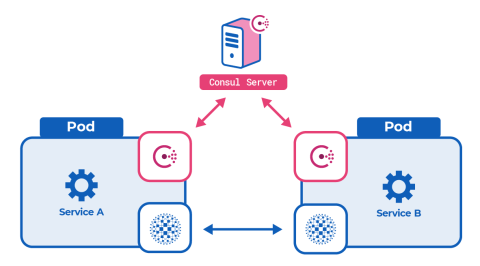
In a Consul service mesh, there are two types of Consul agents. The first type runs in server mode. Consul servers act as the record of truth for the service mesh, storing service information and responding to API requests. The second type runs in client mode. These are deployed next to each of your application services; they communicate with the Consul servers to fetch the latest service mesh topology, which they make available to the local HAProxy instance.
Follow the Installing Consul on Kubernetes guide to install Consul servers into your Kubernetes cluster using Helm, as shown below. Notice that we set the connect flag to true when installing the Helm chart so that we can use Consul as a service mesh:
| $ helm repo add hashicorp https://helm.releases.hashicorp.com | |
| $ helm repo update | |
| $ helm install consul hashicorp/consul \ | |
| --set global.name=consul \ | |
| --set connect=true \ | |
| --set server.replicas=1 \ | |
| --set server.bootstrapExpect=1 \ | |
| --version 0.31.1 |
The last two flags, server.replicas and server.bootstrapExpect, are necessary when using minikube because we’re running a single-node Kubernetes cluster. Otherwise, the Helm chart will try to create multiple Consul servers, which will fail to start due to node affinity rules. You can learn more about that in the Consul Service Discovery and Mesh on Minikube guide.
Next, call kubectl port-forward to allow access to the Consul UI:
| $ kubectl port-forward service/consul-server 8500:8500 |
This makes the UI available at http://localhost:8500/ui. For a production environment, you can expose the UI via the HAProxy Kubernetes Ingress Controller.
Deploy a Service
Now that you have a Consul server listening, let’s add a service and register it with the service mesh. Download the demo project to get the files you’ll need.
Kubernetes makes configuring a service mesh easier tactically because you can run multiple containers inside a single pod, which is often referred to as running sidecar containers. This capability allows you to host inside a single pod the three components you’ll need to register a service. Inside a pod, you will have three containers:
a container running your client application or service
a container running a Consul agent (in client mode)
a container running HAProxy
The HAProxy container is not your typical HAProxy Docker image. It’s the haproxytech/haproxy-consul-connect image, which in addition to hosting HAProxy, runs a daemon that binds to the Consul agent so that the HAProxy configuration will be updated in real time using service discovery information. Criteo, who developed this integration, runs it as massive scale.
The local application sends all of its requests to localhost, where HAProxy is listening, and HAProxy relays those requests to the remote service. On the remote service end, there will be another HAProxy instance that receives the request. So, all service-to-service communication in the service mesh is actually proxy-to-proxy communication.
When the Consul agent container starts, it wants to connect to the Consul servers, but it needs to learn where they are. When operating in Kubernetes, you have the luxury of using the auto-join feature, which finds the Consul server pods based on a label selector. However, you’ll need to add a new Role and RoleBinding object that grants permission to read pod labels.
In the demo project, we’ve defined the file as pod-reader-role.yaml. It looks like this:
| kind: Role | |
| apiVersion: rbac.authorization.k8s.io/v1 | |
| metadata: | |
| namespace: default | |
| name: pod-reader | |
| rules: | |
| - apiGroups: [""] | |
| resources: ["pods"] | |
| verbs: ["get", "watch", "list"] | |
| --- | |
| kind: RoleBinding | |
| apiVersion: rbac.authorization.k8s.io/v1 | |
| metadata: | |
| name: read-pods | |
| namespace: default | |
| subjects: | |
| - kind: User | |
| name: system:serviceaccount:default:default | |
| apiGroup: rbac.authorization.k8s.io | |
| roleRef: | |
| kind: Role | |
| name: pod-reader | |
| apiGroup: rbac.authorization.k8s.io |
Deploy this into your Kubernetes cluster by using kubectl apply:
| $ kubectl apply -f pod-reader-role.yaml |
With that bit of housekeeping out of the way, let’s add a service to the service mesh. In the demo project, we’ve defined a service named news-service. It’s a funny little program that returns random news headlines based on a family favorite game, Mad Libs. It will return headlines like:
dancer imitates eggs!
yuppie collects hairballs!
and so forth.
In the demo project, there’s a file named news-service-deployment.yaml that looks like this:
| apiVersion: apps/v1 | |
| kind: Deployment | |
| metadata: | |
| name: news-service | |
| labels: | |
| app: news-service | |
| spec: | |
| replicas: 1 | |
| selector: | |
| matchLabels: | |
| app: news-service | |
| template: | |
| metadata: | |
| labels: | |
| app: news-service | |
| spec: | |
| containers: | |
| - name: news-service | |
| image: quay.io/nickmramirez/news-service | |
| - name: haproxy-consul | |
| image: haproxytech/haproxy-consul-connect | |
| args: ["-sidecar-for", "news-service", "-enable-intentions"] | |
| - name: consul | |
| image: consul | |
| env: | |
| - name: CONSUL_LOCAL_CONFIG | |
| value: '{ | |
| "service": { | |
| "name": "news-service", | |
| "port": 80, | |
| "connect": { | |
| "sidecar_service": {} | |
| } | |
| } | |
| }' | |
| args: | |
| - agent | |
| - -bind=0.0.0.0 | |
| - "-retry-join=provider=k8s label_selector=\"app=consul\"" |
As you can see, the three containers we described before are present: the application itself, HAProxy, and the Consul agent. Use kubectl to deploy it:
| $ kubectl apply -f news-service-deployment.yaml |
Taking a closer look at the consul container part of this file. You’ll see that it sets the CONSUL_LOCAL_CONFIG environment variable, which defines the JSON-formatted Consul agent configuration.
| - name: CONSUL_LOCAL_CONFIG | |
| value: '{ | |
| "service": { | |
| "name": "news-service", | |
| "port": 80, | |
| "connect": { | |
| "sidecar_service": {} | |
| } | |
| } | |
| }' |
This is how you register the news-service with the Consul service mesh, including telling it which port the service is listening on, which in this case is port 80. In the next section, we set up an application that calls this service.
Deploy an Application That Uses the Service
Next, deploy the app-ui-deployment.yaml file from the demo project. This creates a web application that calls the news-service:
| $ kubectl apply -f app-ui-deployment.yaml |
It looks like this:
| apiVersion: apps/v1 | |
| kind: Deployment | |
| metadata: | |
| name: app-ui | |
| labels: | |
| app: app-ui | |
| spec: | |
| replicas: 1 | |
| selector: | |
| matchLabels: | |
| app: app-ui | |
| template: | |
| metadata: | |
| labels: | |
| app: app-ui | |
| spec: | |
| containers: | |
| - name: app-ui | |
| image: quay.io/nickmramirez/app-ui | |
| - name: haproxy-consul | |
| image: haproxytech/haproxy-consul-connect | |
| args: ["-sidecar-for", "app-ui", "-enable-intentions"] | |
| - name: consul | |
| image: consul | |
| env: | |
| - name: CONSUL_LOCAL_CONFIG | |
| value: '{ | |
| "service": { | |
| "name": "app-ui", | |
| "port": 80, | |
| "connect": { | |
| "sidecar_service": { | |
| "proxy": { | |
| "upstreams": [ | |
| { | |
| "destination_name": "news-service", | |
| "local_bind_port": 3000 | |
| } | |
| ] | |
| } | |
| } | |
| } | |
| } | |
| }' | |
| args: | |
| - agent | |
| - -bind=0.0.0.0 | |
| - "-retry-join=provider=k8s label_selector=\"app=consul\"" | |
| --- | |
| apiVersion: v1 | |
| kind: Service | |
| metadata: | |
| name: app-ui | |
| spec: | |
| selector: | |
| app: app-ui | |
| ports: | |
| - name: http | |
| port: 80 | |
| protocol: TCP | |
| targetPort: 80 |
This Deployment object is nearly identical to the one we used for the news-service, except that we’ve changed the name news-service to app-ui. Consider how its Consul agent configuration differs:
| - name: CONSUL_LOCAL_CONFIG | |
| value: '{ | |
| "service": { | |
| "name": "app-ui", | |
| "port": 80, | |
| "connect": { | |
| "sidecar_service": { | |
| "proxy": { | |
| "upstreams": [ | |
| { | |
| "destination_name": "news-service", | |
| "local_bind_port": 3000 | |
| } | |
| ] | |
| } | |
| } | |
| } | |
| } | |
| }' |
Rather than having an empty sidecar_service stanza, it defines upstreams, one of which is the news-service. This application calls the news-service on localhost port 3000. HAProxy does the heavy lifting of proxying that request to the remote service at port 80.
Use kubectl port-forward to publish this application on port 8080 so that you can see it in your browser.
| $ kubectl port-forward service/app-ui 8080:80 |
It looks like this:
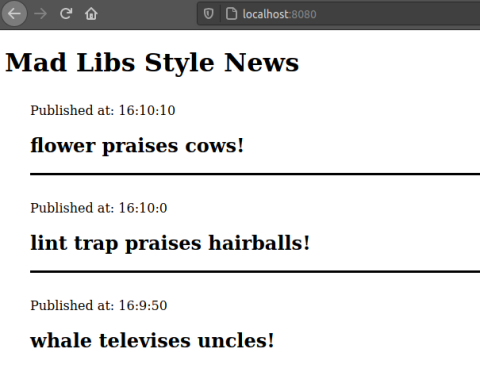
If everything works, the app-ui application is able to make requests to the upstream news-service, which it accesses at localhost:3000, but which actually lives in an entirely different pod in the Kubernetes cluster.
Curious to see the code for the app-ui and news-service applications? It’s available here on GitHub.
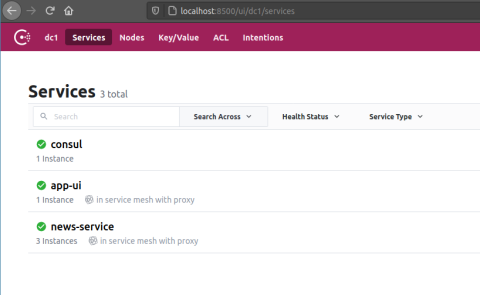
You can also check the Consul UI at http://localhost:8500/ui to see that the news-service and app-ui applications have been registered.
Consul Intentions
Let’s explore some other features of the Consul service mesh. Intentions are authorization policies that let you block one application in the service mesh from making requests to another. Or, you can deny all traffic between services and allow only specific services to communicate. This is controlled in the Consul UI via the Intentions tab. HAProxy is responsible for enforcing Intentions at the proxy level, which is why we include the -enable-intentions flag when deploying that container.
In the Consul UI, go to the Intentions tab. Here, you can allow or deny a route between any pair of services that are registered with the service mesh. Add a deny rule that prevents the app-ui application from communicating with the news-service.
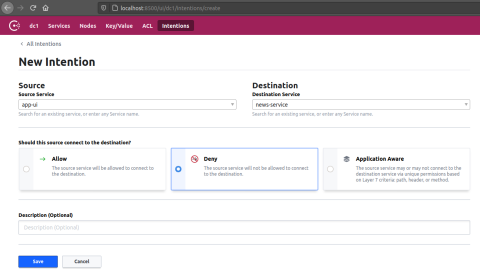
The app-ui web page will stop showing random news headlines and instead show a message at the bottom:
Service offline. Could not get the latest news headline.
Disable the Intention and the news feed will continue again. All of this works because HAProxy supports mTLS between the app-ui application and the news-service. Or, to put it another way, it enforces SSL client certificates in both directions, which allows it to accept or deny requests depending on what you set in Consul.
Consul ACLs
With Consul, you can also set ACLs to restrict who can make requests to the Consul servers through the Consul API. This is a security measure that prevents unauthorized clients from joining the cluster and reading information. Clients authenticate by passing a token with each API request.
To use ACLs, you must enable them by setting the global.acls.manageSystemACLs flag when you install the Consul Helm chart. Uninstall the chart from before and install it again like this:
| $ helm uninstall consul | |
| $ helm install consul hashicorp/consul \ | |
| --set global.name=consul \ | |
| --set connect=true \ | |
| --set server.replicas=1 \ | |
| --set server.bootstrapExpect=1 \ | |
| --set global.acls.manageSystemACLs=true | |
| $ kubectl port-forward service/consul-server 8500:8500 |
Use kubectl get secret to get the bootstrap ACL token, which is base64 encoded:
| $ sudo apt install jq | |
| $ kubectl get secret consul-bootstrap-acl-token \ | |
| -o json | jq -r '.data.token' | base64 -d | |
| 8f1c8c5e-d0fb-82ff-06f4-a4418be245dc |
Use this token to log into the Consul UI. Then go to the ACL tab and double-click the client-token row. This is the token that must be distributed to Consul agents so that they can connect to the Consul server.
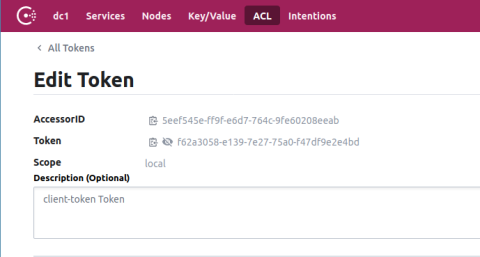
You’ll need to configure your services to use the token, but first, go to the ACL > Policies screen, select the client-token row, and change the policy’s rules so that service_prefix stanza has a policy of write:
| node_prefix "" { | |
| policy = "write" | |
| } | |
| service_prefix "" { | |
| policy = "write" | |
| } |
Next, add the token to your services by editing the YAML files from the demo project. Update the Deployment definition for the HAProxy-Consul container for both the app-ui and news-service deployments, adding the token argument, which you’ll set to the client-token value copied from the Consul UI:
| - name: haproxy-consul | |
| image: haproxytech/haproxy-consul-connect | |
| args: ["-sidecar-for", "news-service", "-enable-intentions", "-token", "f62a3058-e139-7e27-75a0-f47df9e2e4bd"] |
At the same time, update the Consul container’s CONSUL_LOCAL_CONFIG variable so that it includes a primary_datacenter key, which should be the same for all agents and servers (the default is dc1). Also, add an acl stanza that contains a tokens section with the default token for this agent to use, which is again the client-token value:
| - name: consul | |
| image: consul | |
| env: | |
| - name: CONSUL_LOCAL_CONFIG | |
| value: '{ | |
| "primary_datacenter": "dc1", | |
| "acl": { | |
| "enabled": true, | |
| "default_policy": "allow", | |
| "down_policy": "extend-cache", | |
| "tokens": { | |
| "default": "f62a3058-e139-7e27-75a0-f47df9e2e4bd" | |
| } | |
| }, | |
| "service": { | |
| "name": "news-service", | |
| "port": 80, | |
| "connect": { | |
| "sidecar_service": {} | |
| } | |
| } | |
| }' |
Then redeploy the two services and forward the app-ui port again so that you can access it in your browser. Everything should work as before, but now you’ve gained another layer of security.
Conclusion
Choosing HAProxy as the proxy technology in your Consul service mesh means you’re running a high-performance solution and reducing latency between services. That can have a big payoff as you scale out your service mesh infrastructure. Special thanks to the team at Criteo, who developed this integration and use it at a large scale within their company!
Interested in learning more about HAProxy Enterprise? Contact us today.
Subscribe to our blog. Get the latest release updates, tutorials, and deep-dives from HAProxy experts.