
Use HAProxy to add routing, load balancing, and DNS service discovery to Docker Swarm.
Docker Swarm lets you expand beyond hosting Docker containers on a single machine. It oversees a cluster of servers and manages which to deploy a container too, depending on each server’s capacity. Swarm is controlled through the familiar Docker CLI. Installing it and using it feels intuitive and less heavy than Kubernetes. Although, that simpllicity means that some of the advanced features that you’ll find in Kubernetes require a do-it-yourself approach in Swarm.
Routing external traffic into the cluster, load balancing across replicas, and DNS service discovery are a few capabilities that require finesse. Luckily, the HAProxy load balancer integrates well into any environment, and at any scale. You can plug it in and it will take the bulk of the work off your shoulders. Using HAProxy also gives you access to end-to-end HTTP/2, gRPC support, Layer 7 retries, and Prometheus metrics. You can also take advantage of HAProxy Enterprise, which includes additional security and administration features.
In this blog post, you’ll see how to combine HAProxy and Docker Swarm to load balance traffic across your service replicas. You will learn how to scale out your containers and configure HAProxy to use service discovery to automatically update itself to match.
Swarm installation
In our test lab, we set up three Ubuntu Bionic servers. Create three VMs using your preferred virtualization platform or cloud provider. We gave our servers the following static IP addresses:
node1 = 10.64.137.201/24
node2 = 10.64.137.202/24
node3 = 10.64.137.203/24
All hosts in the cluster will act as Swarm managers. Managers take care of tasks such as maintaining the cluster’s state, scheduling services and serving the Swarm HTTP API. You can read more about managers versus workers in the How nodes work article in the Docker documentation.
Start by installing Docker Engine on each server. You can consult the official Docker documentation for the latest details, which indicates to run these commands:
| $ apt update | |
| $ apt install apt-transport-https ca-certificates curl gnupg2 software-properties-common | |
| $ curl -fsSL https://download.docker.com/linux/ubuntu/gpg | sudo apt-key add - | |
| $ add-apt-repository "deb [arch=amd64] https://download.docker.com/linux/ubuntu $(lsb_release -cs) stable" | |
| $ apt update | |
| $ apt install docker-ce docker-ce-cli containerd.io |
Next, use the docker swarm command to add each node to the swarm. Start with node1, using the init argument to bootstrap the cluster and configure the first manager. If you have more than one network interface, use --advertise-addr to select an IP address that other nodes in the swarm will connect to. Here’s the command and its output:
| $ sudo docker swarm init --advertise-addr 10.64.137.201 | |
| Swarm initialized: current node (xvkdic6akgbx0k1odao9ce2yt) is now a manager. | |
| To add a worker to this swarm, run the following command: | |
| docker swarm join --token SWMTKN-1-67rcacnzj6ihnew1nd50gvhdsm087d4a2qgvgulxu62b7xbwep-37l1kvmfe309bp3fzvcaa4rq0 10.64.137.201:2377 | |
| To add a manager to this swarm, run 'docker swarm join-token manager' and follow the instructions. |
This enables node1 as a Docker Swarm manager and returns a token that you’ll use to join the other nodes to the cluster. Next, on node2 and node3, run the suggested docker swarm join command:
| $ sudo docker swarm join --token [YOUR-SWARM-TOKEN] 10.64.137.201:2377 | |
| This node joined a swarm as a worker. |
At this point, node2 and node3 are only worker nodes. You can check the status of your cluster members by logging into node1 and executing the docker node ls command:
| $ sudo docker node ls | |
| ID HOSTNAME STATUS AVAILABILITY MANAGER STATUS ENGINE VERSION | |
| xvkdic6akgbx0k1odao9ce2yt * dock1 Ready Active Leader 19.03.1 | |
| xaj6gfj9xkks3ybtjvsr44emh dock2 Ready Active 19.03.1 | |
| q3wdfk3l8vinh227jwo99y3n7 dock3 Ready Active 19.03.1 |
Next, promote nodes 1 and 2 to be Swarm managers by running the docker node promote command on node1:
| $ sudo docker node promote $(sudo docker node ls --filter role=worker --quiet) | |
| Node xaj6gfj9xkks3ybtjvsr44emh promoted to a manager in the swarm. | |
| Node q3wdfk3l8vinh227jwo99y3n7 promoted to a manager in the swarm. |
You can also use the docker swarm join-token manager command to get a command that displays a token that joins a node to the cluster as a manager, rather than using the worker token and the docker node promote command.
When you run the docker node ls command again, you will see your three nodes as members of the Swarm cluster, each acting as a manager. The two new managers will have the status of Reachable. Check out the Create a swarm tutorial in the Docker documentation to learn more about these steps.
Create an overlay network
Initially, Docker creates a single bridge network that is useful for routing traffic on a single machine. In order to relay traffic between multiple hosts, you need to create a new virtual network of type overlay. This is easy using the docker network create command. Run the following on node1
| $ sudo docker network create --attachable --driver overlay apache-network |
Note that we’re calling this network apache-network. You’ll reference that name when creating new containers so that their virtual NICs are plugged into it. This creates a way for containers to communicate without being directly accessible from outside the cluster.
Create an Apache service
In our simple demo, we’re spinning up instances of the Apache webserver to be the service we want to load balance. Create the Apache service with the following command, which you can run from any of the nodes:
| $ sudo docker service create \ | |
| --mode replicated \ | |
| --replicas 0 \ | |
| --name apache-Service \ | |
| --network apache-network \ | |
| --endpoint-mode dnsrr \ | |
| httpd:2.4 |
Then, you can use docker service ls to see the number of replicas that were created, which is zero in this case. Let’s break down what the docker service create command does.
Argument | Description |
| Allows Swarm to modify the number of concurrently running Apache containers. So, later on, you’ll be able to scale up or down with convenient CLI commands. You could also specify |
| Indicates to Swarm the initial number of containers you would like to create and start. We will increase it later. |
| The service’s name is within the swarm. Pay attention to capitalization; I’ll discuss why that’s important in a moment. |
| Indicates to Swarm which network you want to use for the containers. |
| Configures DNS Round Robin mode. That means that when you query Docker’s internal DNS server to get the IP addresses of your Apache service, it will return the IP addresses of every node running the service. Alternatively, |
As a brief aside, let me tell you why the capitalization used within the service’s name, apache-Service, is important. You will be configuring HAProxy to use service discovery to instantly know when a container has been added so that it can update its configuration. It does this by querying Docker Swarm’s internal DNS server.
When you submit a DNS query for a service name to the Swarm DNS service, it will return one, or all, the IP addresses of the related containers, depending on the endpoint-mode. Usually, a DNS service is case-insensitive, but not in the context of Docker Swarm! With Docker Swarm, the DNS service is case-sensitive. So, be sure to keep that in mind when naming services.
In this setup, we didn’t restrict where within the cluster our containers can be placed. So, they could pop up on any of the three nodes. Generally, Swarm attempts to disperse them as equally as possible.
HAProxy configuration
Prior to creating your HAProxy service in Swarm, prepare your configuration file. The entire sample is found here. Please note that you have to store this file on the same path on all of your cluster nodes that could run your HAProxy container. We use /etc/haproxy/haproxy.cfg.
Create the file and add a global section to the top:
| global | |
| log fd@2 local2 | |
| chroot /var/lib/haproxy | |
| pidfile /var/run/haproxy.pid | |
| maxconn 4000 | |
| user haproxy | |
| group haproxy | |
| stats socket /var/lib/haproxy/stats expose-fd listeners | |
| master-worker |
Here, there are two important settings. The first is the log fd@2 local2 line. This will provide the logs to Docker, which can process them depending on the log driver you’ve set. The second is the master-worker line: It allows you to reload the HAProxy configuration without needing to restart the container itself. We’ll cover how it works in more detail at the end of this tutorial.
Next, add a resolvers section:
| resolvers docker | |
| nameserver dns1 127.0.0.11:53 | |
| resolve_retries 3 | |
| timeout resolve 1s | |
| timeout retry 1s | |
| hold other 10s | |
| hold refused 10s | |
| hold nx 10s | |
| hold timeout 10s | |
| hold valid 10s | |
| hold obsolete 10s |
The Docker Swarm DNS service is always available at 127.0.0.11. So, this section configures HAProxy to direct DNS queries to there. This is essential for DNS-based service discovery.
Next, add a defaults section so that there are some sensible timeouts and other settings:
| defaults | |
| timeout connect 10s | |
| timeout client 30s | |
| timeout server 30s | |
| log global | |
| mode http | |
| option httplog |
Finish with some frontend and backend sections:
| frontend fe_web | |
| bind *:80 | |
| use_backend stat if { path -i /my-stats } | |
| default_backend be_apache_service | |
| backend be_apache_service | |
| balance roundrobin | |
| server-template apache- 6 apache-Service:80 check resolvers docker init-addr libc,none | |
| backend be_apache_service_wrong_case | |
| balance roundrobin | |
| server-template apache- 6 apache-service:80 check resolvers docker init-addr libc,none | |
| backend stat | |
| stats enable | |
| stats uri /my-stats | |
| stats refresh 15s | |
| stats show-legends | |
| stats show-node |
If you are new to HAProxy and are curious about what each section is doing, check out our blog post, The Four Essential Sections of an HAProxy Configuration. This configuration is very basic, but take a closer look at the server-template lines in the backend sections. A server-template generates server lines based on the information it gets through DNS. The first argument is a label that will prefix the generated server names. In this case, it’s apache-.
A numerical suffix will be added to the end of each server’s name, starting at 1 by default, so that each has a unique name. We’ve set the maximum number of server lines that the template will generate to six. So, that’s the most Apache containers that can be filled in via service discovery. You have to adjust it depending on your needs. If you specify more servers than you have containers, the servers that are not assigned IP addresses are simply started in maintenance mode but can be assigned addresses later.
The next argument is apache-Service:80, which is the Swarm service name that will be used for the service discovery. As mentioned earlier, you have to respect the case of the server’s name. The second backend, be_apache_service_wrong_case, emphasizes this point and is here to show that it isn’t affected at all when you issue DNS queries using a different case. Instead of apache-Service, it uses apache-service.
The resolvers docker argument indicates to HAProxy which resolvers section to use.
The init-addr libc,none argument tells HAProxy to perform service discovery at startup, but start even if there aren’t any running Apache containers. This is helpful since you may, as we’ve done, start HAProxy before the Apache replicas have been created. Recall that we defined the Apache service, but set --replicas 0.
Copy this HAProxy configuration file to each node under the folder /etc/haproxy/.
Create an HAProxy service
At this point, you have:
an Apache service defined, but not yet running on any nodes
an HAProxy configuration file that’s been copied to each node into the folder /etc/haproxy/haproxy.cfg
Now you can create the HAProxy service in Swarm. There are three ways to do this:
Create only one HAProxy container and let Swarm’s ingress routing mesh forward clients’ requests to it.
Create only one HAProxy container, but don’t use the ingress routing mesh; HAProxy will receive clients’ requests directly.
Create a replica of HAProxy on each node; Each will receive clients’ requests directly.
We’ll examine these potential implementations next.
One HAProxy container with the ingress routing mesh
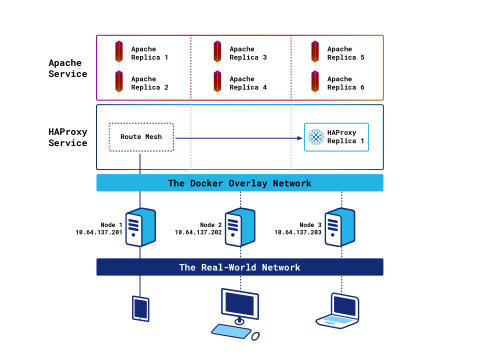
The following command will create a single instance of the HAProxy service and run it on one of the nodes:
| $ sudo docker service create \ | |
| --mode replicated \ | |
| --replicas 1 \ | |
| --name haproxy-service \ | |
| --network apache-network \ | |
| --publish published=80,target=80,protocol=tcp,mode=ingress \ | |
| --publish published=443,target=443,protocol=tcp,mode=ingress \ | |
| --mount type=bind,src=/etc/haproxy/,dst=/etc/haproxy/,ro=true \ | |
| --dns=127.0.0.11 \ | |
| haproxytech/haproxy-debian:2.0 |
Its publish argument states that we want to use the native ingress routing mesh, specified with mode=ingress, which is the default mode of operation. The ingress routing mesh receives client requests on any node and relays them, transparently, to the correct node and container anywhere within the cluster.
The --dns argument is needed so that Docker sends DNS queries originating from this container to its own internal DNS server only. Without it, Docker will also forward queries to nameservers specified in the node’s resolv.conf file and to Google’s DNS nameservers.
Once the service is created, the orchestrator will create an HAProxy container on a random cluster node. Because we’re using the ingress routing mesh, you can point your web browser toward any cluster node’s IP and load the HAProxy Stats page. For example http://10.64.137.202/my-stats. Note that it may take a few moments before the service is available.
After creating your HAProxy service, take a look at the HAProxy logs with the following command:
| $ sudo docker service logs --tail 20 haproxy-service |
You will note a disadvantage of using this mode: The real client’s IP address is masked because Swarm ends the client’s connection and opens a second one to the HAProxy container. Another is that in bigger clusters you tend to see a lot of traffic traveling between nodes (i.e. East-West traffic) due to the ingress routing mesh.
In the next section, you’ll see an alternative mode that will allow you to keep the client’s source IP address and reduce traffic for large clusters.
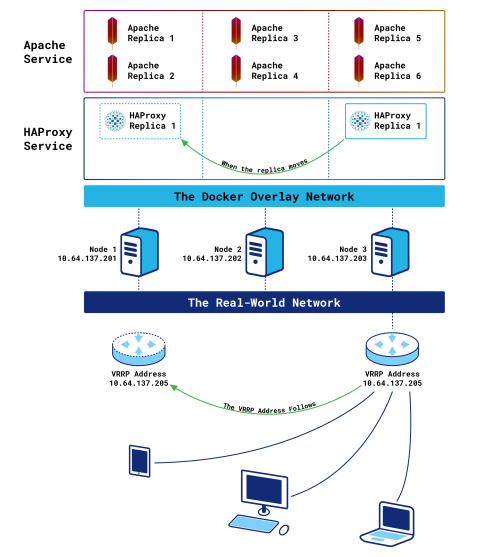
One HAProxy container without the ingress routing mesh
If you created the HAProxy service in the previous section, delete it with the docker service rm command:
| $ sudo docker service rm haproxy-service |
The following command will create our HAProxy service, but without connecting it to the ingress routing mesh:
| $ sudo docker service create \ | |
| --mode replicated \ | |
| --replicas 1 \ | |
| --name haproxy-service \ | |
| --network apache-network \ | |
| --publish published=80,target=80,protocol=tcp,mode=host \ | |
| --publish published=443,target=443,protocol=tcp,mode=host \ | |
| --mount type=bind,src=/etc/haproxy/,dst=/etc/haproxy/,ro=true \ | |
| --dns=127.0.0.11 \ | |
| haproxytech/haproxy-debian:2.0 |
This time, we’re defining mode=host with the publish argument, which bypasses the routing mesh. A single HAProxy instance is created on one of the three nodes, like before. However, this time, Docker will not route requests between nodes. When a node receives a request, it expects the service to be listening there. We will have to route clients’ requests to the correct cluster node—the one running the HAProxy container—another way.
We’ll introduce Keepalived and its VRRP feature for this purpose. The beauty of this solution is that it lets you route traffic to the correct node without increasing East-West traffic. Install Keepalived onto each node with the following command:
| $ sudo apt install keepalived |
The keepalived configuration, which should be created at /etc/keepalived/keepalived.conf, will be the same on each node:
| vrrp_script haproxy_container { | |
| script "/usr/bin/docker container ls --filter name=haproxy-service | /bin/grep haproxy-service" | |
| interval 5 | |
| weight -20 | |
| fall 2 | |
| rise 2 | |
| } | |
| vrrp_instance VI_1 { | |
| interface ens192 | |
| state BACKUP | |
| virtual_router_id 205 | |
| priority 100 | |
| virtual_ipaddress { | |
| 10.64.137.205/32 | |
| } | |
| track_script { | |
| haproxy_container | |
| } | |
| } |
With this config, Keepalived checks whether the HAProxy container is running on the node and, if not, decreases the priority via the vrrp_script block. Decreasing the priority on a node will start a new master’s election process between all nodes. And since only the node with the HAProxy container will have a priority of 100—the others will have 80 because the vrrp_script will fail—it will win the election and own the VIP. If the HAProxy container is relocated to a different node, the VIP will move accordingly.
After you’ve copied the keepalived.conf file to each destination, restart Keepalived by running service keepalived restart on each node.
By installing Keepalived, a virtual IP (VIP) is added in front of the cluster that is floated to the node hosting HAProxy. If that node fails, the container will be recreated on another node and the VIP will migrate over to it.
After you’ve set this up and sent a few requests, take a look at the HAProxy logs with the following command:
| $ sudo docker service logs --tail 20 haproxy-service |
This time you will note that the real client’s IP address is preserved because the connection between the client and HAProxy is direct. It also reduces East-West traffic because requests are received directly, rather than being sent through the routing mesh. The disadvantage is that you are running only a single instance of HAProxy, which limits the capacity of traffic you can receive. Next, you’ll see a third option that will allow you to operate multiple load balancers.
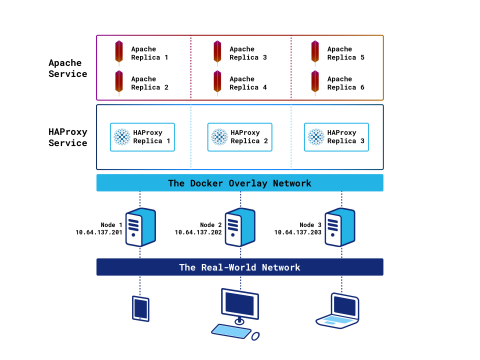
One HAProxy container per node
If you created the HAProxy service in the previous section, delete it with the docker service rm command:
| $ sudo docker service rm haproxy-service |
The following command will create an HAProxy container on each node in the cluster:
| $ sudo docker service create \ | |
| --mode global \ | |
| --name haproxy-service \ | |
| --network apache-network \ | |
| --publish published=80,target=80,protocol=tcp,mode=host \ | |
| --publish published=443,target=443,protocol=tcp,mode=host \ | |
| --mount type=bind,src=/etc/haproxy/,dst=/etc/haproxy/,ro=true \ | |
| --dns=127.0.0.11 \ | |
| haproxytech/haproxy-debian:2.0 |
In the previous sections, you set --mode to replicated, which means that Swarm creates as many replicas as specified with the --replicas argument and tries to disperse them evenly throughout the cluster. When the Swarm mode is set to global, the orchestrator will create and start an HAProxy container on each node.
Now, you can point your web browser to any node’s IP address to load the Stats page. This gives you the benefit of less East-West traffic, like the previous solution, but with the capacity to handle more requests because there are more running instances of HAProxy.
In order to make this deployment mode efficient, it’s advised to add an external L4 load balancer, such as HAProxy in TCP mode, in front of your Swarm cluster. This will spread the load across the different HAProxy containers.
Be aware that when you view the Stats page, the displayed stats are relevant only for the related HAProxy container. Actually, the HAProxy containers will not share any information between them. So, stats, stick tables, and variables will be limited to the HAProxy container where they have been generated.
You have seen three different ways to deploy HAProxy as a Swarm service. Which is the best? Actually, there isn’t one. It all depends on your infrastructure and needs.
Placement constraints
A quick word about placement constraints: You may, as an example, have a cluster of 20 nodes and you would like to control where your HAProxy containers could be started when using --mode replicated. In this case, you should use placement constraints. They allow you to restrict which nodes Swarm can choose to run your containers. Let’s say you would like to run HAProxy only on nodes 2 and 3; Run these commands on any manager:
| $ sudo docker node update --label-add LB-NODE=yes dock2 | |
| $ sudo docker node update --label-add LB-NODE=yes dock3 |
Then, specify the constraint at service creation:
| $ sudo docker service create \ | |
| --mode global \ | |
| --name haproxy-service \ | |
| --network apache-network \ | |
| --publish published=80,target=80,protocol=tcp,mode=host \ | |
| --publish published=443,target=443,protocol=tcp,mode=host \ | |
| --mount type=bind,src=/etc/haproxy/,dst=/etc/haproxy/,ro=false \ | |
| --dns=127.0.0.11 \ | |
| --constraint node.labels.LB-NODE==yes \ | |
| haproxytech/haproxy-debian:2.0 /usr/sbin/haproxy -f /etc/haproxy/haproxy.cfg -L local_haproxy |
Or on an existing service with the docker service update command:
| $ docker service update --constraint-add node.labels.LB-NODE==yes haproxy-service |
The container will only be started on nodes with a matching label.
Service discovery
You have now seen several ways in which you could host one or more instances of HAProxy in Docker Swarm. The next question is: How will HAProxy automatically update its configuration as replicas of Apache are created?
We touched on it before, but with Docker Swarm, the service discovery is done by sending DNS type A queries to Swarm’s DNS service. Remember, one of the most important points to keep in mind is that the service’s name is case-sensitive.
Use the HAProxy Stats page to observe the service discovery results. Initially, here is what you should see, regardless of the deployment model you’ve chosen:

HAProxy Stats page with no servers
Since we don’t yet have any replicas for our Apache service, HAProxy indicates that it doesn’t see any backend servers. They are all in maintenance mode. Now, increase the number to one with the following command:
| $ sudo docker service scale apache-Service=1 |
Refresh the Stats page and you will see that a new container is detected for the service named apache-Service; note that our lower-case apache-service is unaffected.

HAProxy Stats page with one server
Increase the number of replicas to six and check the Stats page once again:
| $ sudo docker service scale apache-Service=6 |
The Stats page now shows all six servers are up:

HAProxy Stats page with six servers
As you can see, by using server-template and DNS service discovery, HAProxy is able to match its configuration to the number of Apache replicas.
HAProxy configuration reload
Let’s finish this post with a word about reloading the HAProxy configuration. As you may know, when you run the command service haproxy reload on a classic HAProxy install, the configuration is reloaded without killing any active connections. That’s due to having master-worker in the configuration, as well as expose-fd listeners on the stats socket line; The master-worker directive creates a master process that oversees several worker processes. When a reload happens, the worker processes are replaced, but the master process handles transferring active connections.
We will aim to do the same in the container. Our current configuration already has the master-worker directive in the global section. So, a configuration reloads can be done with the following command, which will not kill any current connections:
| $ sudo docker kill --signal USR2 $(docker container ls --filter name=haproxy-service --quiet) |
The inconvenience of this method is that you have to run the command directly on a node where the HAProxy container is running. This could be a pain if your cluster contains dozens or more nodes. Unfortunately, Docker Swarm is not currently able to take care of locating the container and sending the USR2 signal by itself. There is a workaround described in Iain Collins’ blog post, How to run a command on every node in a Docker Swarm cluster.
Moving past that, let’s consider something we can make easier: In order to preserve stick table data across a reload, you need a few more lines in the configuration, as well as one more argument passed to HAProxy at startup.
Let’s look at the configuration first. Add a peers section as follows:
| peers mypeers | |
| peer local_haproxy 127.0.0.1:1024 |
A peers section, when configured to point at localhost as we’ve done here, preserves stick table data between reloads. That’s because, during a soft restart, the old process connects to the new one and pushes all of its entries to it.
Next, add a peers argument to any stick-table directives, such as:
| stick-table type ip size 1k expire 1h store http_req_cnt,http_req_rate(1m) peers mypeers | |
| http-request track-sc0 src |
In order to pass the required argument to HAProxy at startup, you have to specify it when you create the Swarm service (-L local_haproxy) :
| $ sudo docker service create \ | |
| --mode replicated \ | |
| --replicas 1 \ | |
| --name haproxy-service \ | |
| --network apache-network \ | |
| --publish published=80,target=80,protocol=tcp,mode=host \ | |
| --publish published=443,target=443,protocol=tcp,mode=host \ | |
| --mount type=bind,src=/etc/haproxy/,dst=/etc/haproxy/,ro=false \ | |
| --dns=127.0.0.11 \ | |
| haproxytech/haproxy-debian:2.0 /usr/sbin/haproxy -f /etc/haproxy/haproxy.cfg -L local_haproxy |
Now, you will not lose your stick table data during a reload.
Conclusion
In this blog post, we demonstrated several ways to integrate HAProxy into Docker Swarm. You can use the Swarm’s ingress routing mesh, use Keepalived to route requests directly to HAProxy, or deploy a load balancer to every node in the cluster. You saw how to set up DNS service discovery and server templates so that as Apache is scaled out, the HAProxy configuration is automatically updated. You also learned how to manage reloads.
Using an HAProxy load balancer allows you to evenly distribute requests to all of your Apache replicas. It gives you other benefits too, such as HTTP/2, gRPC support, and Prometheus metrics.
Want to stay up to date on similar topics? Subscribe to this blog! You can also follow us on Twitter and join the conversation on Slack.
HAProxy Enterprise combines HAProxy Community, the world’s fastest and most widely used, open-source load balancer and application delivery controller, with enterprise-class features, services, and premium support. It is a powerful product tailored to the goals, requirements, and infrastructure of modern IT. Contact us to learn more and sign up for a free trial!
Subscribe to our blog. Get the latest release updates, tutorials, and deep-dives from HAProxy experts.
