
HAProxy with the HAProxy Data Plane API can integrate with Consul to enable service discovery for your load balancer configuration.
Many Ops team professionals rank HAProxy as their favorite load balancer because it adds high availability, security and observability not only to their public-facing websites, but to their internal services as well. At the same time, HashiCorp’s Consul is their go-to for service discovery because it allows them to maintain a reliable, centralized registry of where each service is within their network, making it easy for one service or web app to find another even as new service nodes are created or removed. When you combine HAProxy and Consul, you can automate parts of your load balancer configuration by querying Consul for the IP addresses of your internal services and filling them into HAProxy’s configuration in real time.
Yet, even though there have been ways to combine the two, there had not been a tailor-made integration specifically meant for it. Let’s consider the options that existed previously for integrating these tools.
There’s consul-template, which you can use to populate your HAProxy configuration from a template file, filling server addresses from Consul’s registry into the template’s variables. However, this method replaces the HAProxy configuration file on disk after each change and then reloads the load balancer process; not at all a bad way to go, but it seems more fitting for configuration files that change less often.
Another option is to run Consul as a DNS server and then have HAProxy make DNS queries to it to resolve server IP addresses at runtime. This method is more dynamic, but it also has its limitations: DNS records have a Time-to-Live, which can introduce a delay before an address change is picked up, and before HAProxy 2.4 you were limited on the size of a DNS response that HAProxy could accept due to the UDP protocol beneath. (Latest update: HAProxy 2.4 allows DNS resolution over TCP, greatly expanding the acceptable size of a DNS response.)
Now there’s a third way to integrate HAProxy with Consul that avoids these shortcomings. You can configure HAProxy to interact directly with the Consul API, giving it direct access to Consul’s service discovery information. In this blog post, you will learn how to set this up.
If you’d like to follow along with the example, clone the demo project from GitHub.
Install the Consul Servers
The first thing to do is install a Consul server. Consul agents that run in server mode become the centralized registry for service discovery information in your network. They answer queries from other Consul agents about where a particular service can be found. For example, if you ask them where the log service is running, they may return to you that it is running on three machines, with these IP addresses, on these ports. Meanwhile, services such as the log service register themselves with the Consul clients so that they can become discoverable.
Read the official Consul documentation to see how to install a Consul server. In the demo project, we install one onto a virtual machine and run it as a Systemd service. Consul reads its configuration file, /etc/consul.d/consul.hcl, at startup. In the demo, we use the following consul.hcl file to initialize the server:
| datacenter = "dc1" | |
| server = true | |
| data_dir = "/var/lib/consul/" | |
| bind_addr = "192.168.50.21" | |
| client_addr = "192.168.50.21" | |
| bootstrap = true | |
| bootstrap_expect = 1 | |
| ui_config { | |
| enabled = true | |
| } | |
| enable_syslog = true | |
| log_level = "INFO" |
In this case, the virtual machine has been given a static IP address of 192.168.50.21, so we set that for the bind_addr and client_addr fields. Other Consul agents will connect to that address when they join the cluster. Notice that we’ve also set the server field to true to indicate that this agent should run in server mode. We then start Consul with the following command (baked into the Systemd service in the demo project):
| $ /usr/bin/consul agent -config-dir=/etc/consul.d/ |
Once it’s running, you can access Consul’s web UI at port 8500.
Install HAProxy & the HAProxy Data Plane API
On another virtual machine, install HAProxy and its RESTful API, the HAProxy Data Plane API. The Data Plane API has grown; so much so that simply calling it an API doesn’t quite capture the whole truth. Case in point, one of its newest features is the ability to act as a Consul API client and update the local HAProxy configuration using the service discovery information that it reads.
First, install HAProxy as a Systemd service. On Ubuntu, the installation looks like this:
| $ sudo add-apt-repository -y ppa:vbernat/haproxy-2.4 | |
| $ sudo apt update | |
| $ sudo DEBIAN_FRONTEND=noninteractive apt install -y haproxy |
Next, install the HAProxy Data Plane API:
| $ wget https://github.com/haproxytech/dataplaneapi/releases/download/v2.3.0/dataplaneapi_2.3.0_Linux_x86_64.tar.gz | |
| $ tar -zxvf dataplaneapi_2.3.0_Linux_x86_64.tar.gz | |
| $ sudo cp build/dataplaneapi /usr/local/bin/ | |
| $ sudo chmod +x /usr/local/bin/dataplaneapi |
The latest version of the API requires a configuration file, dataplaneapi.yaml, at startup. Create that file at /etc/haproxy/dataplaneapi.yaml and add the following to it:
| config_version: 2 | |
| name: haproxy1 | |
| dataplaneapi: | |
| host: 192.168.50.20 | |
| port: 5555 | |
| user: | |
| - name: dataplaneapi | |
| password: mypassword | |
| insecure: true |
In the demo project, the HAProxy virtual machine has the static IP address 192.168.50.20, so we set that for the host field. We also set a username and password, which you will pass when accessing the API. Next, update HAProxy’s configuration file, /etc/haproxy/haproxy.cfg, and add a program section, which tells HAProxy to start the API when its own process starts up. To use this keyword, you must add master-worker to the global section or include the -W argument when starting HAProxy (the Systemd service already has this argument).
| program api | |
| command /usr/local/bin/dataplaneapi -f /etc/haproxy/dataplaneapi.yaml | |
| no option start-on-reload |
Then restart the HAProxy service.
| $ sudo systemctl restart haproxy |
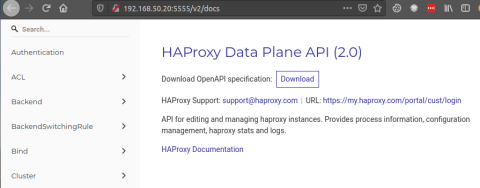
You can then access the API at port 5555. For example, in the demo project, http://192.168.50.20:5555/v2/docs will show you the API’s documentation.
Enable Consul Service Discovery
To enable HAProxy to use the Consul API, send a POST request to the HAProxy Data Plane API’s /v2/services_discovery/consul endpoint.
| $ curl -u dataplaneapi:mypassword \ | |
| -H 'Content-Type: application/json' \ | |
| -d '{ | |
| "address": "192.168.50.21", | |
| "port": 8500, | |
| "enabled": true, | |
| "retry_timeout": 10 | |
| }' http://192.168.50.20:5555/v2/service_discovery/consul |
The body of the request is JSON with the following fields:
Field | Description |
address | The Consul server’s IP address. |
port | The Consul server’s HTTP API port (i.e. 8500). |
enabled | Whether to enable this integration. |
retry_timeout | Duration in seconds in-between requesting data from the Consul server. |
After calling this endpoint, the HAProxy Data Plane API begins monitoring Consul’s service catalog. It will add server lines to your HAProxy configuration when new services register themselves with Consul. Let’s try it out in the next section.
Register a Service With Consul
In the demo project, we have a third virtual machine that runs a web server. We install Consul onto that machine too, although this one does not run in server mode. As before, install Consul and create the file /etc/consul.d/consul.hcl, but give it the following contents:
| datacenter = "dc1" | |
| server = false | |
| data_dir = "/var/lib/consul/" | |
| bind_addr = "192.168.50.22" | |
| retry_join = ["192.168.50.21"] | |
| enable_syslog = true | |
| log_level = "INFO" |
This VM has a static IP address of 192.168.50.22, which we use to set the bind_addr field. The retry_join field indicates the address of the Consul server, which the agent uses to join the Consul cluster. Once the local Consul agent is running, you can register the web server as a service on the network so that HAProxy can discover it. Add a new file named web.json and add the following contents, which indicate the port of our listening web server and a name to give it in the Consul registry:
| { | |
| "service": { | |
| "name": "web", | |
| "port": 80 | |
| } | |
| } |
Then call consul services register to add it to the registry:
| $ consul services register ./web.json |
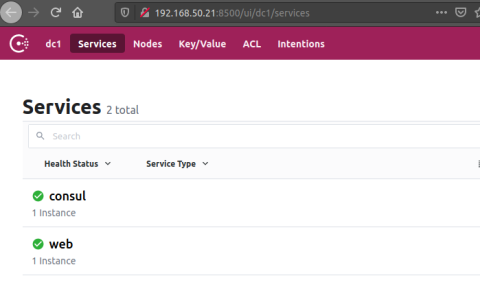
Check the Consul web UI and you should see a new service named web.
Go back to your HAProxy server and check the /etc/haproxy/haproxy.cfg file. You should see that the server has been added to a new backend section automatically. It looks like this:
| backend consul-backend-192.168.50.21-8500-web | |
| server SRV_V2u4y 192.168.50.22:80 check weight 128 | |
| server SRV_1NQXA 127.0.0.1:80 disabled weight 128 | |
| server SRV_DWcAP 127.0.0.1:80 disabled weight 128 | |
| server SRV_IIcqg 127.0.0.1:80 disabled weight 128 |
Most of the server lines are disabled, but the first one points to the server that you just added with Consul! When you register more instances of the same service, HAProxy will fill in these disabled server slots, which lets you scale up or down in many cases without a reload. To add more servers to the same backend, register more services with Consul, but keep the same name, web, in their JSON files. The only thing left to do is configure a frontend section that routes traffic to this backend pool of servers.
Conclusion
In this blog post, you learned how to integrate HAProxy and Consul by using the HAProxy Data Plane API, which enables dynamic load balancer configuration changes that are pulled directly from Consul’s service discovery registry. Although there have been other ways to combine Consul with HAProxy, this new way is more dynamic and responsive. Try it out yourself and see what you think!
HAProxy Enterprise powers modern application delivery at any scale and in any environment, providing the utmost performance, observability, and security for your critical services. Organizations harness its cutting edge features and enterprise suite of add-ons, which are backed by authoritative, expert support and professional services. Ready to learn more? Sign up for a free trial.
Subscribe to our blog. Get the latest release updates, tutorials, and deep-dives from HAProxy experts.