
Use HAProxy as an API gateway to enable API monetization.
Using HAProxy as an API Gateway, Part 1 [Introduction]
Using HAProxy as an API Gateway, Part 2 [Authentication]
Using HAProxy as an API Gateway, Part 3 [Health Checks]
Using HAProxy as an API Gateway, Part 4 [Metrics]
Using HAProxy as an API Gateway, Part 6 [Security]
In our previous blog post, Using HAProxy as an API Gateway, Part 2 [Authentication], you learned that when you operate HAProxy as an API gateway, you can restrict access to your APIs to only clients that present a valid OAuth 2 access token. In this post, we take it a step further. You will learn how to leverage tokens to grant some users more access than others and then charge for the service. This is called API monetization and it’s one way to turn your APIs, and the data that they expose, into a profitable enterprise.
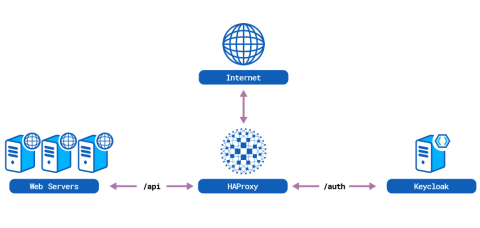
You’ll find the example code in our GitHub repository. We use Docker Compose to create the following components in a self-contained, virtual network:
an HAProxy server, which acts as an API gateway,
three API servers behind HAProxy,
a Keycloak server, also behind HAProxy, which acts as our authentication server.
Here’s how it all fits together: When HAProxy receives an API call—which is any HTTP request that has a URL beginning with /api/—it relays it to one of the three API servers behind it. However, clients must attach access tokens, which are like digital members-only cards, to their requests before HAProxy will grant them access. An access token bestows certain privileges to the client that presents it. In our demo, each client has a right to make HTTP requests to our service, but some clients are allowed to make more requests per minute than others depending on their token.
HAProxy can validate a token, read its properties, and make decisions based on those properties. We imprint our tokens with a subscription level: bronze, silver, or gold. Bronze is the lowest tier and clients who present a token with that level are granted only 10 requests per minute. Silver clients get 100 requests per minute and those with a gold level are allowed 1000 requests per minute.
That’s one end of the equation. The other is the party that creates the tokens. As you saw in our previous blog post about authentication and authorization, HAProxy will work with a variety of OAuth 2 token providers, including Auth0 and Okta. In this post, we use a self-hosted authentication server called Keycloak. We place our Keycloak server behind HAProxy and whenever a client requests a URL beginning with /auth/, HAProxy routes it there. Typically, these requests are either a client requesting a token or you, the administrator, adding clients to the system.
With these subscription levels in place and HAProxy granting access only to clients that have a token, you can of course start charging a fee to access your service. Et voilà! API monetization. Let’s see how to set it up!
Set Up the Demo Project
Before a client can send a request to your API servers, they must authenticate with Keycloak, get an OAuth 2 access token from it, and present that token to HAProxy. HAProxy then verifies whether the token is valid before allowing the client to proceed with their request.
First, download the sample project and then initialize the components by calling Docker Compose:
| $ git clone https://github.com/haproxytechblog/haproxy-api-monetization-demo.git | |
| $ cd haproxy-api-monetization-demo | |
| $ sudo docker-compose up -d |
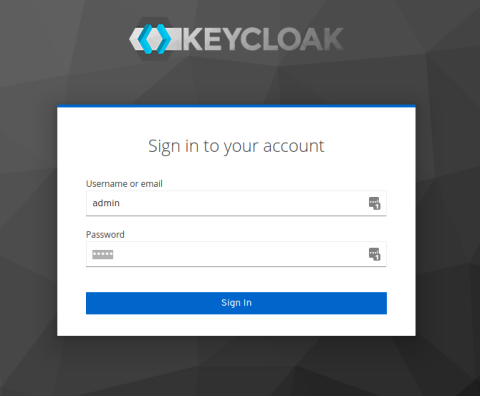
These commands start up HAProxy, Keycloak, and the API servers. Once the demo is up and running, go to http://localhost/auth/ and log into the Keycloak Administration Console with the username and password admin.
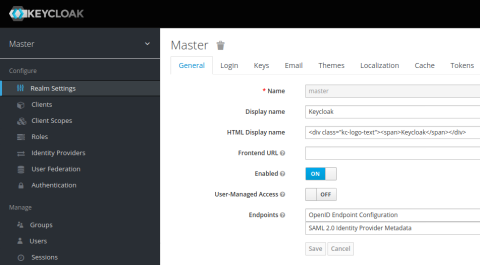
When you first log in, you’ll see the configuration screen for the top-most realm. From here, you have full access to all of Keycloak.
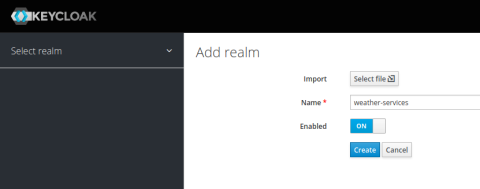
Next, you’ll need to create new realms for each service that you want to monetize. Within each realm, you can add authorized clients. First, click the top-level dropdown menu where it says Master and choose Add realm. For this example, set the new realm’s name to weather-services. Then click Create.
You are taken to the Realm Settings page for the weather-services realm.
From here click the Tokens tab, set the Default Signature Algorithms field to RS256, and then click Save. Keycloak will now sign its access tokens with its private key and, later, HAProxy will use Keycloak’s public key to verify that signature.
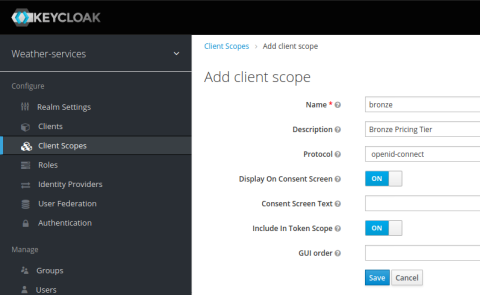
Click the Client Scopes link next. Add three scopes—bronze, silver, and gold—which will serve as different pricing tiers for accessing your Weather Services APIs. Click the Create button and add each of these scopes.
After you’ve created the bronze, silver, and gold scopes, click the Clients link. In the most technical sense, a client is an application that accesses your services. For example, the client might be a web application that uses your API to get up-to-date weather forecasts. More broadly, a client may be a customer who has signed up to call your service, and they may do so from multiple applications.
Click the Create button on the Clients screen to add a new client.
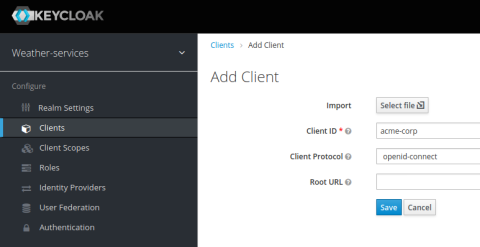
When adding a client, you’re asked to assign a unique Client ID. This can be any string, such as the organization’s name, email address, or a GUID. The client will use this ID when they access your services, so it must be something you don’t mind sharing with them. In this exercise, I set the Client ID to acme-corp.
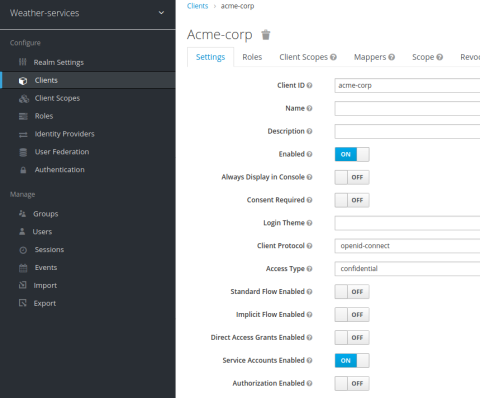
After you’ve created the client, you’re taken to the client’s Settings screen. Because we want to enable machine-to-machine authentication, you must enable the OAuth 2 Client Credentials grant. That’s what OAuth calls the workflow for allowing an application to request an access token. To enable this on the Settings screen, change the Access Type field to confidential and set Service Accounts Enabled to on.
You can set Standard Flow Enabled and Direct Access Grants Enabled to off. We won’t be using those types of grants.
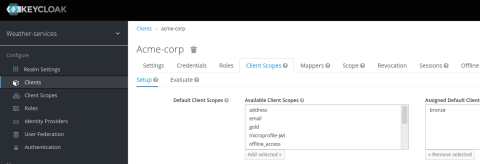
Click Save at the bottom of the screen and then on the Client Scopes tab, add the bronze scope. Remove all of the other previously assigned client scopes. One peculiar behavior of Keycloak is that by default it assigns the roles client scope, which has the effect of adding a second value to the aud field in the token, which you don’t want. Play it safe and remove all extra scopes.
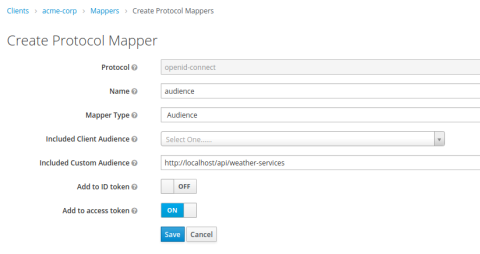
Next, go to the Mappers tab and create a new mapper. Set its Mapper Type field to Audience and its Included Custom Audience field to the URI of your API service. In this example, I set it to http://localhost/api/weather-services. The audience value will need to match what we hardcode in the HAProxy configuration. It’s one way that HAProxy validates the token.
Now you’re ready to play the role of a client requesting access to your services. We’ve given the acme-corp client a scope called bronze, which will mean they’re allowed up to 10 API calls per minute. That rate limit is handled by HAProxy.
Get an Access Token
Now that you’ve configured a client in Keycloak, you can try out getting an access token. First, copy the Client ID from the acme-corp Client page and the Secret from the Credentials page. Then, use curl to request a new access token, providing the client_id and client_secret fields with your request. Note that we set the grant_type field to client_credentials:
| $ curl --request POST \ | |
| --url 'http://localhost/auth/realms/weather-services/protocol/openid-connect/token' \ | |
| --data 'client_id=acme-corp' \ | |
| --data 'client_secret=7f2587ee-a178-4152-bd91-7b758c807759' \ | |
| --data 'grant_type=client_credentials' | |
| {"access_token":"eyJhbGciOiJSUzI1NiIsI...","expires_in":300,"refresh_expires_in":0,"token_type":"Bearer","not-before-policy":0,"scope":"bronze"} |
The request returns a JSON document that includes an access token. The token is encoded, but you can decode it by pasting it into the Encoded textbox on the https://jwt.io/ website. An example of the decoded fields is shown below.

You’ll find three of the fields especially interesting:
issis the issuer, or the service that authenticated the client and created the token; In this case, it’s set to http://localhost/auth/realms/weather-services, which is the Keycloak realm for our weather-services API.audis the audience, which is the URL of your API gateway; In this case, it’s set to http://localhost/api/weather-services.scopeis the list of permissions granted to the client; It includes bronze.
The scope field includes the bronze client scope, which we will use when setting a rate limit for this client.
Configure Access in HAProxy
First, you need to configure HAProxy so that it limits access to your services to only authorized clients. Install the HAProxy OAuth library into HAProxy, which is a Lua library that inspects incoming OAuth 2 access tokens that are attached to HTTP requests. The library’s GitHub page has instructions for how to install it, but in the demo project, the library is already installed as part of the Docker container’s image.
Next, configure the library. In the global section of your HAProxy configuration file, use the setenv directive to define the issuer, audience and public key that HAProxy should use when validating tokens.
| global | |
| lua-load /usr/local/share/lua/5.3/jwtverify.lua | |
| setenv OAUTH_ISSUER http://localhost/auth/realms/weather-services | |
| setenv OAUTH_AUDIENCE http://localhost/api/weather-services | |
| setenv OAUTH_PUBKEY_PATH /etc/haproxy/pem/pubkey.pem |
The issuer and audience must match the token’s iss and aud field exactly or else the token won’t be accepted. That ensures that the token comes from a trusted source (Keycloak) and is meant for our API only.
HAProxy uses the public key to verify the digital signature on the token. Keycloak uses its private key to sign the access tokens it gives to clients. HAProxy verifies that signature by comparing it with Keycloak’s public key, which it stores locally.
In our example project, the public key, pubkey.pem, is mounted as a volume into the HAProxy container. Download the key from Keycloak by going to the weather-services Realm Settings > Keys page and clicking the Public key link on the row that says RS256.

Replace the contents of the file pubkey.pem in the demo project with the value from Keycloak. You must prefix the value with —–BEGIN PUBLIC KEY—– and end it with —–END PUBLIC KEY—–, as shown here:
| -----BEGIN PUBLIC KEY----- | |
| MIIBIjANBgkqhkiG9w0BAQEFAAOCAQ8AMIIBCgKCAQEAoG0pxfK54qjF8gUzjARji3D2VZ9x7UTRE+ | |
| 75SoIcSHkPWg8Dlb/DzDNpofG8bB3FyvcqihF0sFTnbQG4+2XKODuxeG2o609YhGvai0hHNZFXZEANM | |
| AoRSEdSq3oCDiAladKez92VjxDjo3W9zLvFhAAYEGQDBvRTqbbHhsCm5fm2k7A3wMB5H0G/i2x6ZDD5 | |
| tA7LsIngyJwELSIjFzIfP8xylJdppWwQFJEjYagCXahO4WW+oOMpFs+X1gJ3xBlN6pLsVSNWrKZMe/qp | |
| ZDzQO8qnGoVI7tkZpCkR62B7OyVGzjDB0NwJTwN787xuTURsDNF0Gm3rFgSVnVokn07rqQIDAQAB | |
| -----END PUBLIC KEY----- |
Next, in the frontend section where you want to restrict client access, add the following configuration directives:
| frontend fe_api | |
| bind :80 | |
| # a stick table stores the count of requests each clients makes | |
| stick-table type ipv6 size 100k expire 1m store http_req_cnt | |
| # allow 'auth' request to go straight through to Keycloak | |
| http-request allow if { path_beg /auth/ } | |
| use_backend keycloak if { path_beg /auth/ } | |
| # deny requests that don't send an access token | |
| http-request deny deny_status 401 unless { req.hdr(authorization) -m found } | |
| # verify access tokens | |
| http-request lua.jwtverify | |
| http-request deny deny_status 403 unless { var(txn.authorized) -m bool } | |
| # add the client's subscription level to the access logs: bronze, silver, gold | |
| http-request capture var(txn.oauth_scopes) len 10 | |
| # deny requests after the client exceeds their allowed requests per minute | |
| http-request deny deny_status 429 if { var(txn.oauth_scopes) -m sub bronze } { src,table_http_req_cnt gt 10 } | |
| http-request deny deny_status 429 if { var(txn.oauth_scopes) -m sub silver } { src,table_http_req_cnt gt 100 } | |
| http-request deny deny_status 429 if { var(txn.oauth_scopes) -m sub gold } { src,table_http_req_cnt gt 1000 } | |
| # track clients' request counts. This line will not be called | |
| # once the client is denied above, which prevents them from perpetually | |
| # locking themselves out. | |
| http-request track-sc0 src | |
| default_backend be_api |
This configuration requires that all requests include a valid, non-expired access token. It also checks the token’s scopes to see which subscription level was assigned. Bronze level allows up to 10 requests per minute, silver allows 100 requests per minute, and gold allows 1000 requests per minute.
Restart the HAProxy Docker container to load the new settings:
| $ sudo docker-compose restart haproxy |
Make a Request
Try it out by first getting an access token using the following curl command:
| $ curl --request POST \ | |
| --url 'http://localhost/auth/realms/weather-services/protocol/openid-connect/token' \ | |
| --data 'client_id=acme-corp' \ | |
| --data 'client_secret=9e9e2acc-cd15-4878-9e5a-c815d29a976f' \ | |
| --data 'grant_type=client_credentials' |
Copy the access token from the response and paste it into the following command where it says [ACCESS_TOKEN]:
| $ curl --request GET \ | |
| --url http://localhost/api/weather-services/43213 \ | |
| --header 'authorization: Bearer [ACCESS_TOKEN]' |
You should get back a valid JSON response. If not, check HAProxy’s logs with the docker-compose logs haproxy command. Since we configured the acme-corp client to have bronze access, you can make only 10 requests per minute, after which you will get a 429 Too Many Requests error.
Try assigning the silver or gold scope to the acme-corp client via the Keycloak Administration Console, fetching a new token, and then retrying the GET request. You should be allowed more requests per minute.
Conclusion
When you use HAProxy as an API gateway, you can validate OAuth 2 access tokens. By imprinting subscription levels into the tokens, you can monetize your APIs, charging a fee for expanded access. Monetization can be a smart move once your APIs reach a certain level of popularity, and you can even continue to offer a free tier to entice newcomers. With HAProxy, you can layer on this functionality at any point.
API monetization can take many forms and rate limiting is only one aspect. Yet, it’s one that’s used successfully by many companies. To protect your customers, you’ll want to add security protections that deter bots and malicious users. HAProxy Enterprise provides that type of extra security.
Interested in learning what HAProxy Enterprise has to offer? Contact us to learn more! Want to know when more content like this is published? Subscribe to our blog and follow us on Twitter. You can also join the conversation on Slack.
Subscribe to our blog. Get the latest release updates, tutorials, and deep-dives from HAProxy experts.
![Using HAProxy as an API Gateway, Part 6 [Security]](https://cdn.haproxy.com/img/containers/partner_integrations/api-gateway-security.png/809caaf409b9cbba5f53d22b31c00307/api-gateway-security.png)
![Using HAProxy as an API Gateway, Part 4 [Metrics]](https://cdn.haproxy.com/img/containers/partner_integrations/api-gateway-4-metrics.png/bead5c0427ca39dcc7c44ed61225e630/api-gateway-4-metrics.png)
![Using HAProxy as an API Gateway, Part 1 [Introduction]](https://cdn.haproxy.com/img/containers/partner_integrations/2022/api-gateway-pt1/avalanche-area-1080x540.png/2b915c11c726470bf6e314e194c3a7ed/avalanche-area-1080x540.png)
![Using HAProxy as an API Gateway, Part 3 [Health Checks]](https://cdn.haproxy.com/img/containers/partner_integrations/image2-2-%281%29.png/5ef4ef148b968f89804293c3d44312e7/image2-2-%281%29.png)