
There has been a constant stream of interest in running high-availability HAProxy configurations on Amazon.
There are a few different approaches possible, and this is the first in a series of three blog posts to describe them.
In this blog post, we are going to show the most straightforward method – HAProxy used in combination with Amazon Elastic Load Balancing (ELB) and Amazon Application Load Balancer (ALB).
That high-availability setup can be implemented using HAProxy Community or HAProxy Enterprise. For HAProxy Community, please use your favorite operating system’s Amazon AMI image and install a recent version of HAProxy on it.
For HAProxy Enterprise, we have recently released HAProxy Enterprise version 1.7r2 for Amazon Elastic Compute Cloud EC2. This release contains all standard and additional HAProxy Enterprise features, it is optimized towards cloud usage, and it comes with Amazon CloudFormation integration tools and support for Amazon Enhanced Networking with network interrupt tuning and pinning. BYOL versions are also going to be available very soon.
The HAProxy Enterprise Amazon AMI options available are:
Ubuntu images are based on the current Ubuntu LTS 16.04.3 Xenial release, while Red Hat Enterprise images are based on the official Red Hat Enterprise 7.4 GA.
This blog post is part of our AWS Best Practices series. See Part 2 and Part 3.
High Availability with HAProxy
There are several methods available for an Amazon high availability load balancer setup with HAProxy:
The simplest method is to use the Amazon Elastic Load Balancing (ELB) and have it serve as a front-facing load balancer and a reverse proxy for multiple HAProxy instances. The HAProxy instances then listen to private IP addresses and reverse proxy the requests to the application servers. A similar alternative is available using Amazon Application Load Balancer (ALB). Both ELB and ALB variants will be described in this blog post.
A direct model is also available with HAProxy alone (without ELB or ALB), but it is more complex due to having to configure AWS Identity and Access Management policies, and it requires more in-depth knowledge of AWS’ inner workings. That approach will be described in our upcoming part 2 of this series.
On top of the direct model, it is possible to achieve even better levels of fault tolerance by using VRRP or Heartbeat protocol for peer failure detection. That approach will be described in our upcoming part 3 in this series.
“Infrastructure as Code”
We will demonstrate a high availability setup using Hashicorp Terraform which allows building complex infrastructure scenarios using simple and reusable high-level code. With Terraform, it is possible to review the execution plan and actions to be performed during deployment, see resources and dependencies and store infrastructure design and changes in version control.
While several similar tools exist such as Amazon’s native CloudFormation and Canonical’s Juju, we are using Terraform primarily for its simplicity, popularity, and reusability with other cloud providers.
Simple HA Setup with Amazon Classic ELB and HAProxy
Our simple setup will be based on Amazon Classic Elastic Load Balancer (ELB). ELB will distribute incoming traffic across HAProxy instances. Unlike DNS-based failover mechanisms, ELB enables rapid backend server ejection from the pool as soon as the health probes fail and provides greater levels of fault tolerance.
The PROXY protocol, designed by our HAProxy Technologies CTO Willy Tarreau, will be used to communicate client connection information to HAProxy instances. The PROXY protocol is protocol-agnostic and simple to implement on Amazon infrastructure because Amazon Classic ELB has built-in support for it. Amazon ELB will be set up with an ELB policy to enable PROXY protocol for TCP mode and the HAProxy instances will receive it. This removes the need for passing connection information in HTTP headers like X-Forwarded-For or to be doing any protocol-specific parsing on the ELB.
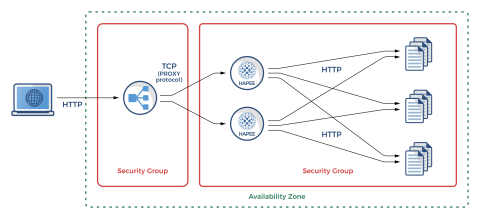
Simple HA Setup with Amazon Classic ELB and HAProxy
Our example setup will look like the following:
A single ELB is used to load balance HAProxy instances in TCP-only mode and uses the PROXY protocol
Multiple HAProxy instances are configured (all in a single Availability Zone), each having separate health checks which correspond to both HAProxy instance health and the health of individual backend application servers
Multiple application instances are configured (in our example that will be a very simple Busybox HTTP server)
Before going further, please note that this is a simple example with some limitations:
There are no HTTPS ports in use; production applications would certainly use them
HAProxy configurations shown are basic; production HAProxy instances would also include advanced ACLs for HTTP routing and filtering, connection control, DDoS protection rules, complex rewrites, etc.
All instances (ELB, HAProxy, and app nodes) are in a single Availability Zone; production solutions would have Amazon Route53 on top of multiple ELBs spanning several AZs, each balancing their own cluster of HAProxy and app server instances
Please also note that the Amazon Classic ELB is superseded by Amazon Application Load Balancer (ALB) or Network Load Balancer (NLB). However, due to support for the PROXY protocol, overall simplicity (no need for multiple AZ setup, no need for cross-zone load balancing), EC2-Classic support, support for both TCP and HTTP/HTTPS, backend HTTP authentication, and other specific features, some users may still choose ELB as a part of their HA setup.
Also, as mentioned in the introduction, the ALB method is described below in this blog post as well, and our upcoming blog posts parts 2 and 3 will demonstrate HA setups where HAProxy instances are listening for user traffic directly. (In those setups none of the Amazon ELB, ALB, or NLB products are needed or used.)
The setup described here does not require any Elastic IP addresses assigned to HAProxy or application servers. As the ELB itself does not have a fixed IP address, DNS labels are usually set with CNAME to Amazon ELB DNS label, which can be default or custom through Amazon Route 53.
Health checks are configured on ELB going towards HAProxy instances on a dedicated HTTP port (tcp/8080), which is then correspondingly configured on each HAProxy instance and checks the number of active and healthy servers in each backend. Backend server lists in HAProxy are populated through Amazon instance User Data script, which automatically populates them.
Security-wise, ELB has a separate Security Group which allows tcp/22 access and HTTP tcp/80 access from anywhere. Individual HAProxy and application instances allow tcp/22 access from anywhere too, but as a security precaution, they allow tcp/80 (HTTP traffic) and tcp/8080 (HTTP health checks) from ELB only. Due to how Terraform planner works, we have to split Security Groups that depend on each other into two groups, for planners to be able to resolve the cyclic dependency.
To conveniently provide you with access to the complete configuration, we have created a GitHub project with all the necessary files contained in the directory haproxytech/cloud-blueprints/aws_elb.
In the rest of this section, the most important excerpts from those files will be shown.
So let us proceed with the actual Terraform code that will do the magic. We will first set up a VPC in the region of our choosing as well as the network bits required:
provider "aws" {
  region = "${var.aws_region}"
}

resource "aws_vpc" "default" {
  cidr_block           = "20.0.0.0/16"
  enable_dns_hostnames = true

  tags {
    Name = "hapee_test_vpc"
  }
}

resource "aws_subnet" "tf_test_subnet" {
  vpc_id                  = "${aws_vpc.default.id}"
  cidr_block              = "20.0.0.0/24"
  map_public_ip_on_launch = true

  tags {
    Name = "hapee_test_subnet"
  }
}

resource "aws_internet_gateway" "gw" {
  vpc_id = "${aws_vpc.default.id}"

  tags {
    Name = "hapee_test_ig"
  }
}

resource "aws_route_table" "r" {
  vpc_id = "${aws_vpc.default.id}"

  route {
    cidr_block = "0.0.0.0/0"
    gateway_id = "${aws_internet_gateway.gw.id}"
  }

  tags {
    Name = "aws_route_table"
  }
}

resource "aws_route_table_association" "a" {
  subnet_id      = "${aws_subnet.tf_test_subnet.id}"
  route_table_id = "${aws_route_table.r.id}"
}
Then we will set up a Classic ELB with PROXY protocol for tcp/80 and health checking on each HAProxy as a target, and port tcp/9080 for the URL /haproxy_status. That URL will later be configured in HAProxy to count the number of active backend servers and report with HTTP 200 status if there is more than 1 server up.
resource "aws_elb" "hapee_elb" {
  name = "hapee-test-elb"

  subnets = ["${aws_subnet.tf_test_subnet.id}"]

  security_groups = ["${aws_security_group.elb.id}"]

  listener {
    instance_port     = 80
    instance_protocol = "tcp"
    lb_port           = 80
    lb_protocol       = "tcp"
  }

  health_check {
    healthy_threshold   = 2
    unhealthy_threshold = 2
    timeout             = 3
    target              = "HTTP:8080/haproxy_status"
    interval            = 30
  }

  instances                   = ["${aws_instance.hapee_node.*.id}"]
  cross_zone_load_balancing   = false
  idle_timeout                = 400
  connection_draining         = true
  connection_draining_timeout = 400

  tags {
    Name = "hapee_elb"
  }
}

resource "aws_proxy_protocol_policy" "proxy_http" {
  load_balancer  = "${aws_elb.hapee_elb.name}"
  instance_ports = ["80"]
}
We will also spawn a number of app serving instances.
resource "aws_instance" "web_node" {
  count = "${var.web_cluster_size}"

  instance_type = "${var.aws_web_instance_type}"

  ami = "${lookup(var.ubuntu_aws_amis, var.aws_region)}"

  key_name = "${var.key_name}"

  vpc_security_group_ids = ["${aws_security_group.instance_sg1.id}", "${aws_security_group.instance_sg2.id}"]
  subnet_id              = "${aws_subnet.tf_test_subnet.id}"
  user_data              = "${file("web-userdata.sh")}"

  tags {
    Name = "web_node_${count.index}"
  }
}
And a number of HAProxy Enterprise instances.
data "template_file" "hapee-userdata" {
  template = "${file("hapee-userdata.sh.tpl")}"

  vars {
    serverlist = "${join("\n", formatlist("    server app-%v %v:80 cookie app-%v check", aws_instance.web_node.*.id, aws_instance.web_node.*.private_ip, aws_instance.web_node.*.id))}"
  }
}

resource "aws_instance" "hapee_node" {
  count = "${var.hapee_cluster_size}"

  instance_type = "${var.aws_hapee_instance_type}"

  ami = "${lookup(var.hapee_aws_amis, var.aws_region)}"

  key_name = "${var.key_name}"

  vpc_security_group_ids = ["${aws_security_group.instance_sg1.id}", "${aws_security_group.instance_sg2.id}"]
  subnet_id              = "${aws_subnet.tf_test_subnet.id}"
  user_data              = "${data.template_file.hapee-userdata.rendered}"

  tags {
    Name = "hapee_node_${count.index}"
  }
}
You might be wondering how will each HAProxy instance get a list of application servers behind it. The code that does it is passed through Amazon User Data and expanded from a simple template file. It will execute on HAProxy instances after boot. You can also observe the health checking code for tcp/9080 HTTP probes serving the URL “/haproxy_status”.
#!/bin/sh
tee /etc/hapee-1.7/hapee-lb.cfg <<EOF
global
    log                127.0.0.1 local0
    log                127.0.0.1 local1 notice
    user               hapee-lb
    group              hapee
    chroot             /var/empty
    pidfile            /var/run/hapee-1.7/hapee-lb.pid
    stats socket       /var/run/hapee-1.7/hapee-lb.sock user hapee-lb group hapee mode 660 level admin
    stats timeout      10m
    module-path        /opt/hapee-1.7/modules
    daemon

defaults
    mode               http
    log                global
    option             httplog
    option             dontlognull
    option             forwardfor except 127.0.0.0/8
    option             redispatch
    retries            3
    timeout connect    10s
    timeout client     300s
    timeout server     300s

listen webapp
    bind *:80          accept-proxy
    balance            roundrobin
    cookie             SERVERID insert indirect nocache
${serverlist}

frontend health
    bind *:8080
    acl backend_dead nbsrv(webapp) lt 1
    monitor-uri /haproxy_status
    monitor fail if backend_dead
EOF
systemctl restart hapee-1.7-lb
We will also need app serving code for which we will also use Amazon Instance User Data to deliver executable payload which will start a simple HTTP server from Busybox tools.
#!/bin/sh
apt-get update -y
apt-get install -y busybox
echo "Hello, World" > /tmp/index.html
busybox httpd -p 80 -h /tmp
And finally, we will create two Security Groups, one for Classic ELB and one for HAProxy and app servers which will allow incoming connections from ELB only. You will be able to notice that we have actually used two groups grouped as one, as Terraform cannot resolve cyclic dependencies otherwise.
resource "aws_security_group" "instance_sg1" {
name = "instance_sg1"
description = "Instance (HAProxy Enterprise/Web node) SG to pass tcp/22 by default"
vpc_id = "${aws_vpc.default.id}"
ingress {
from_port = 22
to_port = 22
protocol = "tcp"
cidr_blocks = ["0.0.0.0/0"]
self = true
}
egress {
from_port = 0
to_port = 0
protocol = "-1"
cidr_blocks = ["0.0.0.0/0"]
self = true
}
}
resource "aws_security_group" "instance_sg2" {
name = "instance_sg2"
description = "Instance (HAProxy Enterprise/Web node) SG to pass ELB traffic by default"
vpc_id = "${aws_vpc.default.id}"
ingress {
from_port = 80
to_port = 80
protocol = "tcp"
security_groups = ["${aws_security_group.instance_sg1.id}", "${aws_security_group.elb.id}"]
}
ingress {
from_port = 8080
to_port = 8080
protocol = "tcp"
security_groups = ["${aws_security_group.instance_sg1.id}", "${aws_security_group.elb.id}"]
}
}
resource "aws_security_group" "elb" {
name = "elb_sg"
description = "Used in the terraform"
vpc_id = "${aws_vpc.default.id}"
ingress {
from_port = 80
to_port = 80
protocol = "tcp"
cidr_blocks = ["0.0.0.0/0"]
}
egress {
from_port = 0
to_port = 0
protocol = "-1"
cidr_blocks = ["0.0.0.0/0"]
}
depends_on = ["aws_internet_gateway.gw"]
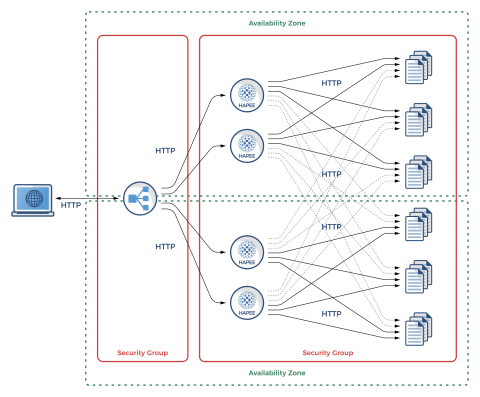
}Advanced HA Setup with Amazon ALB and HAProxy
Amazon ALB is a load balancer solution mostly oriented towards microservices. It is a Layer 7 (HTTP/HTTPS-only) solution, but with content-based routing, request tracing, HTTP/2 support, better container support, etc. One of the key differences compared to ELB is that ALB requires a multi-zone setup and is able to perform cross-zone balancing.
In this section we will show Amazon ALB setup with HAProxy that balances over two availability zones, each having its own set of two HAProxy load balancers and ending up on six different app servers. HAProxy will also be doing cross-zone load balancing to even the load.
Our example setup will look like the following:
Advanced HA Setup with Amazon ALB and HAProxy
To conveniently provide you with access to the complete configuration, we have created a GitHub project with all the necessary files contained in the directory haproxytech/cloud-blueprints/aws_alb.
In the rest of this section, excerpts from those files and the most important differences compared to ELB will be shown.
Terraform code to instantiate this setup is fairly straightforward and, apart from ALB-specific code, there are only two differences compared to the ELB setup – the lack of PROXY protocol support and the presence of multi-zone setup.
To go with multiple Availability Zones (AZs) we have implemented chunks of code on top of previous ELB code which makes sure we have the identical amount of instance replicas in all AZs. Note that an AZ will get its own CIDR in VPC.
We will show differences compared to the code blocks from the Classic ELB setup. Let’s start with the networking code changes.
data "aws_availability_zones" "all" {}

resource "aws_vpc" "default" {
  cidr_block           = "20.0.0.0/16"
  enable_dns_hostnames = true

  tags {
    Name = "hapee_test_vpc"
  }
}

resource "aws_subnet" "tf_test_subnet" {
  count                   = "${var.aws_az_count}"
  vpc_id                  = "${aws_vpc.default.id}"
  cidr_block              = "${cidrsubnet(aws_vpc.default.cidr_block, 8, count.index)}"
  availability_zone       = "${data.aws_availability_zones.all.names[count.index]}"
  map_public_ip_on_launch = true

  tags {
    Name = "hapee_test_subnet"
  }
}

resource "aws_route_table_association" "a" {
  count          = "${var.aws_az_count}"
  subnet_id      = "${element(aws_subnet.tf_test_subnet.*.id, count.index)}"
  route_table_id = "${aws_route_table.r.id}"
}
The ALB Terraform code is significantly different from ELB code given that API requires Target Group Associations for all instances being balanced. Listener and Health Checking code have only a few subtle changes. ALB itself is present in all zones and is able to communicate directly with all HAProxy configured.
resource "aws_lb" "hapee_alb" {
  name = "hapee-test-alb"

  internal = false

  subnets         = ["${aws_subnet.tf_test_subnet.*.id}"]
  security_groups = ["${aws_security_group.alb.id}"]

  tags {
    Name = "hapee_alb"
  }
}

resource "aws_lb_target_group" "hapee_alb_target" {
  name = "hapee-test-alb-tg"

  vpc_id = "${aws_vpc.default.id}"

  port     = 80
  protocol = "HTTP"

  health_check {
    interval            = 30
    path                = "/haproxy_status"
    port                = 8080
    protocol            = "HTTP"
    timeout             = 5
    healthy_threshold   = 3
    unhealthy_threshold = 3
    matcher             = "200,202"
  }

  tags {
    Name = "hapee_alb_tg"
  }
}

resource "aws_lb_listener" "hapee_alb_listener" {
  load_balancer_arn = "${aws_lb.hapee_alb.arn}"

  port     = 80
  protocol = "HTTP"

  default_action {
    target_group_arn = "${aws_lb_target_group.hapee_alb_target.arn}"
    type             = "forward"
  }
}

resource "aws_lb_target_group_attachment" "hapee_alb_target_att" {
  count = "${var.hapee_cluster_size * var.aws_az_count}"

  target_group_arn = "${aws_lb_target_group.hapee_alb_target.arn}"
  target_id        = "${element(aws_instance.hapee_node.*.id, count.index)}"

  port = 80
}
Also please have in mind that the HAProxy and app server instances are separate per AZ layout.
resource "aws_instance" "web_node" {
  count = "${var.web_cluster_size * var.aws_az_count}"

  instance_type = "${var.aws_web_instance_type}"

  ami = "${lookup(var.ubuntu_aws_amis, var.aws_region)}"

  key_name = "${var.key_name}"

  vpc_security_group_ids = ["${aws_security_group.instance_sg1.id}", "${aws_security_group.instance_sg2.id}"]
  subnet_id              = "${element(aws_subnet.tf_test_subnet.*.id, count.index / var.web_cluster_size)}"
  user_data              = "${file("web-userdata.sh")}"

  tags {
    Name = "web_node_${count.index}"
  }
}

data "template_file" "hapee-userdata" {
  template = "${file("hapee-userdata.sh.tpl")}"

  vars {
    serverlist = "${join("\n", formatlist("    server app-%v %v:80 cookie app-%v check", aws_instance.web_node.*.id, aws_instance.web_node.*.private_ip, aws_instance.web_node.*.id))}"
  }
}

resource "aws_instance" "hapee_node" {
  count = "${var.hapee_cluster_size * var.aws_az_count}"

  instance_type = "${var.aws_hapee_instance_type}"

  ami = "${lookup(var.hapee_aws_amis, var.aws_region)}"

  key_name = "${var.key_name}"

  vpc_security_group_ids = ["${aws_security_group.instance_sg1.id}", "${aws_security_group.instance_sg2.id}"]
  subnet_id              = "${element(aws_subnet.tf_test_subnet.*.id, count.index / var.hapee_cluster_size)}"
  user_data              = "${data.template_file.hapee-userdata.rendered}"

  tags {
    Name = "hapee_node_${count.index}"
  }
}
Conclusion
We hope you have enjoyed this blog post providing an introduction to high availability on Amazon with HAProxy.
If you would like to use HAProxy on Amazon backed by enterprise support from HAProxy Technologies, please see our HAProxy Enterprise – Trial Version or contact us for expert advice.
Stay tuned for our blog posts parts 2 and part 3 in this series!
Subscribe to our blog. Get the latest release updates, tutorials, and deep-dives from HAProxy experts.

![Using HAProxy as an API gateway, part 1 [introduction]](https://cdn.haproxy.com/img/containers/partner_integrations/2022/api-gateway-pt1/avalanche-area-1080x540.png/2b915c11c726470bf6e314e194c3a7ed/avalanche-area-1080x540.png)
