Our Aloha users have one incredible piece of technology in their hands. The Aloha Boxes (or, as we call them, HAProxy Enterprise-in-a-box) are built to last and serve, and every now and then, we like to show our Aloha users how they can configure the boxes to their specific needs.
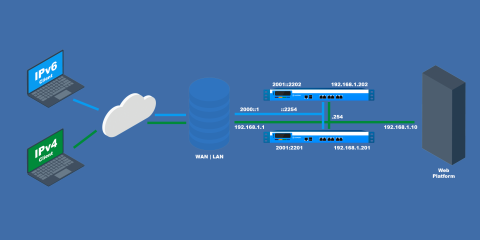
In this short blog post, you’ll learn how to configure your Aloha Box to use it as an IPv6 to IPv4 gateway without modifying anything on your current platform. The above diagram will help us with that.
Your website is available on the service IP 192.168.1.254 through IPv4. The IPv4 router translates the IPv4 public address to the mentioned service IP. IPv6, on the other hand, uses the resolved hostname directly on the 2001::2254 IP which is the IPv6 service actually IP hosting the service. The router then sends regular traffic directly to Aloha. This means that all IPv6 traffic will be automatically translated to IPv4 by Aloha. There’s nothing you need to change on your servers, and they don’t even need to be IPv6 compliant.
This HAProxy Enterprise little box does all the heavy lifting for you. Let’s take a look at the configuration.
Configuration
Network configuration for Aloha 1
In the GUI, click on Services – network – eth0 setup, and then simply update the configuration as shown below:
service network eth0
    vrrp id 254
    vrrp garp 30
    vrrp prio 100
    vrrp no-address
    vrrp address 2001::2254
    vrrp address 192.168.1.254
    vrrp address 2001::2254
    ip6 address 2001::2201/96
    ip address 192.168.1.201/24
    mtu 1500
Click on OK, and then on Close to finish configuring.
Once the configuration has been updated, you need to reload the services:
Network: Click on
Services–eth0 reloadiconVRRP: Click on
Services–vrrp reloadicon
Network configuration for Aloha 2
In the GUI, click on Services – network – eth0 setup icon, and then simply update the configuration as shown below:
service network eth0
    vrrp id 254
    vrrp garp 30
    vrrp prio 99
    vrrp no-address
    vrrp address 2001::2254
    vrrp address 192.168.1.254
    vrrp address 2001::2254
    ip6  address 2001::2202/96
    ip address 192.168.1.202/24
    mtu 1500
Click on OK, and then on Close to finish configuring.
Once the configuration has been updated, you need to reload the services:
Network: Click on
Services–eth0 reloadiconVRRP: Click on
Services–vrrp reloadicon
HAProxy Technologies’ Aloha is available in two flavors! You can choose between physical (hardware) load balancers and virtual ones for all your cloud and container needs.
Similar Articles:
Layer 7 (HAProxy) configuration
The following configuration applies to both of your Aloha Hardware load balancers.
Your final step of the Aloha configuration should be adding a bind to your IPv6 service address in its corresponding frontend section:
frontend ft_myappli
    bind 192.168.1.254:80
    bind 2001::2254:80
    mode http
    log global
    option httplog
    maxconn 1000
    timeout client 25s
    default_backend bk_myappli
Click on OK, and then on Close to finish configuring.