
There is such a thing as too many layers. There’s a restaurant in town that serves the most outrageously layered sandwiches. I’m talking burgers topped with cheese, ham, onion rings, and guacamole. It’s the same with load balancers: layering one proxy over another proxy—it starts to seem like overkill.
As you learned in the previous article in this series, when hosting your infrastructure in AWS, high availability can be achieved by placing AWS Elastic Load Balancing (ELB) in front of two HAProxy load balancers. It’s a way to load balance the load balancers, so to speak.
Yet, something about it gives you a bit of heartburn. “Can’t I just use HAProxy without these extra layers?” you wonder.
Yes, you can!
In this post, you’ll remove the dependency on ELB. A pair of active-active HAProxy Enterprise load balancers will receive Internet traffic directly. Both will receive requests and forward them to backend servers, creating redundancy without the need for additional, downstream proxies.
Placing HAProxy at the edge of your AWS infrastructure is possible without involving Elastic Load Balancing (ELB). In this article, we’ll discuss how. This blog post is part of a series. See Part 1 and Part 3.
High availability architecture
Let’s get a quick overview of how the experiment will look. You’ll have two highly available EC2 instances running HAProxy Enterprise. Each will be assigned an Elastic Network Interface (ENI) that’s associated with two private IP addresses. On each machine, one private IP address will be mapped to a publicly routable Elastic IP address (EIP). The other is held in reserve. In the event that the other HAProxy instance fails, its EIP will be mapped to this unused private IP on the healthy instance. When the failed node recovers, the EIP will return to its original ENI.
The load balancers will serve traffic to backend node.js websites. Using node.js makes it easy to create simple, one-off web applications.
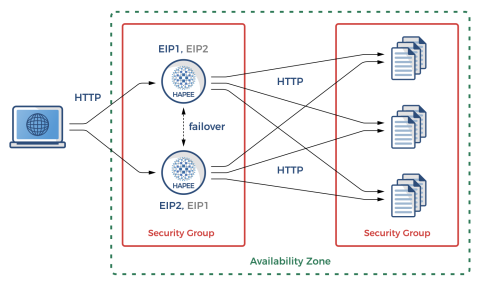
Overview of the high availability architecture
In the event that one of the load balancers fails, you’ll use the AWS Command Line Interface (CLI) to dynamically reassign its Elastic IP address to the other node. Instead of calling the CLI commands yourself, though, you will let Heartbeat do that. Heartbeat is a tool that comes from the Linux-HA project and provides high-availability clustering. Heartbeat will send UDP heartbeat messages to your nodes and dynamically failover the EIP to the other node if one peer can’t reach the other.
This model requires you to create Identity and Access Management (IAM) policies in AWS to be able to both view and modify EIP assignments dynamically. You’ll see how to automate the whole setup by using Terraform and Ansible.
Infrastructure creation with Terraform
You’ll create the environment in AWS by using Terraform. Terraform lets you write declarative configuration files that automate the process of creating infrastructure in AWS. In this way, you get a repeatable process for setting up and tearing down your cloud-based infrastructure. Download the full example project on GitHub. To run Terraform, navigate into the example project directory and run:
| export AWS_ACCESS_KEY_ID=[YOUR ACCESS KEY] | |
| export AWS_SECRET_ACCESS_KEY=[YOUR SECRET ACCESS KEY] | |
| terraform init | |
| terraform apply -auto-approve |
The resources being created include the following:
Two HAProxy Enterprise load balancers
Three node.js web applications
The network including VPC, subnet, Internet gateway, and route table
Security groups for allowing some types of traffic to reach our nodes
IAM policy permissions
Public and private IP address associations
While the network and instance creation with Terraform is quite straightforward and likely doesn’t need further explanation, we will show the excerpt that selects the most recent Ubuntu-based HAProxy Enterprise image from the AWS Marketplace (with “483gxnuft87jy44d3q8n4kvt1” being the HAPEE AWS Marketplace Product ID).
| // Lookup latest HAPEE AWS AMI (1.8r1 at this moment) | |
| data "aws_ami" "hapee_aws_amis" { | |
| most_recent = true | |
| filter { | |
| name = "product-code" | |
| values = ["483gxnuft87jy44d3q8n4kvt1"] | |
| } | |
| filter { | |
| name = "name" | |
| values = ["hapee-ubuntu-xenial-amd64-hvm-1.8*"] | |
| } | |
| owners = ["aws-marketplace"] | |
| } |
The same strategy is used for our node.js web servers, but using a regular Ubuntu 16.04 image (with “099720109477” being the Canonical AWS Marketplace Owner ID).
| // Lookup latest Ubuntu Xenial 16.04 AMI | |
| data "aws_ami" "ubuntu_aws_amis" { | |
| most_recent = true | |
| filter { | |
| name = "name" | |
| values = ["ubuntu/images/hvm-ssd/ubuntu-xenial-16.04-amd64-server-*"] | |
| } | |
| owners = ["099720109477"] | |
| } |
The HAProxy Enterprise AWS images include RHEL and Ubuntu and are tuned to ensure optimal load balancing performance.
In order for your nodes to communicate with one another and the outside world, you must define security groups that act as firewalls with only specific ports open. This is handled by Terraform. The security group for the HAProxy nodes includes ingress rules for the following:
SSH (port 22) from anywhere
HTTP/HTTPS (ports 80 and 443) from anywhere
HAProxy Real-Time Dashboard UI (ports 9022 and 9023) from anywhere
Heartbeat unicast (port udp/694) from inside the network
ICMP Type 3, Code 4 (MTU Discovery) from anywhere
The security group for the node.js backends will need to permit the following:
SSH (port 22) from anywhere
HTTP (port 80) from the load balancers
Another security precaution that AWS implements is restricting who can call various AWS API methods. Since your EC2 instances will use Heartbeat to list network interfaces and associate, dissociate, and release EIPs, Terraform must set up IAM policies that allow these actions.
The following Terraform configuration creates an IAM role with the necessary permissions and assigns it to an instance profile. This instance profile is later assigned to the HAProxy EC2 instances.
| // IAM policy document - Assume role policy | |
| data "aws_iam_policy_document" "instance_assume_role_policy" { | |
| statement { | |
| actions = ["sts:AssumeRole"] | |
| principals { | |
| type = "Service" | |
| identifiers = ["ec2.amazonaws.com"] | |
| } | |
| } | |
| } | |
| // IAM policy document - EIP permissions policy | |
| data "aws_iam_policy_document" "eip_policy" { | |
| statement { | |
| sid = "1" | |
| actions = [ | |
| "ec2:DescribeAddresses", | |
| "ec2:AllocateAddress", | |
| "ec2:ReleaseAddress", | |
| "ec2:DescribeInstances", | |
| "ec2:AssociateAddress", | |
| "ec2:DisassociateAddress", | |
| "ec2:DescribeNetworkInterfaces", | |
| "ec2:AssignPrivateIpAddresses", | |
| "ec2:UnassignPrivateIpAddresses", | |
| ] | |
| resources = ["*"] | |
| } | |
| } | |
| // IAM role - EIP role | |
| resource "aws_iam_role" "eip_role" { | |
| name = "hapee_eip_role" | |
| assume_role_policy = "${data.aws_iam_policy_document.instance_assume_role_policy.json}" | |
| } | |
| // IAM role policy - EIP role policy | |
| resource "aws_iam_role_policy" "eip_role_policy" { | |
| name = "hapee_eip_role_policy" | |
| role = "${aws_iam_role.eip_role.id}" | |
| policy = "${data.aws_iam_policy_document.eip_policy.json}" | |
| } | |
| // IAM instance profile - EIP instance profile | |
| resource "aws_iam_instance_profile" "eip_instance_profile" { | |
| name = "hapee_instance_profile" | |
| role = "${aws_iam_role.eip_role.id}" | |
| } |
While we’re on the subject of IAM permissions, note that when you apply your Terraform configuration, the user account that you connect to AWS with needs to have certain privileges. In particular, because you are dynamically giving your load balancers the ability to view and change network settings, your Terraform user account must have the rights to grant those permissions. It will need access to the following actions, which can be set through the AWS console:
| { | |
| "Version": "2012-10-17", | |
| "Statement": [ | |
| { | |
| "Sid": "VisualEditor0", | |
| "Effect": "Allow", | |
| "Action": [ | |
| "iam:AddRoleToInstanceProfile", | |
| "iam:CreateInstanceProfile", | |
| "iam:CreateRole", | |
| "iam:GetInstanceProfile", | |
| "iam:GetRole", | |
| "iam:GetRolePolicy", | |
| "iam:DeleteInstanceProfile", | |
| "iam:DeleteRole", | |
| "iam:DeleteRolePolicy", | |
| "iam:ListInstanceProfilesForRole", | |
| "iam:PassRole", | |
| "iam:PutRolePolicy", | |
| "iam:RemoveRoleFromInstanceProfile", | |
| "ec2:AllocateAddress", | |
| "ec2:AssociateRouteTable", | |
| "ec2:AssociateAddress", | |
| "ec2:AttachInternetGateway", | |
| "ec2:AuthorizeSecurityGroupIngress", | |
| "ec2:AuthorizeSecurityGroupEgress", | |
| "ec2:CreateInternetGateway", | |
| "ec2:CreateRoute", | |
| "ec2:CreateRouteTable", | |
| "ec2:CreateSecurityGroup", | |
| "ec2:CreateSubnet", | |
| "ec2:CreateTags", | |
| "ec2:CreateVpc", | |
| "ec2:DescribeAddresses", | |
| "ec2:DescribeImages", | |
| "ec2:DescribeVpcs", | |
| "ec2:DescribeVpcAttribute", | |
| "ec2:DescribeVpcClassicLink", | |
| "ec2:DescribeVpcClassicLinkDnsSupport", | |
| "ec2:DescribeSecurityGroups", | |
| "ec2:DescribeInternetGateways", | |
| "ec2:DescribeNetworkAcls", | |
| "ec2:DescribeRouteTables", | |
| "ec2:DescribeSubnets", | |
| "ec2:DescribeInstances", | |
| "ec2:DescribeVolumes", | |
| "ec2:DescribeTags", | |
| "ec2:DescribeInstanceAttribute", | |
| "ec2:DescribeInstanceCreditSpecifications", | |
| "ec2:DescribeNetworkInterfaces", | |
| "ec2:DescribeAccountAttributes", | |
| "ec2:DeleteSubnet", | |
| "ec2:DeleteSecurityGroup", | |
| "ec2:DeleteRouteTable", | |
| "ec2:DeleteInternetGateway", | |
| "ec2:DeleteVpc", | |
| "ec2:DetachInternetGateway", | |
| "ec2:DisassociateAddress", | |
| "ec2:DisassociateRouteTable", | |
| "ec2:ModifySubnetAttribute", | |
| "ec2:ModifyVpcAttribute", | |
| "ec2:ReleaseAddress", | |
| "ec2:TerminateInstances", | |
| "ec2:RevokeSecurityGroupEgress", | |
| "ec2:RunInstances" | |
| ], | |
| "Resource": "*" | |
| } | |
| ] | |
| } |
Post-creation configuration with Ansible
Right after creating the initial stack with Terraform, you must run Ansible to ensure that all of your instances have up-to-date software, required configuration, secondary IP addresses, helper scripts, etc. Ansible is an automation tool for provisioning servers with required software and settings. The ansible-playbook command connects to your AWS EC2 instances and applies for the Ansible roles.
| ansible-playbook site.yml |
You’ll need to set up an SSH key-pair beforehand so that you can connect. This is set in the variables.tf file for Terraform and ansible.cfg for Ansible. Also, note that the Jinja2 templating engine requires the Python package jmespath to be installed on your workstation. You can install it as follows:
| apt install python-pip | |
| pip install jmespath |
Here’s a summary of the Ansible roles, describing their purpose:
Ansible roles applied to HAProxy instances
Role name | Purpose |
secondary-ip | Ensures that each HAPEE instance is able to configure a secondary private IP on boot, as that doesn’t happen by default on Amazon EC2. |
ec2facts | Gathers ENI and EIP facts for further use in Heartbeat EIP helper scripts. |
hapee-lb | Auto-generates the hapee-lb.cfg configuration file from a Jinja2 template and populates private IPs in the backend server definition. |
heartbeat | Handles complete Heartbeat installation with all prerequisites and configuration (ha.cf, authkeys, haresources, updateEIP1 and updateEIP2 Heartbeat Resource Agents) on both load-balancer nodes; note that helper scripts differ between load balancer nodes. |
Ansible role applied to web backend nodes
Role name | Purpose |
nodejs | Handles installation and configuration of the node.js HTTP server. |
In the upcoming sections, we’ll explain these roles in detail.
secondary-ip
In order for a load balancer to reassign a failed peer’s EIP to itself, you need to have a secondary private IP address to associate with it. EIPs are assigned either to the whole ENI or to an individual private IP address. We are choosing the latter because dealing with multiple ENIs causes more overhead.
Every EC2 instance gets one private IP by default. Adding a second is a two-step process. First, you’ll use the ec2_eni module from the development version of Ansible to add a secondary private address to the existing ENI.
| - name: gather HAPEE EC2 ENI details | |
| ec2_eni_facts: | |
| region: "{{ region | default('us-east-1') }}" | |
| filters: | |
| attachment.instance-id: "{{ ec2_id }}" | |
| register: aws_ec2_eni_facts | |
| - name: add secondary IP address | |
| ec2_eni: | |
| region: "{{ region | default('us-east-1') }}" | |
| eni_id: "{{ aws_ec2_eni_facts['network_interfaces'][0]['id'] }}" | |
| subnet_id: "{{aws_ec2_eni_facts['network_interfaces'][0]['subnet_id'] }}" | |
| state: present | |
| secondary_private_ip_address_count: 1 |
The next step is to query AWS for instance metadata to find out what address was assigned. In the Amazon Linux distribution, a specific ec2-net-utils package would handle this step, ensuring that, if enabled, a secondary private IP address keeps being refreshed with DHCP. Sadly this doesn’t happen automatically with any other Linux distribution, so we must use a rudimentary shell script to do so. The secondary-ip Ansible role copies this shell script to the load balancer node and sets it to run as a service.
The script is as follows:
| #!/bin/bash | |
| MAC_ADDR=$(ifconfig eth0 | sed -n 's/.*HWaddr \([a-f0-9:]*\).*/\1/p') | |
| IP=($(curl "http://169.254.169.254/latest/meta-data/network/interfaces/macs/$MAC_ADDR/local-ipv4s" 2>/dev/null)) | |
| for ip in ${IP[@]:1}; do | |
| echo "Adding IP: $ip" | |
| ip addr show dev eth0 | grep -q "inet $ip/24" || ip addr add dev eth0 "$ip/24" | |
| done |
Now after the service starts up, each load balancer will have two private IP addresses assigned to their respective ENIs.
ec2facts
Prior to applying for the heartbeat role, the ec2facts role gathers some information about the EC2 ENIs and EIPs. This includes information about interface IDs, allocation IDs, and private addresses that are needed when configuring Heartbeat.
Although the example project gets many of its variables from ec2.py, which is used for creating a dynamic inventory, it doesn’t populate all of the information you need. So, the example project relies on two other development-version Ansible modules: ec2_eni_facts and ec2_eip_facts. Together, these generate the rest of the necessary variables.
hapee-lb
The hapee-lb role generates a complete HAProxy Enterprise configuration file, hapee-lb.cfg, that sets up round-robin HTTP load-balancing over all of the backend web servers. It uses a fairly extensible Jinja2 template, which you can further customize to cover specific configuration cases such as a number of threads to run depending on the number of CPU cores, and so on:
| global | |
| log 127.0.0.1 local0 | |
| log 127.0.0.1 local1 notice | |
| user hapee-lb | |
| group hapee | |
| chroot /var/empty | |
| pidfile /var/run/hapee-1.8/hapee-lb.pid | |
| stats socket /var/run/hapee-1.8/hapee-lb.sock user hapee-lb group hapee mode 660 level admin | |
| stats timeout 10m | |
| module-path /opt/hapee-1.8/modules | |
| daemon | |
| defaults | |
| mode http | |
| log global | |
| option httplog | |
| option dontlognull | |
| option forwardfor except 127.0.0.0/8 | |
| option tcp-smart-accept | |
| option tcp-smart-connect | |
| option redispatch | |
| retries 3 | |
| timeout connect 10s | |
| timeout client 30s | |
| timeout server 30s | |
| listen webapp | |
| bind *:80 | |
| balance roundrobin | |
| cookie SERVERID insert indirect nocache | |
| {% for backend in groups['tag_Name_hapee_web_node'] %} | |
| server {{ hostvars[backend]['ec2_private_dns_name'] }} {{ hostvars[backend]['ec2_private_ip_address'] }}:80 cookie {{ hostvars[backend]['ec2_private_dns_name'] }} check | |
| {% endfor %} |
When this template is rendered, the listen section will include all of the addresses of your web servers, as in the following example:
| listen webapp | |
| bind *:80 | |
| balance roundrobin | |
| cookie SERVERID insert indirect nocache | |
| server ip-20-0-0-66.ec2.internal 20.0.0.61:80 cookie ip-20-0-0-66.ec2.internal check | |
| server ip-20-0-0-5.ec2.internal 20.0.0.252:80 cookie ip-20-0-0-5.ec2.internal check | |
| server ip-20-0-0-63.ec2.internal 20.0.0.24:80 cookie ip-20-0-0-63.ec2.internal check |
heartbeat
The real magic of the project is setting up high availability between your load balancers through Heartbeat. Furthermore, Heartbeat associates the elastic IP addresses with the private IP addresses on the HAProxy nodes.
This role is the most complex of all, as several files must be rendered from templates. The Heartbeat configuration file, ha.cf, needs to list all private IP addresses in use as well as the default gateway, which it pings to avoid split-brain situations. Its Ansible template looks like this:
| crm no | |
| keepalive 2 | |
| deadtime 15 | |
| initdead 60 | |
| udpport 694 | |
| {% for backend in groups['tag_Name_hapee_lb_node'] %} | |
| {% for addr in hostvars[backend]['aws_ec2_eni_facts']['network_interfaces'][0]['private_ip_addresses'] | map(attribute='private_ip_address') | list %} | |
| ucast eth0 {{ addr }} | |
| {% endfor %} | |
| {% endfor %} | |
| ping {{ ansible_default_ipv4.gateway }} | |
| auto_failback on | |
| {% for backend in groups['tag_Name_hapee_lb_node'] %} | |
| node {{ hostvars[backend]['ansible_hostname'] }} | |
| {% endfor %} |
The rendered file will look like this:
| crm no | |
| keepalive 2 | |
| deadtime 15 | |
| initdead 60 | |
| udpport 694 | |
| ucast eth0 20.0.0.33 | |
| ucast eth0 20.0.0.161 | |
| ucast eth0 20.0.0.182 | |
| ucast eth0 20.0.0.16 | |
| ping 20.0.0.1 | |
| auto_failback on | |
| node ip-20-0-0-98 | |
| node ip-20-0-0-43 |
We are using unicast communication, as in a cloud environment using multicast is not a feasible option unless we delve into various overlays that make it happen. For our purposes, using unicast is good enough. When the template is rendered, each private IP address will be listed on its own line, prefixed with ucast eth0.
In the haresources file, we list the primary node for each EIP resource and the helper scripts, updateEIP1 and updateEIP2, that map the EIPs to private addresses. The helper scripts are basically just wrappers over the AWS CLI:
| {{ hostvars[first_eip]['ansible_hostname'] }} updateEIP1 | |
| {{ hostvars[second_eip]['ansible_hostname'] }} updateEIP2 |
Let’s review possible scenarios that the updateEIP Resource Agent scripts will handle. Note that these are just regular LSB init scripts.
No failure scenario:
updateEIP1 on the first node associates EIP1 to primary ENI, primary private IP
updateEIP2 on the second node allocates EIP2 to primary ENI, primary private IP
Failure scenario:
updateEIP2 on the first node (failure on the second node) associates EIP2 to primary ENI, secondary private IP
updateEIP1 on the second node (failure on the first node) associates EIP1 to primary ENI, secondary private IP
Let’s take a look at the template for the updateEIP1 script:
| #!/bin/sh | |
| EIP={{ first_eip }} # EIP1 | |
| ENI_ID={{ aws_ec2_eni_facts['network_interfaces'][0]['id'] }} # ENI local | |
| ALLOCATION_ID={{ hostvars[first_eip]['aws_ec2_eip_facts']['addresses'][0]['allocation_id'] }} # EIP1 ID | |
| PRIVATE_IP={% if ansible_host == first_eip %}{{ ec2_private_ip_address }}{% else %}{{ aws_ec2_eni_facts['network_interfaces'][0]['private_ip_addresses'] | json_query("[?private_ip_address!='" + ec2_private_ip_address + "'].private_ip_address") | first }}{% endif %} | |
| export AWS_DEFAULT_REGION={{ ec2_region }} | |
| case "$1" in | |
| start) | |
| timeout 60 aws ec2 associate-address --allow-reassociation --allocation-id "$ALLOCATION_ID" --network-interface-id "$ENI_ID" --private-ip-address "$PRIVATE_IP" | |
| echo "$0" started | |
| ;; | |
| stop) | |
| timeout 60 aws ec2 disassociate-address --allocation-id "$ALLOCATION_ID" | |
| echo "$0" stopped | |
| ;; | |
| status) | |
| timeout 10 aws ec2 describe-addresses --allocation-ids "$ALLOCATION_ID" | fgrep -q "\"$PRIVATE_IP\"" | |
| [ $? -eq 0 ] && echo OK || echo FAIL | |
| ;; | |
| Esac |
The updateEIP2 script is the same as updateEIP1, except that first_eip is switched for second_eip. Both scripts have standard and required actions for a Resource Agent: The start command will associate an EIP to a primary ENI and primary or secondary private address, depending on whether it is an EIP belonging to a remote peer or to a local instance; the stop command will disassociate an EIP; the status command just shows an EIP association status.
The end result
Once these Ansible roles are executed, you’ll have two HAProxy Enterprise load balancers that accept traffic directly over publicly routed Elastic IP addresses. Remember to update your DNS settings to point to both EIPs.
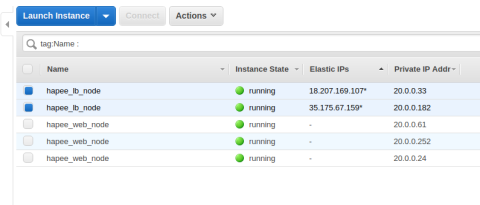
Two HAProxy load balancers that accept traffic directly over publicly routed Elastic IP addresses
These instances are able to monitor one another and recover their peer’s EIP if the peer is stopped due to maintenance or failure. This allows you to put HAProxy at the front lines of your cloud infrastructure without the need for Elastic Load Balancing.
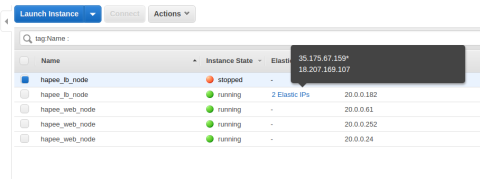
Such a setup allows for the recovery of one peer’s EIP if the peer is stopped due to maintenance or failure
Conclusion
This concludes our HAProxy Enterprise Heartbeat HA example. Doesn’t it feel good to remove some extra layers from your AWS infrastructure? As a reminder, all of the example code is available and contains complete Terraform and Ansible configurations. Use it for testing and to contribute further improvements!
In the next part of this blog series, we will replace Heartbeat with Keepalived/VRRP, which is our standard enterprise-recommended setup. Please leave comments below! Contact us to learn more about HAProxy Enterprise or sign up for a free trial.
Subscribe to our blog. Get the latest release updates, tutorials, and deep-dives from HAProxy experts.

![Using HAProxy as an API Gateway, Part 2 [Authentication]](https://cdn.haproxy.com/img/containers/partner_integrations/image2-e1548174430466.png/3942e9fa498bb46e325ba72db6f9bd84/image2-e1548174430466.png)
![Using HAProxy as an API gateway, part 1 [introduction]](https://cdn.haproxy.com/img/containers/partner_integrations/2022/api-gateway-pt1/avalanche-area-1080x540.png/2b915c11c726470bf6e314e194c3a7ed/avalanche-area-1080x540.png)