
In this blog post, learn to use HAProxy, Keepalived, Terraform and Ansible to set up highly-available load balancing in AWS.
In the third part of this series, we are again tackling how to implement a highly available architecture in AWS. In the first article, HAProxy on AWS: Best Practices Part 1, you learned how to set up redundant HAProxy load balancers by placing them behind Amazon Elastic Load Balancing (ELB) in order to safeguard against one of the load balancers failing. In HAProxy on AWS: Best Practices Part 2, you learned that high availability can be achieved without ELB by having both HAProxy load balancers monitor one another using Heartbeat.
As in the previous article, the design that you’ll see here consists of two active-active, HAProxy Enterprise load balancers running on EC2 instances relaying traffic to three backend web servers. The HAProxy Enterprise AMI is a high-performance, fully-tuned image, tailor-made for running HAProxy. The currently supported distributions are Ubuntu and RHEL. Either way, you’ll be using an image that’s guaranteed to get you started on the right foot.
As you’ve seen, you can leverage the AWS Command Line Interface (CLI) to dynamically reassign an Elastic IP address (EIP) to a load balancer. That means that you don’t need ELB in front of your two HAProxy instances in order to achieve automatic failover. Last time, we demonstrated how to use Heartbeat to invoke the CLI in the event of a load balancer failure. Now, we’re going to show how to configure the Keepalived service and the Virtual Router Redundancy Protocol (VRRP) for creating a fault-tolerant setup.
High Availability Architecture
We often prefer Keepalived when designing for high availability, due to its proven stability and wide use. It provides a way to check on the health of a machine and trigger actions when a failure occurs. VRRP is a protocol for automatically assigning IP addresses to hosts.
The only difference from a typical configuration is that we cannot use multicast on Amazon EC2. So, we will use unicast peer definitions. It’s possible to create a multicast overlay with n2n. However, it is much simpler to manage a unicast configuration and requires fewer moving parts.
Here is an overview of how traffic will be received by one of the two load balancers and then forwarded to a backend server:
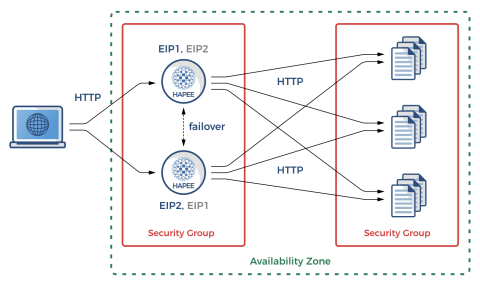
High availability in AWS using HAProxy
When either of the HAProxy nodes fails, Keepalived will quickly detect the condition and invoke our helper scripts. They, in turn, will utilize the AWS CLI to migrate the failed load balancer’s EIP to a secondary private IP address on the remaining, functional load balancer. That way, traffic can continue to flow using the same public IP address.
The remaining load balancer will pick up the slack until the other node recovers. Typically, Keepalived is able to detect a node failure and complete a full EIP reassociation within several seconds—usually in less than five seconds. In our example setup, we have Keepalived configured to detect a range of service failures including OpenSSH failure, DHCP client failure, and HAProxy failure. It will also notice split-brain situations wherein the default gateway is unreachable.
Before you’re able to utilize the CLI calls for managing EIPs, you must grant permissions by creating Identity and Access Management (IAM) policies in AWS. We will cover that in the next section.
Creating Infrastructure with Terraform
Terraform replaces the point-and-click creation of cloud resources with an Infrastructure-as-code approach. It works with many different cloud providers, initializing complex infrastructure using a declarative configuration language. With Terraform, you get a repeatable and clean stack that consists of only the defined resources and their dependencies.
Download the latest version of Terraform, such as:
| $ apt update | |
| $ apt install -y unzip | |
| $ wget -O ./terraform.zip https://releases.hashicorp.com/terraform/0.11.13/terraform_0.11.13_linux_amd64.zip | |
| $ unzip ./terraform.zip -d ./terraform | |
| $ cp ./terraform/terraform /usr/local/bin |
Before using Terraform, you must set up a user account in AWS that has permissions to create infrastructure. Also, since you’ll be giving Keepalived the ability to view and change network settings, your account must have the right to grant those permissions. Log into the AWS console and go to IAM > Policies > Create Policy. Select the JSON tab on the Create policy screen and enter the following:
| { | |
| "Version": "2012-10-17", | |
| "Statement": [ | |
| { | |
| "Sid": "VisualEditor0", | |
| "Effect": "Allow", | |
| "Action": [ | |
| "iam:AddRoleToInstanceProfile", | |
| "iam:CreateInstanceProfile", | |
| "iam:CreateRole", | |
| "iam:GetInstanceProfile", | |
| "iam:GetRole", | |
| "iam:GetRolePolicy", | |
| "iam:DeleteInstanceProfile", | |
| "iam:DeleteRole", | |
| "iam:DeleteRolePolicy", | |
| "iam:ListInstanceProfilesForRole", | |
| "iam:PassRole", | |
| "iam:PutRolePolicy", | |
| "iam:RemoveRoleFromInstanceProfile", | |
| "ec2:AllocateAddress", | |
| "ec2:AssociateRouteTable", | |
| "ec2:AssociateAddress", | |
| "ec2:AttachInternetGateway", | |
| "ec2:AuthorizeSecurityGroupIngress", | |
| "ec2:AuthorizeSecurityGroupEgress", | |
| "ec2:CreateInternetGateway", | |
| "ec2:CreateRoute", | |
| "ec2:CreateRouteTable", | |
| "ec2:CreateSecurityGroup", | |
| "ec2:CreateSubnet", | |
| "ec2:CreateTags", | |
| "ec2:CreateVpc", | |
| "ec2:DescribeAddresses", | |
| "ec2:DescribeImages", | |
| "ec2:DescribeVpcs", | |
| "ec2:DescribeVpcAttribute", | |
| "ec2:DescribeVpcClassicLink", | |
| "ec2:DescribeVpcClassicLinkDnsSupport", | |
| "ec2:DescribeSecurityGroups", | |
| "ec2:DescribeInternetGateways", | |
| "ec2:DescribeNetworkAcls", | |
| "ec2:DescribeRouteTables", | |
| "ec2:DescribeSubnets", | |
| "ec2:DescribeInstances", | |
| "ec2:DescribeVolumes", | |
| "ec2:DescribeTags", | |
| "ec2:DescribeInstanceAttribute", | |
| "ec2:DescribeInstanceCreditSpecifications", | |
| "ec2:DescribeNetworkInterfaces", | |
| "ec2:DescribeAccountAttributes", | |
| "ec2:DeleteSubnet", | |
| "ec2:DeleteSecurityGroup", | |
| "ec2:DeleteRouteTable", | |
| "ec2:DeleteInternetGateway", | |
| "ec2:DeleteVpc", | |
| "ec2:DetachInternetGateway", | |
| "ec2:DisassociateAddress", | |
| "ec2:DisassociateRouteTable", | |
| "ec2:ModifySubnetAttribute", | |
| "ec2:ModifyVpcAttribute", | |
| "ec2:ReleaseAddress", | |
| "ec2:TerminateInstances", | |
| "ec2:RevokeSecurityGroupEgress", | |
| "ec2:RunInstances" | |
| ], | |
| "Resource": "*" | |
| } | |
| ] | |
| } |
Click the Review policy button. Give the policy a name, such as TerraformAccess, and description, then click Create policy.
Next, go to Groups > Create New Group. Assign a group name, such as TerraformGroup, then click Next Step. On the next screen, select TerraformAccess from the list of policies, then click Next Step. Then click Create Group.
Next, go to Users > Add user. Assign a username, such as TerraformUser, and then check the box to set its access type to Programmatic access. On the next screen, check the box next to the TerraformGroup group and then click Next. On the last screen, click the Create user button. At this stage, it’s important to copy the Access key ID and Secret access key and save them somewhere. You can click the Download .csv button to do this.
You must also create an SSH key-pair or use an existing one. Log into the AWS console and go to EC2 > Key Pairs > Create Key Pair. When you create one, you’ll be prompted to save its private-key PEM file. Be sure to set appropriate permission on it:
| $ chmod 600 mykeypair.pem |
Our complete example, which includes our Terraform files, is on Github. Use the following commands to clone it and create your own infrastructure demo.
| $ git clone https://github.com/haproxytech/cloud-blueprints.git | |
| $ cd cloud-blueprints/aws_keepalived/ | |
| $ export AWS_ACCESS_KEY_ID=[YOUR ACCESS KEY] | |
| $ export AWS_SECRET_ACCESS_KEY=[YOUR SECRET ACCESS KEY] | |
| $ terraform init | |
| $ terraform apply -var="key_name=mykeypair" |
Include a variable named key_name when you call terraform apply. The Terraform scripts install the public key of an SSH key-pair onto each virtual machine, but they need to know the name of the key-pair first.
The resources being created include:
Two HAProxy Enterprise load balancers
Three node.js web applications
The network including VPC, subnet, Internet gateway, and route table
Security groups for allowing some types of traffic to reach our nodes
IAM policy permissions (regarding EIP and ENI management)
Public and private IP addresses, which are assigned to the load balancers
While the Terraform configuration in main.tf is fairly straightforward, there are some important parts that we would like to address. The following snippet demonstrates how we are selecting the HAProxy Enterprise image from the AWS Marketplace:
| // Find latest HAProxy Enterprise Ubuntu AMI | |
| data "aws_ami" "hapee_aws_amis" { | |
| most_recent = true | |
| filter { | |
| name = "product-code" | |
| values = ["483gxnuft87jy44d3q8n4kvt1"] | |
| } | |
| filter { | |
| name = "name" | |
| values = ["hapee-ubuntu-bionic-amd64-hvm-1.8*"] | |
| } | |
| owners = ["aws-marketplace"] | |
| } |
This excerpt selects the most recent HAProxy Enterprise 1.8 (at this moment 1.8r2) Ubuntu AMI. This AMI is based on Ubuntu 18.04 Bionic Beaver for the AMD64 platform and supports full (HVM) virtualization. You should set product-code to the given value and use aws-marketplace as the owners so that only official images from HAProxy Technologies are selected. These filters also ensure a quick and efficient lookup.
HAProxy Enterprise AWS images are available as both RHEL and Ubuntu and are tuned to ensure optimal load balancing performance. Images include an optimized kernel and service settings, sample service configurations, and all of our enterprise modules.
We use similar logic to select the base Ubuntu 18.04 image for our node.js web applications:
| // Find latest Ubuntu Bionic 18.04 AMI | |
| data "aws_ami" "ubuntu_aws_amis" { | |
| most_recent = true | |
| filter { | |
| name = "name" | |
| values = ["ubuntu/images/hvm-ssd/ubuntu-bionic-18.04-amd64-server-*"] | |
| } | |
| owners = ["099720109477"] | |
| } |
Something else to note about the Terraform files is that we’re allowing VRRP traffic (IP protocol 112) in each load balancer’s security group.
| ingress { | |
| from_port = 0 | |
| to_port = 0 | |
| protocol = "112" | |
| self = true | |
| } |
When Terraform runs, it automatically creates the IAM role with all the necessary permissions for EIP and Elastic Network Interface (ENI) management. That role will be assigned to an instance profile and later associated with the EC2 load balancer instances.
| // IAM policy document - Assume role policy | |
| data "aws_iam_policy_document" "instance_assume_role_policy" { | |
| statement { | |
| actions = ["sts:AssumeRole"] | |
| principals { | |
| type = "Service" | |
| identifiers = ["ec2.amazonaws.com"] | |
| } | |
| } | |
| } | |
| // IAM policy document - EIP permissions policy | |
| data "aws_iam_policy_document" "eip_policy" { | |
| statement { | |
| sid = "1" | |
| actions = [ | |
| "ec2:DescribeAddresses", | |
| "ec2:AllocateAddress", | |
| "ec2:ReleaseAddress", | |
| "ec2:DescribeInstances", | |
| "ec2:AssociateAddress", | |
| "ec2:DisassociateAddress", | |
| "ec2:DescribeNetworkInterfaces", | |
| "ec2:AssignPrivateIpAddresses", | |
| "ec2:UnassignPrivateIpAddresses", | |
| ] | |
| resources = ["*"] | |
| } | |
| } | |
| // IAM role - EIP role | |
| resource "aws_iam_role" "eip_role" { | |
| name = "hapee_eip_role" | |
| assume_role_policy = "${data.aws_iam_policy_document.instance_assume_role_policy.json}" | |
| } | |
| // IAM role policy - EIP role policy | |
| resource "aws_iam_role_policy" "eip_role_policy" { | |
| name = "hapee_eip_role_policy" | |
| role = "${aws_iam_role.eip_role.id}" | |
| policy = "${data.aws_iam_policy_document.eip_policy.json}" | |
| } | |
| // IAM instance profile - EIP instance profile | |
| resource "aws_iam_instance_profile" "eip_instance_profile" { | |
| name = "hapee_instance_profile" | |
| role = "${aws_iam_role.eip_role.id}" | |
| } |
When creating HAProxy Enterprise EC2 instances, it’s important to make sure that the unattended-upgrade utility, which regularly checks for the latest package updates and automatically performs them, does not start post-boot. Allowing it to do so would lock the package database and prevent Ansible from running immediately after Terraform. To avoid such a case, the example project uses cloud-init through the aws_instance resource’s user_data argument. By specifying runcmd, commands will execute at boot that stop the apt-daily and apt-daily-upgrade services.
| // Instance definition for HAProxy Enterprise nodes | |
| // Static instance count at 2 | |
| resource "aws_instance" "hapee_node" { | |
| count = 2 | |
| instance_type = "${var.aws_hapee_instance_type}" | |
| ami = "${data.aws_ami.hapee_aws_amis.id}" | |
| key_name = "${var.key_name}" | |
| iam_instance_profile = "${aws_iam_instance_profile.eip_instance_profile.id}" | |
| vpc_security_group_ids = ["${aws_security_group.hapee_node_sg.id}"] | |
| subnet_id = "${aws_subnet.tf_test_subnet.id}" | |
| user_data = <<EOF | |
| #cloud-config | |
| runcmd: | |
| - systemctl stop apt-daily.service | |
| - systemctl kill --kill-who=all apt-daily.service | |
| - systemctl stop apt-daily.timer | |
| - systemctl stop apt-daily-upgrade.timer | |
| EOF | |
| tags { | |
| Name = "hapee_lb_node" | |
| } | |
| } |
Post-creation Configuration With Ansible
As flexible as Terraform is, individual service installation and tuning is much easier to do with a configuration management tool like Ansible. An Ansible playbook will make sure that all instances have up-to-date software, required services running, secondary IP addresses assigned, EIP management helper scripts installed, etc.
Install the latest version of Ansible, like this (note that we are running this on an Ubuntu 18.04 workstation that has Python2 installed):
| $ apt update | |
| $ apt install -y software-properties-common python-pip | |
| $ apt-add-repository --yes --update ppa:ansible/ansible | |
| $ apt install -y ansible | |
| $ pip install boto jmespath |
To execute the playbook, Ansible must be able to connect to your running virtual machines via SSH. If you haven’t already done so, you need to create an SSH key-pair and add its public key to each instance. See the previous section about running Terraform.
Next, update ansible.cfg so that the private_key_file variable is set to the path to the PEM file that you saved.
| [defaults] | |
| inventory = ./inventory | |
| roles_path = ./roles | |
| host_key_checking = False | |
| remote_user = ubuntu | |
| private_key_file = ./mykeypair.pem |
Use the ansible-playbook command to connect to all EC2 instances and apply the configuration.
| $ ansible-playbook site.yml |
Here’s a summary of the Ansible roles, describing their purposes:
Ansible roles applied to HAProxy instances
secondary-ip | Ensures that each HAProxy instance is able to configure a secondary private IP on boot, as that doesn’t happen by default on Amazon EC2. |
ec2facts | Gathers ENI and EIP configuration details for further use in Keepalived configuration and Keepalived EIP helper scripts. |
hapee-lb | Auto-generates the hapee-lb.cfg configuration file from a Jinja2 template and populates private IPs in the backend server definition. |
keepalived | Handles Keepalived installation and configuration, populating two VRRP instances (one for each of the secondary EIPs), generates random VRRP instance passwords and generates EIP migration helper scripts, which are different for each instance. |
Ansible role applied to web backend nodes
Role name | Purpose |
nodejs | Handles installation and configuration of the node.js web server. |
In the following sections, we’ll explain these roles in detail.
Only Amazon Linux is able to, by default, configure secondary private IP address for EC2 instances through ec2-net-utils. Other distributions typically require a manual configuration, as in our example.
secondary-ip
Let’s take a look at the secondary-ip Ansible role. It installs a helper script onto each load balancer server. The script starts as a Systemd service and queries instance metadata to get the associated IPv4 address. It then assigns the IP to the eth0 network interface as an additional IP alias.
| #!/bin/bash | |
| MAC_ADDR=$(ip addr show dev eth0 | sed -n 's/.*ether \([a-f0-9:]*\).*/\1/p') | |
| IP=($(curl "http://169.254.169.254/latest/meta-data/network/interfaces/macs/$MAC_ADDR/local-ipv4s" 2>/dev/null)) | |
| for ip in ${IP[@]:1}; do | |
| echo "Adding IP: $ip" | |
| ip addr show dev eth0 | grep -q "inet $ip/24" || ip addr add dev eth0 "$ip/24" | |
| done |
This secondary IP is a private address, not yet exposed outside the AWS network. However, if Keepalived detects that the other load balancer has failed, the failed node’s public-facing EIP is automatically paired with this IP. In essence, the secondary IP is an empty slot to which the EIP can migrate.
ec2facts
The example project gets many of its variables from ec2.py, which is used for creating a dynamic inventory. However, this doesn’t populate all of the information you need. The ec2facts role gathers information about the EC2 ENIs and EIPs, which is needed when configuring Keepalived. This includes interface IDs, allocation IDs and private IPv4 addresses allocated to the instance and its interfaces.
To get this data, the role uses two Ansible modules: ec2_eni_facts and ec2_eip_facts. Together, these generate the rest of the necessary variables.
hapee-lb
The hapee-lb role generates a complete HAProxy Enterprise configuration file, hapee-lb.cfg, that does round-robin load balancing of the node.js web applications. As is typical when using Ansible, we’re leveraging the extensible Jinja2 templating language, which permits various dynamic expressions and references to Ansible variables.
The template generates listen sections that, when rendered, include all of the private IP addresses of the backend node.js servers. While the template is fairly generic, you can easily extend it to enable threading, TLS termination and other sorts of load balancing essentials.
| global | |
| log 127.0.0.1 local0 | |
| log 127.0.0.1 local1 notice | |
| user hapee-lb | |
| group hapee | |
| chroot /var/empty | |
| pidfile /var/run/hapee-1.8/hapee-lb.pid | |
| stats socket /var/run/hapee-1.8/hapee-lb.sock user hapee-lb group hapee mode 660 level admin | |
| stats timeout 10m | |
| module-path /opt/hapee-1.8/modules | |
| daemon | |
| defaults | |
| mode http | |
| log global | |
| option httplog | |
| option dontlognull | |
| option forwardfor except 127.0.0.0/8 | |
| option tcp-smart-accept | |
| option tcp-smart-connect | |
| option redispatch | |
| retries 3 | |
| timeout connect 10s | |
| timeout client 30s | |
| timeout server 30s | |
| listen webapp | |
| bind *:80 | |
| balance roundrobin | |
| cookie SERVERID insert indirect nocache | |
| {% for backend in groups['tag_Name_hapee_web_node'] %} | |
| server {{ hostvars[backend]['ec2_private_dns_name'] }} {{ hostvars[backend]['ec2_private_ip_address'] }}:80 cookie {{ hostvars[backend]['ec2_private_dns_name'] }} check | |
| {% endfor %} |
keepalived
The final and most complex Ansible role installs the AWS CLI and HAProxy Enterprise version of Keepalived, generates the Keepalived service configuration, and installs the EIP management helper scripts. We should mention a specific code block near the beginning of the task definition:
| - name: wait for automatic system updates | |
| shell: while pgrep -f '/usr/bin/unattended-upgrade$'; do sleep 5; done; |
This particular task relates to the already mentioned unattended-upgrade utility. If the utility is already running, Ansible will stop and wait until the process has been completed. Otherwise, if we proceeded without waiting, the package database would be locked and the apt/dpkg utilities would fail to install the required packages. This would ultimately cause the Ansible role to fail.
The keepalived Ansible role configures two VRRP instances, one of which will be always in the BACKUP state initially. The BACKUP instance, by default, has a priority of 100 and the MASTER has a priority of 101. The instance with the higher priority within the group becomes the MASTER. Remember that this role is being run on both load balancers. So, each load balancer is the MASTER instance of its own EIP. The two load balancers operate in an active-active configuration. In the event of a failure, one load balancer assumes control of both EIPs.
The HAProxy Enterprise AMI, by default, leverages an up-to-date Keepalived package named hapee-extras-vrrp for implementing the VRRP service. This package has been extensively tested and qualified to work well with HAProxy Enterprise. You can find more information on configuring the Keepalived service in our official documentation.
The configuration is more complex than the one shown in the last blog post for the Heartbeat service. Primarily, that’s due to more complex logic in defaults/main.yml that sets all the required variables for later interpolation in the templates/hapee-vrrp.cfg.j2 Jinja2 template. Take a look at the template file and notice the many variables being referenced. Here’s a snippet:
| vrrp_instance vrrp_1 { | |
| interface {{ keepalived_interface1 }} | |
| virtual_router_id {{ keepalived_router_id1 }} | |
| state {{ keepalived_role1 | upper }} | |
| priority {{ keepalived_priority1 }} | |
| unicast_src_ip {{ self_ip_address }} | |
| unicast_peer { | |
| {{ peer_ip_address }} | |
| } | |
| authentication { | |
| auth_type PASS | |
| auth_pass {{ keepalived_password1 }} | |
| } | |
| track_script { | |
| chk_gw | |
| chk_dhclient | |
| chk_sshd | |
| chk_lb | |
| } | |
| notify_master /usr/local/sbin/update-EIP1.sh | |
| } |
This file also includes VRRP configuration that performs the following health checks:
| vrrp_script chk_sshd { | |
| script "pkill -0 sshd" | |
| interval 5 | |
| weight -4 | |
| fall 2 | |
| rise 1 | |
| } | |
| vrrp_script chk_dhclient { | |
| script "pkill -0 dhclient" | |
| interval 5 | |
| weight -4 | |
| fall 2 | |
| rise 1 | |
| } | |
| vrrp_script chk_lb { | |
| script "pkill -0 hapee-lb" | |
| interval 2 | |
| weight 6 | |
| fall 2 | |
| rise 1 | |
| } | |
| vrrp_script chk_gw { | |
| script "/usr/local/sbin/ping-vrrp-check.sh {{ self_gateway }}" | |
| interval 3 | |
| weight 0 | |
| fall 2 | |
| rise 3 | |
| } |
The command, pkill -0, checks whether a process is running. These checks perform the following actions:
Default gateway ICMP echo checks to avoid a split-brain situation. An error status will cause a FAULT state until ICMP checks start returning OK exit statuses.
DHCP client checks: An error status will subtract 4 from the initial priority.
OpenSSH service checks: An error status will subtract 4 from the initial priority.
HAProxy process checks: An OK status will add 6 to the initial priority.
Weights assigned to the script checks are intentionally larger than the MASTER-BACKUP priority gap so that check failures cause appropriate VRRP instance state transitions. If you want to require that a particular script check should return an OK status or else you’ll put the instance into the FAULT state, use a weight of 0 as we’ve done for the chk_gw check, which checks that the gateway is reachable. Setting a hard requirement here avoids split-brain by disabling the server regardless of whether it is currently the MASTER instance.
As mentioned previously, there is no multicast capability on Amazon EC2 so we’re using unicast local and peer IPv4 addresses and authenticating each of the VRRP instances separately. Upon VRRP instance state transitions, appropriate EIP helper scripts are executed, each using the AWS CLI to perform EC2 API calls.
The portion of the rendered Keepalived configuration that defines the VRRP instances will look like this:
| vrrp_instance vrrp_1 { | |
| interface eth0 | |
| virtual_router_id 51 | |
| state BACKUP | |
| priority 100 | |
| unicast_src_ip 20.0.0.37 | |
| unicast_peer { | |
| 20.0.0.95 | |
| } | |
| authentication { | |
| auth_type PASS | |
| auth_pass gsrMorZVTldJBFa | |
| } | |
| track_script { | |
| chk_gw | |
| chk_dhclient | |
| chk_sshd | |
| chk_lb | |
| } | |
| notify_master /usr/local/sbin/update-EIP1.sh | |
| } | |
| vrrp_instance vrrp_2 { | |
| interface eth0 | |
| virtual_router_id 50 | |
| state MASTER | |
| priority 101 | |
| unicast_src_ip 20.0.0.37 | |
| unicast_peer { | |
| 20.0.0.95 | |
| } | |
| authentication { | |
| auth_type PASS | |
| auth_pass oqjbPcORUogJzjq | |
| } | |
| track_script { | |
| chk_gw | |
| chk_dhclient | |
| chk_sshd | |
| chk_lb | |
| } | |
| notify_master /usr/local/sbin/update-EIP2.sh | |
| } |
The EIP helper scripts, update-EIP1.sh.j2 and update-EIP2.sh.j2, while rather complicated in the template form, render into very simple shell scripts. This, for example, is the update-EIP1.sh script:
| #!/bin/bash | |
| EIP="54.85.110.20" # EIP1 | |
| ENI_ID="eni-0edecb9ddf8dba687" # ENI local | |
| ALLOCATION_ID="eipalloc-09548cd798b1cd798" # EIP1 ID | |
| PRIVATE_IP="20.0.0.170" | |
| export AWS_DEFAULT_REGION="us-east-1" | |
| timeout 60 aws ec2 associate-address --allow-reassociation --allocation-id "$ALLOCATION_ID" --network-interface-id "$ENI_ID" --private-ip-address "$PRIVATE_IP" |
The script will reassign an EIP with a specific ID to the current load balancer’s local ENI using a specific private IP address.
The End Result
Once these Ansible roles are executed, you’ll have two HAProxy Enterprise load balancers that accept traffic directly over publicly routed Elastic IP addresses. Remember to update your DNS settings to point to both EIPs. If a fatal error occurs with either HAProxy instance—which includes networking, kernel and service-related issues—the remaining live instance will reclaim the remote EIP automatically. Once the original load balancer recovers, the EIP will return to it automatically.
For example, here’s a screenshot of the two load balancers running healthily:
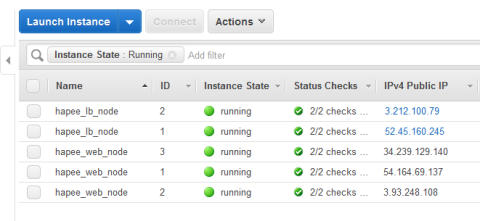
When both load balancers are up, each owns its EIP
However, when I manually stop one, the other takes over its EIP:
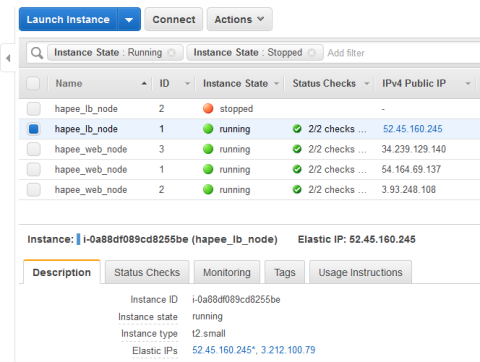
When a load balancer is down, the other takes its EIP
Remember to use terraform destroy to tear down the resources in AWS when you no longer need them so you don’t get charged for the usage.
Conclusion
This concludes our HAProxy Enterprise Keepalived HA example. As a reminder, all of the example code is available and contains the complete Terraform and Ansible configurations. Use the provided source code to build your own HAProxy AWS deployment. Any contributions are encouraged!
Please leave comments below! Contact us to learn more about HAProxy Enterprise or sign up for a free trial. You can also join the conversation on Slack and follow us on Twitter. HAProxy Enterprise combines HAProxy, the world’s fastest and most widely used, open-source load balancer and application delivery controller, with enterprise-class features, services and premium support.
Subscribe to our blog. Get the latest release updates, tutorials, and deep-dives from HAProxy experts.

![Using HAProxy as an API Gateway, Part 3 [Health Checks]](https://cdn.haproxy.com/img/containers/partner_integrations/image2-2-%281%29.png/5ef4ef148b968f89804293c3d44312e7/image2-2-%281%29.png)
