In his HAProxyConf 2019 presentation, Chad Lavoie (Director of Support, HAProxy Technologies) describes how to get started and how to build tools that integrate with the API. He demonstrates how to configure a frontend and backend in HAProxy, and then how to modify a configuration using the API. Use the HAProxy Data Plane API to configure your load balancer using HTTP REST commands.
Watch Chad’s presentation video or read the transcript below.
Explore more HAProxyConf 2019 talks in our User Spotlight Series.
Transcript
I’m going to be talking about the programmatic API for HAProxy, or the Data Plane API, which basically is a way. Currently, you have an HAProxy configuration file either built by template or by hand and you have all sorts of configuration systems that need to be able to modify it. So, you need to have some way to actually do that and so you need an HTTP-based system in order to do it.

A lot of people here have already written some form of API which can modify, typically through a template of HAProxy. But if you’re using something like TensorFlow to analyze your images and turn them into HAProxy configurations, you’re probably going to need something a little bit more complicated to keep up with the latest buzzwords!
It’s especially useful if you’re in a containerized system, where you do not have direct SSH access to all of your services in order to send the latest configurations over and update them. This will allow you to do it with a username and password or SSL certificate authentication – instead of having to be able to get shell access just to modify a config or have them all check in with Puppet, that type of thing.
It’s useful for clustering, although this for now only talks to a single HAProxy instance. You can use it to configure a canary HAProxy server and then if the configuration passes, you then send it off to the rest of them. Or you can do a number of [them], or just have a script, which configures your entire cluster.
A RESTful API to Configure HAProxy
What exactly is the Data Plane API? It’s basically a RESTful API to configure HAProxy. Basically, any configuration that you can write by hand, be it SSL cipher bind lines or rate-limiting, can be done via the Data Plane API.

It will integrate very well with . If you’re using an AI in order to generate your configuration and your is growing in the wrong direction and makes an invalid HAProxy configuration, the API will nicely not allow it to actually deploy the broken configuration and instead wait for a fixed one.
It’s written in Golang, so it’s nice and easy to add additional features to and if you search for HAProxy Data Plane API via Google or similar search engines, you will find the GitHub project and documentation for it. The documentation contains most of what I will talk about here.
It reads and writes the generic HAProxy configuration so you do not need specific tags like comments you’ve seen if you’re familiar with the ALOHA, where you need comments in order for it to see the configuration. This will modify directly to an actually handwritten HAProxy configuration in addition to automated configuration. To use it, it is an OpenAPI interface so you can use an OpenAPI code generator or, it’s a RESTful interface so you can write to a simple shell script to make these calls or use a Python application, etc. It’s pretty simple.
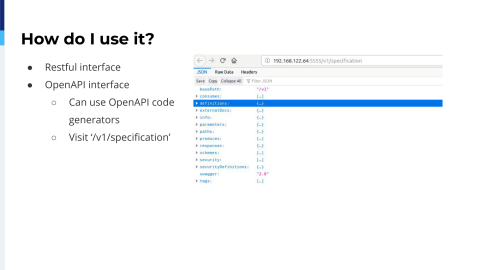
Therefore, I would not recommend using /v1/specification for actually figuring out how to use it. The documentation is relatively well written and is far better than this. But if you visit, you can visit /v1/specification to get the JSON output which, if you open in Firefox, will give you a nice tree of the various endpoints that you can call. If you open in Chrome you’ll get three pages of JSON which will cause you to no longer to want to use it! So don’t do that.
An Easy Way to Get Started

In order to run the Data Plane API, the easiest way to do it is to use the new program directive in HAProxy 2.0 which lets you start up utilities from the master process of HAProxy. In this particular case, it’s a relatively straightforward set of arguments. Most of this is pretty much straight from the documentation, nothing particularly interesting. Just the host, the port, the configuration file, the socket to talk to, the binary, how to reload it; Pretty much a copy and paste from the docs. And username and password, which the API will use to actually allow you to talk to it.
Now we’re going to go through a quick overview of exactly how to configure a service using the Data Plane API. A lot of this is a bunch of curl commands which I’m running on the command line to show how this actually works. Usually, this is going to be done through some form of scripting, but if you’re just writing, if you just want to make one-off trigger changes like adding rate limiting to your services, if Prometheus is detecting a high request rate, you can very easily write a shell script to make these calls without too much trouble.

The first thing you want to do is get the configuration version. Notably, this is also a way to get a list of frontends. You just give it with the username and password, point to the URL, and /configuration/frontends will give you a list of all of the frontends and the basics of them. Again, ones you’ve written by hand as well as ones you’ve added by the API or ones that have been added by a template system. And the _version tells you the version number and what you need to know in order to actually proceed with this. There is also, obviously, a way to get backends, get global settings – whatever information you’re seeking.
Transaction System
Then, next, there’s a transaction system. You do not have to use the transaction system in order to actually use the Data Plane API. All of these various options have a non-transaction equivalent that works exactly the same way; but a transaction is useful if you are bundling all of your configurations together and you’re, say, adding a full new service like I’m doing in this example where I want to do everything all at the same time instead of making a whole bunch of independent requests and adding configuration fragments.
So you just make a request: Post a request of the transaction with the version number that you want and you will get an ID back which you will use; and, of course, there’s a way you can view all your existing transactions, cancel them, and we’ll get into what happens if a transaction does not succeed, in a second.
Create a Backend with Servers

Then you create a backend – relatively straightforward. You will notice that there are no server lines in this particular request. That is because we’re going to add them in a minute, which is very useful if you have a situation where you just want to add a backend to an existing or add a server to an existing backend via an automated method, and you do not want to have to go through recreating your entire backend or respecifying all your backend settings in order to do it. But, all of your usual load balancing methods are available, or health check methods are available, via this API to set up your backend the same as you would if you wrote it by hand.

Next, we will add a server to the new backend. This is a little bit more complicated as there are a number of different options you can use in this. This is just a way to add a single server. If you want to add say ten servers, you can do that using an array of servers. So, you can add a whole bunch at the same time with a single request or you can just add a single server. This works the same way as if you’re doing it to an existing backend or to a new one as part of a transaction. And you can specify the usual SSL options if you want to talk to your backend over SSL, restrict ciphers, all that fun stuff is available here as well.
Create a Frontend and a Bind Line

Next, we’re going to create a frontend, which is again, with the exception of not having a binding line or any use_backend lines, it has the general configuration for what backend to talk to and the usual configurations. If you want to do things like add rules based upon what URL, there is an API you can use to add pretty much any command, option, routing to the frontend that you are seeking.
Next, you will want to add servers to this backend. For some reason, it appears to have, or I took out my slide about adding a backend to the API. But, it is relatively straightforward to add a backend.
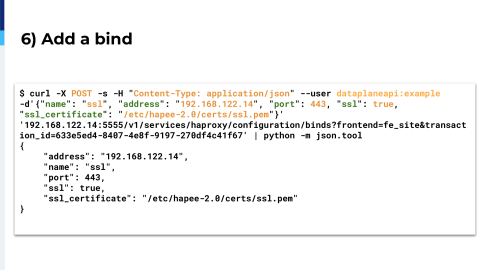
It pretty much is: Add a bind line, rather, which allows you to specify the certificate name that you want to add, the address, the port and you can do the usual bind stuff and, in addition to this, you can of course also go to the global section and add to the usual bind ciphers with this. You do not have to specify your exact cipher preferences on the bind line. But, this API allows you to do anything you would seek to do! And, as there are already a whole lot of various APIs available, you can just replace any of your existing APIs with this API.
Commit the Transaction
Then when you’re done, you will commit the transaction. It’s again, relatively simple if you’re doing this with individual requests, it would commit automatically. But in this case, it will just tell you if it is successful or not. If it is not successful, it prints a very useful error message out at the end of it which will tell you exactly what went wrong and what is wrong with the config. So, you can hopefully make some sense of it. Or if you’re just doing it from a GUI, tell the user that or highlight the appropriate field that it’s complaining about and hopefully repair the issue. Useful again if you’re doing something like a canary deployment where you have a script which is fixing a – which is making a change – and instead of doing it to your entire cluster where – hopefully the configuration is not going to fail partway through – it’s relatively reliable and I’ve had no problems doing deployments without complaints.