Users and passwords
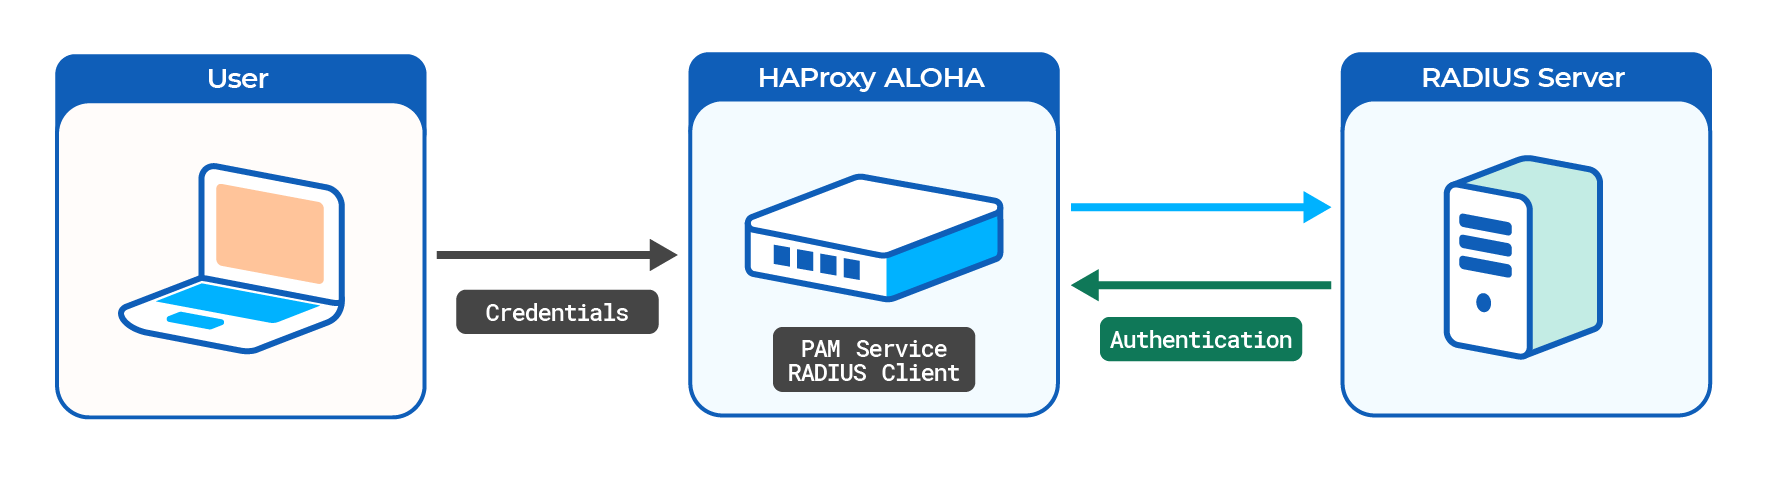
RADIUS authentication
Available since
- HAProxy ALOHA 12.5
System administrators can authenticate to HAProxy ALOHA through an external RADIUS server for administration or monitoring purposes.
You can, for example, implement the following list of access rights:
| Alice | Bob | Carol | Dave | |
|---|---|---|---|---|
| Web interface | admin |
admin |
admin |
monitor |
| SSH | admin |
admin |
||
| Serial port | admin |
Configure the RADIUS server Jump to heading
In this example, we will authenticate users through the traditional RADIUS users file. Alternatively, the RADIUS server can query an LDAP server.
We will use a FreeRADIUS 3.0 server.
-
Follow the FreeRADIUS Getting Started guide to install FreeRADIUS on a server.
-
Add your HAProxy ALOHA appliance as a new RADIUS client in the FreeRADIUS client configuration file,
/etc/freeradius/3.0/clients.conf./etc/freeradius/3.0/clients.confclient aloha { # The ALOHA IP address ipaddr = 192.168.1.38 # Secret shared between the RADIUS server and ALOHA secret = saUz@w7!iwfa # Do not require the Message-Authenticator field require_message_authenticator = no # Transport protocol proto = udp # Network Access Server type for ALOHA nas_type = other }/etc/freeradius/3.0/clients.confclient aloha { # The ALOHA IP address ipaddr = 192.168.1.38 # Secret shared between the RADIUS server and ALOHA secret = saUz@w7!iwfa # Do not require the Message-Authenticator field require_message_authenticator = no # Transport protocol proto = udp # Network Access Server type for ALOHA nas_type = other }Caution
Change the
secretstring. -
Add usernames and passwords to the RADIUS user authorization file,
/etc/freeradius/3.0/mods-config/files/authorize./etc/freeradius/3.0/mods-config/files/authorizealice Cleartext-Password := "TmjRDl61NuiA" bob Cleartext-Password := "AIQols16y1R6" carol Cleartext-Password := "Jb4cWp70D94u" dave Cleartext-Password := "Jkxv:Qoc;p4@"/etc/freeradius/3.0/mods-config/files/authorizealice Cleartext-Password := "TmjRDl61NuiA" bob Cleartext-Password := "AIQols16y1R6" carol Cleartext-Password := "Jb4cWp70D94u" dave Cleartext-Password := "Jkxv:Qoc;p4@"You can also limit how a user can log into HAProxy ALOHA to one of the following methods:
Login method ID Description wuiLog in via the web UI. sshdLog in via SSH. loginLog in via a local keyboard or serial login. Add a
NAS-Identifierparameter to set the login allowed, for example:/etc/freeradius/3.0/mods-config/files/authorizecarol Cleartext-Password := "Jb4cWp70D94u", NAS-Identifier == "wui"/etc/freeradius/3.0/mods-config/files/authorizecarol Cleartext-Password := "Jb4cWp70D94u", NAS-Identifier == "wui" -
Restart the RADIUS server.
nixsudo systemctl restart freeradiusnixsudo systemctl restart freeradiusTo test your setup, start the RADIUS server in debug mode.
Configure HAProxy ALOHA Jump to heading
On the HAProxy ALOHA server:
-
Edit the file
/etc/security/pam_radius.conf. -
Select the Tools tab, then use the File manager to browse to the
/etc/securityfolder and edit the filepam_radius.conf. -
Add your RADIUS server. Use the same
secretstring you specified in the FreeRADIUS client configuration file.# RADIUS Server[:Port] Shared Secret [Timeout (s)] [source_ip] [vrf] 192.168.1.69 saUz@w7!iwfa 60# RADIUS Server[:Port] Shared Secret [Timeout (s)] [source_ip] [vrf] 192.168.1.69 saUz@w7!iwfa 60 -
Edit the file
/etc/security/users.conf. -
Select the Tools tab, then use the File manager to browse to the
/etc/securityfolder and edit the fileusers.conf. -
Add the same users that you defined on the RADIUS server, specifying the following for each:
auth_typeofradius- Optional:
serviceset towui,sshd, orlogin. This is another way restrict how a user can log in, rather than setting it in the FreeRADIUSauthorizefile. allowordenyto enable or disable this user’s loginmap_to_userset to eitheradminfor read/write access ormonitorfor read-only access.
For example, these directives implement the example access rights listed at the top of this page.
 user=alice      auth_type=radius                  : allow map_to_user admin
 user=bob        auth_type=radius service=wui,sshd : allow map_to_user admin
 user=carol      auth_type=radius service=wui      : allow map_to_user admin
 user=dave       auth_type=radius service=wui      : allow map_to_user monitor

 :deny
user=alice auth_type=radius : allow map_to_user admin user=bob auth_type=radius service=wui,sshd : allow map_to_user admin user=carol auth_type=radius service=wui : allow map_to_user admin user=dave auth_type=radius service=wui : allow map_to_user monitor :denyCaution
The
:denyentry must be the last in the file. HAProxy ALOHA evaluates entries from top to bottom. All entries after:denyare ignored. -
In the
Servicestab, click pam setup.
-
Add RADIUS support to the PAM service.
haproxyservice pamautostartradius_auth 1haproxyservice pamautostartradius_auth 1Tip
To get more verbose logs for easier troubleshooting, specify
debug 1as well. -
Apply your changes to the PAM configuration.

-
Restart the PAM service.

-
Save your configuration from the Setup tab.
You can also launch the following commands from a terminal:
nixsudo config set pam ldap_auth 1sudo config set pam autostartsudo service pam restartnixsudo config set pam ldap_auth 1sudo config set pam autostartsudo service pam restart
You can now test logging in to the web UI with various credentials.
Reference Jump to heading
RADIUS clients.conf syntax Jump to heading
| Attribute | Description | Example |
|---|---|---|
client |
Name of your HAProxy ALOHA appliance (the new RADIUS client, or NAS). | aloha |
ipaddr |
IP address of your HAProxy ALOHA appliance. | 192.168.1.38 |
secret |
Shared secret used to encrypt the user’s password between your HAProxy ALOHA appliance (the RADIUS client, or NAS) and the Ubuntu VM (the RADIUS server). You will specify this secret on your HAProxy ALOHA appliance, in /etc/security/pam_radius.conf. |
|
require_message_authenticator |
no: allows the RADIUS server to require a Message-Authenticator. |
HAProxy ALOHA pam_radius.conf syntax Jump to heading
| Parameter | Description | Default | Requiredness |
|---|---|---|---|
server[:port] |
IP address:port of your RADIUS server, in this case, the Ubuntu VM. Surround IPv6 addresses with square brackets. | Default port name: radius, looked up from /etc/services/ |
Mandatory. Port name is optional. |
secret |
The shared secret you specified in /etc/freeradius/3.0/clients.conf on the Ubuntu VM. |
Mandatory | |
timeout |
Number of seconds the module waits for the server to respond. Mandatory. 3 to 60 seconds. | 3 seconds. | Mandatory |
source_ip |
Makes PAM bind the socket that connects to a given server to a given IP address. | none | Optional |
vrf |
Make PAM bind the socket that connects to a given server to a given VRF. | none | Optional |
HAProxy ALOHA users.conf syntax Jump to heading
Each line in the users.conf file comprises at least one filter and one action.
<FILTERS>:<ACTIONS>
<FILTERS>:<ACTIONS>
You can specify multiple comma-separated filters and actions on the same line.
Filters Jump to heading
user
| Value | Description |
|---|---|
| Comma-separated list of usernames | Example: user=user1,user2 |
*, or no filter |
Actions will apply to all users. |
auth_type
| Value | Description |
|---|---|
radius |
Users authenticate against a RADIUS server. |
map_to_user
| Value | Description |
|---|---|
admin |
Grant administration rights. |
monitor |
Grant monitor rights. |
| Any Linux user on HAProxy ALOHA | Map user to another user. |
service
| Value | Description |
|---|---|
wui |
Log in via the web UI. |
sshd |
Log in via SSH. |
login |
Log in via a local keyboard or serial login. |
Actions Jump to heading
allow
Grant access.
deny
Forbid access.
map_to_user
| Value | Description |
|---|---|
admin |
Grant administration rights. |
monitor |
Grant monitor rights. |
| Any Linux user on HAProxy ALOHA | Map user to another user. |
See also Jump to heading
Do you have any suggestions on how we can improve the content of this page?