Getting started
Set up HAProxy ALOHA using the configuration wizard
This page applies to:
- HAProxy ALOHA - all versions
You can use the Wizard tab to set up the network configuration of HAProxy ALOHA.
Will erase settings
Running the wizard will erase all previous network settings you have already saved.
On the web user interface, click the Wizard tab. Then click Next to start, or Cancel to quit.
Configure network interfaces Jump to heading
Use the Physical interfaces screen to configure the HAProxy ALOHA network adapters so that they are compatible with the switches and computers on your network.
-
Select the network speed (Auto / 10 / 100 / 1000 Mbps) to match the supported speed of your network.
-
Select negotiation mode (Auto / half duplex / full duplex).
-
Optional: Write a description for the interface.
-
Click Next to go to the next step.
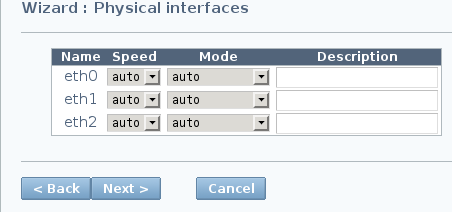
The number of interfaces may vary with the appliance model or the number of virtual network interfaces configured in a virtual appliance.
Configure link aggregation Jump to heading
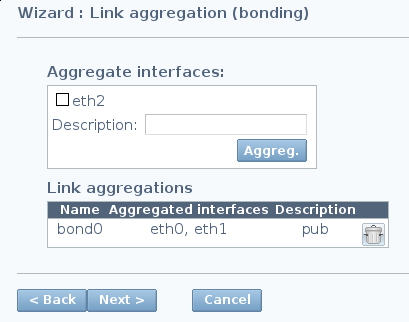
Use the Link aggregation screen to aggregate two or more network interfaces. If you do not need to create an aggregate, click Next to go to the next step.
-
Check the network interfaces to aggregate.
-
Type a description for the aggregation.
-
Click Aggreg. The result should looks like the image below:
-
Repeat these steps to aggregate a different group of interfaces if required.
-
Click Next to go to the next step. The default aggregation mode is active-backup.
Configure membership in a VLAN Jump to heading
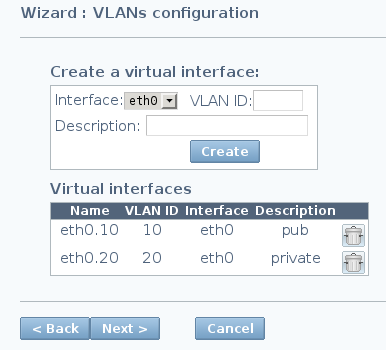
Use the VLANs configuration screen to join HAProxy ALOHA to a virtual local area network (VLAN). If you do not need to join a VLAN, click Next to go to the next step.
-
Choose the network interface on which you want to create a virtual interface.
-
Type the VLAN ID that you configured on your switch.
-
Optional: Type a short description for this virtual interface.
-
Click Create.
The result should look like the image below:
-
Repeat these steps to create other virtual interfaces connected to VLANs.
-
Click Next to go to the next step.
Configure static IP addresses Jump to heading
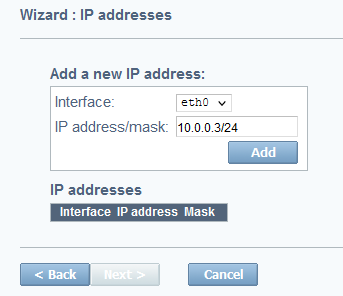
Use the IP addresses screen to assign static IP addresses to HAProxy ALOHA. This step is mandatory and you must add at least one address, even if it is only an address used to reach the HAProxy ALOHA web user interface. In the case of the virtual appliance, you can use this to replace the dynamically assigned address that HAProxy ALOHA was given on first install.
-
Choose the network interface that you want to configure.
-
Set the IP address/subnet mask, using the format:
aaa.bbb.ccc.ddd/mm. -
Click Add. The result should look like the image below:
-
Repeat these steps as required to assign more static IP addresses.
-
Click Next to go to the next step.
Configure IP routes Jump to heading
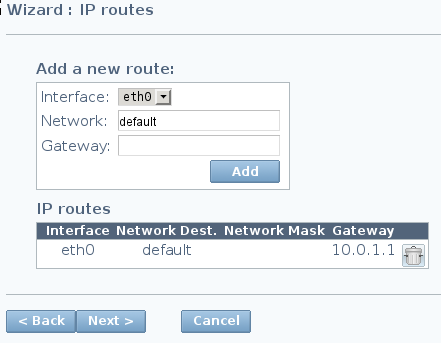
Use the IP routes screen to add network routing information to HAProxy ALOHA. In a production environment, you should, at a minimum, configure the default gateway route that will be used to reach users and servers that are located on a different subnet.
-
Choose a network interface through which you will send traffic destined for the specified network.
-
For Network, enter the subnetwork. Use one of the following values:
- A network prefix followed by a CIDR, e.g.
192.168.1.0/24. - A network prefix followed by a subnet mask, e.g.
192.168.1.0/255.255.255.0. - The special value
default, which means the default gateway.
- A network prefix followed by a CIDR, e.g.
-
For Gateway, enter the destination IP address.
-
Click Add.
The result should look like the image below:
-
Repeat these steps as required to set more routes.
-
Click Next to go to the next step.
Configure high availability Jump to heading
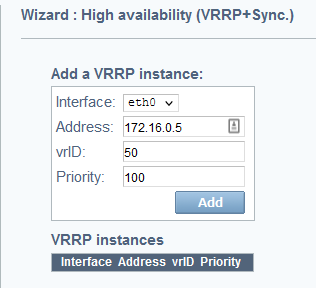
Use the High availability screen to enable active-standby mode between two HAProxy ALOHA instances and create virtual IP addresses (VIPs) for your application services. If the primary HAProxy ALOHA loses connectivity, the VIP will automatically migrate to the standby HAProxy ALOHA and continue serving traffic.
-
Choose the interface on which you would like to create the VIP.
-
Enter the virtual IP address that you wish to create on the network. Be sure to use the same value when configuring this VIP on the standby HAProxy ALOHA instance.
-
The vrID is the virtual router ID. Choose an integer between 0 and 255 and be sure to use the same value when configuring the standby HAProxy ALOHA instance in order to pair them.
This ID must be unique on your network.
-
The Priority sets whether this HAProxy ALOHA instance should be the primary or standby instance. Choose an integer between 1 and 254, making sure that the primary instance has a higher number than the standby.
Next, enable synchronization of the load balancer configuration between the two HAProxy ALOHA instances.
-
Choose HAProxy ALOHA instance’s role in the cluster:
Active(primary) orPassive(standby). -
Set Local address to the IP address that should be used for synchronization.
-
Set Remote address to the IP address of the peer HAProxy ALOHA instance.
-
Click Next to go to the next step.
Configure management Jump to heading
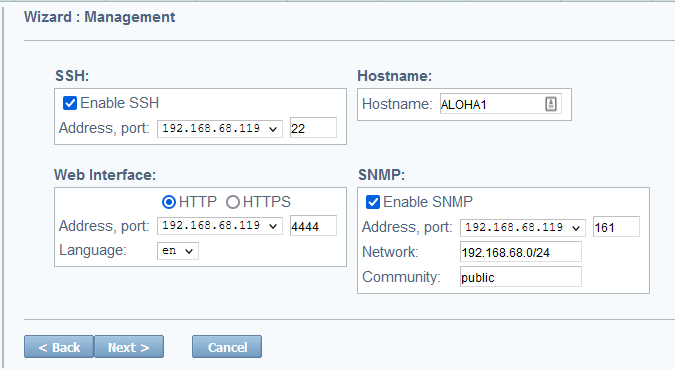
Use the Management screen to configure access to the server and web user interface, set the server’s hostname, and enable SNMP monitoring.
-
In the SSH section, check the Enable SSH box to enable SSH to HAProxy ALOHA server. You can also change the SSH port or keep the default value, 22.
-
In the Hostname section, you can assign a different server hostname.
-
In the Web Interface section, you can enable access to the web user interface over either HTTP or HTTPS. You can also restrict the IP address where the UI is hosted. It defaults to all IP addresses (denoted with an asterisk). You can also change the display language of the UI to either
enfor English orfrfor French.The protocol and the port for the web UI must be the same for both HAProxy ALOHA instances in a cluster.
-
In the SNMP section, enable Simple Network Management Protocol (SNMP) to allow an SNMP management server to collect device data from this HAProxy ALOHA instance. The configuration wizard supports SNMPv2c only. To use SNMPv3, edit the snmpd service on the Services tab later. See the SNMP topic.
- Check the Enable SNMP box.
- Set the IP address and port on which HAProxy ALOHA should accept SNMP requests. You can also set this to an asterisk to listen on all IP addresses assigned to the server.
- For Network, enter a subnetwork to restrict the IP addresses from which SNMP requests are allowed to originate. Set this to a network prefix and CIDR, such as
192.168.1.0/24. - For Community, enter a community string. This serves as a shared password that the SNMP management server must send with its request.
-
Click Next to go to the next step.
Display the summary Jump to heading
This last step in the configuration wizard summarizes the completed steps and allows you to apply them.
- Click Apply to install the configuration.
Do you have any suggestions on how we can improve the content of this page?