Tutorials
A step-by-step tutorial to set up HAProxy Enterprise using Docker for the first time
Welcome to the tutorial on getting started with HAProxy Enterprise using Docker.
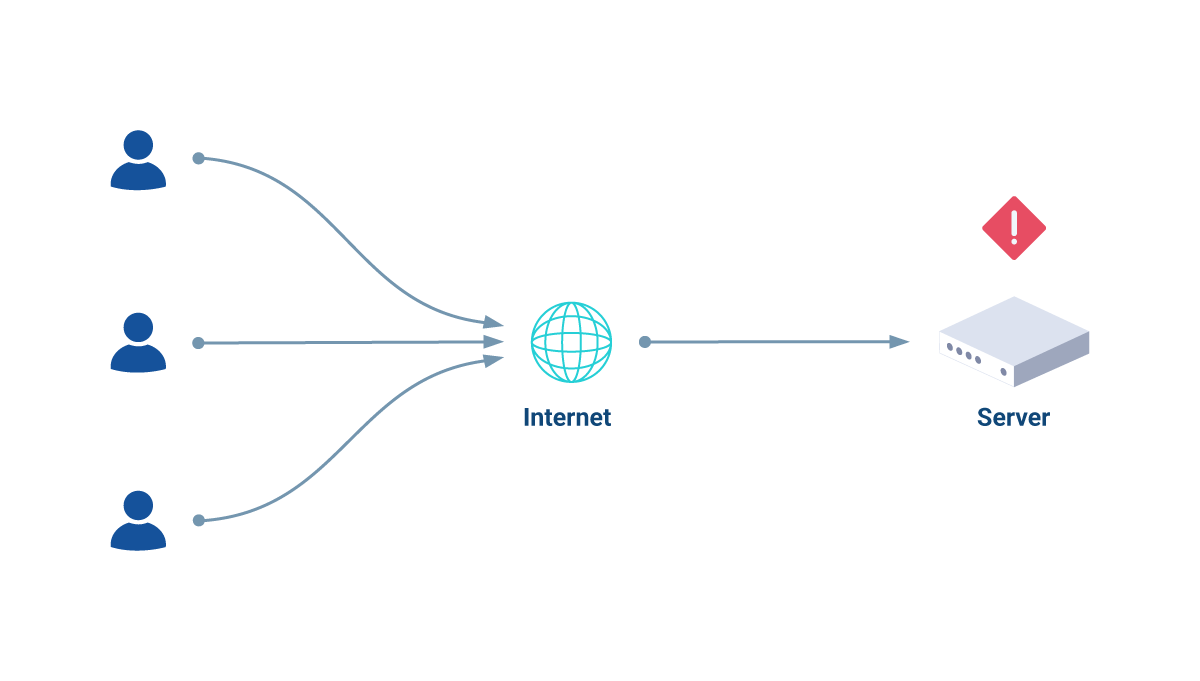
In this tutorial, you will walk through an example use case and set up HAProxy Enterprise in a development environment. Your use case involves end-users wanting to access your website. There’s just one problem: only one web server is handling all the web traffic right now, and there are signs of it being overwhelmed.

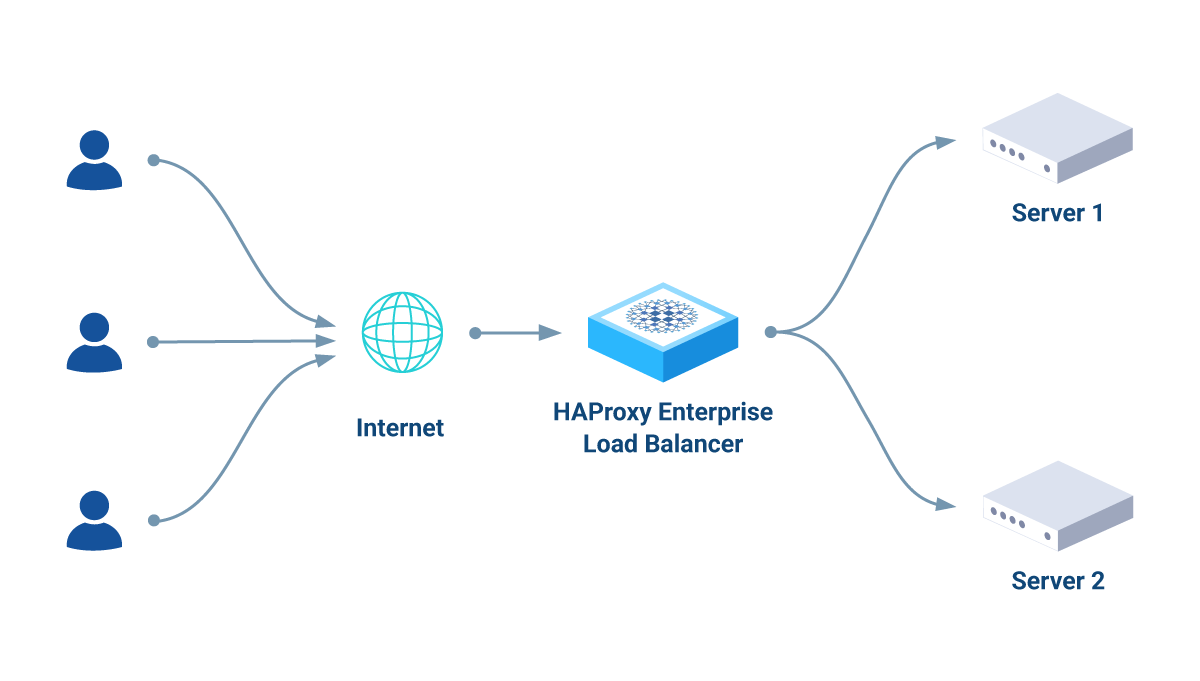
Your website is gaining popularity, and it’s time to scale. You have been tasked with implementing a load balancer between the end-users and two identical web servers. A load balancer will distribute requests evenly so that the two web servers share the work. Your goal is to have an HAProxy Enterprise load balancer handle all the web traffic being sent from end-users and forward that traffic to your web servers.

You will see some code examples throughout this tutorial. These code examples are designed to offer real-world, working code as a place to start implementing HAProxy Enterprise.
The following steps will walk you through setting up HAProxy Enterprise with Docker.
Step 0 - Check your prerequisites Jump to heading
You must have access to a stable internet connection and a computer with Docker Desktop installed (installation instructions here).
Docker is an open platform for developing, shipping, and running applications using containers. Containers are lightweight, standalone, executable packages of software that include everything you need to run an application (which can include code, runtime, system tools, system libraries, and settings). You will use Docker to get an HAProxy Enterprise Docker container up and running.
Open a Terminal session. Create a directory called hapee-tutorial in your preferred location, and change directory into it:
nixmkdir hapee-tutorialcd hapee-tutorial
“hapee” stands for “HAProxy Enterprise Edition”
You are ready to continue to Step 1 if you have a trial license key.
Don’t have one? Request a free HAProxy Enterprise trial to obtain your trial license key. Once you have one, return here and continue to Step 1.
Step 1 - Obtain an HAProxy Enterprise Docker image Jump to heading
A Docker image is a standardized package that includes all of the files, binaries, libraries, and configurations to run a container. The haproxy-enterprise image hosts HAProxy Enterprise, and you can obtain it by using Terminal.
Log into the hapee-registry.haproxy.com Docker registry using your HAProxy Enterprise license key as both the username and password:
nixdocker login https://hapee-registry.haproxy.com
If login is successful, you will see the following message: Login Succeeded.
Pull the HAProxy Enterprise image:
nixdocker pull hapee-registry.haproxy.com/haproxy-enterprise:3.2r1
outputtext3.2r1: Pulling from haproxy-enterprise00d67a470c5: Pull complete6bb6daa6e42b: Pull complete49543f4059: Pull complete51b3f827b3e5: Pull completeDigest: sha256:bd32fa7e4b0a2e8da4a3c1ecf66c125868f8f86bc65fe44a2f860a3d2331gStatus: Downloaded newer image for hapee-registry.haproxy.com/haproxy-enterprise:3.2r1hapee-registry.haproxy.com/haproxy-enterprise:3.2r1
You have obtained an HAProxy Enterprise Docker image.
Step 2 - Create an HAProxy Enterprise configuration file Jump to heading
An HAProxy Enterprise configuration file stores settings for an HAProxy Enterprise load balancer. This is where you will make changes to the load balancer so that it can fit your needs.
Create a directory for the HAProxy Enterprise load balancer and change directory into it:
nixmkdir hapee-3.2cd hapee-3.2
In the hapee-3.2 directory, create an HAProxy Enterprise configuration file called: hapee-lb.cfg.
Open the configuration file with your preferred text editor and insert the following code:
nix#---------------------------------------------------------------------# Process global settings#---------------------------------------------------------------------globalstats socket /var/run/hapee-3.2/hapee-lb.sock user hapee-lb group hapee mode 660 level adminlog stdout format raw local0 info#---------------------------------------------------------------------# Common defaults that the 'backend' section will# use if not designated in their block#---------------------------------------------------------------------defaultsmode httplog globaltimeout connect 10stimeout client 300stimeout server 300s#---------------------------------------------------------------------# main frontend which forwards to the backend#---------------------------------------------------------------------frontend fe_mainbind :80 # direct HTTP accessdefault_backend web_servers#---------------------------------------------------------------------# default round-robin balancing in the backend#---------------------------------------------------------------------backend web_serversbalance roundrobinserver s1 172.16.0.11:80 checkserver s2 172.16.0.12:80 check
Save and close this file. You configured your first HAProxy Enterprise configuration file!
Detailed explanation of this HAProxy Enterprise configuration file
What does each line of your configuration file do?
nixglobal
nixglobal
The global section defines parameters for process-wide security and performance tunings. See Global.
nixstats socket /var/run/hapee-3.2/hapee-lb.sock user hapee-lb group hapee mode 660 level admin
The stats socket parameter enables the HAProxy Runtime API.
nixlog stdout format raw local0 info
The log parameter enables logging. To understand how logging works, see Manage HAProxy Enterprise logs.
nixdefaults
nixdefaults
The defaults section helps reduce code duplication by applying its settings to all of the frontend and backend sections that come after it. See Defaults.
nixmode http
nixmode http
Sets HTTP as the running mode for the load balancer, as opposed to TCP or UDP. See HTTP, TCP, and Load balance UDP with HAProxy Enterprise.
nixlog global
nixlog global
This setting tells each subsequent frontend to use the log setting defined in the global section.
nixtimeout connect 10stimeout client 300stimeout server 300s
timeout connect sets the amount of time that HAProxy will wait for a connection to a backend server to be established. timeout client sets how long to wait during client inactivity. The timeout server sets how long to wait for backend server inactivity. See Timeouts.
nixfrontend fe_main
nixfrontend fe_main
You are defining a frontend with the name fe_main. This section defines the IP addresses and ports that clients can connect to. See Frontends.
nixbind :80 # direct HTTP access
A bind setting assigns a listener to localhost:80. See Bind options.
nixdefault_backend web_servers
The default_backend setting will send traffic to the specified backend called web_servers. See Backends.
nixbackend web_serversbalance roundrobinserver s1 172.16.0.11:80 checkserver s2 172.16.0.12:80 check
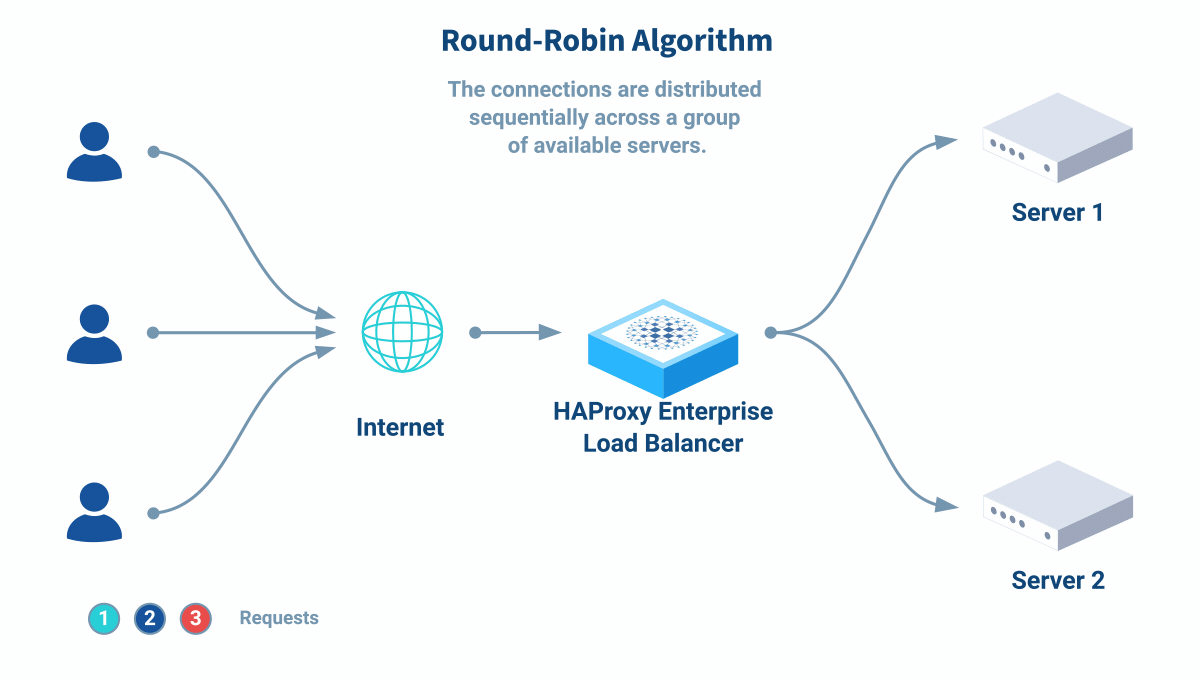
The backend section you named web_servers defines two web servers to handle requests with a round-robin algorithm (see other available algorithms in Change the load balancing algorithm). You have specified an IP address for each web server. The check argument monitors a server to check if it’s healthy; see HTTP health checks.
Step 3 - Create an index.html file for each web server
Jump to heading
To demonstrate request traffic being sent to web servers in your development environment, you will create two Apache HTTP servers with Docker. Apache is an open-source HTTP web server application. By creating an index.html file for each web server, you will visualize the request traffic that end-users will send to your web servers and how HAProxy Enterprise handles those requests.
Back in the hapee-tutorial directory, create a directory for the first web server and change directory into it:
nixcd ..mkdir public-html-web1cd public-html-web1
Create an HTML file called index.html, and insert the following HTML code into that file:
nix<html><body><h1>It works! Web server 1 received your request this time.</h1></body></html>
Save and close the file. Move back to the hapee-tutorial directory and repeat the steps for the second web server:
nixcd ..mkdir public-html-web2cd public-html-web2
Create an HTML file called index.html, and insert the following HTML code into that file:
nix<html><body><h1>It works! Web server 2 received your request this time.</h1></body></html>
Note how this text says “Web server 2” instead of “Web server 1”. Save and close this file. You’ve created an index.html file for each web server.
Step 4 - Docker Compose Jump to heading
Docker Compose is a tool for configuring and running many Docker containers at once. Compose makes development easier with the use of a single YAML configuration file. You’ll use it to start, stop, and rebuild services with Docker.
Move back to the hapee-tutorial directory:
nixcd ..
nixcd ..
Create a YAML file called docker-compose.yml, and insert the following code:
nix---networks:my_custom_network:driver: bridgeipam:config:- subnet: 172.16.0.0/16gateway: 172.16.0.1services:hapee-3.2:image: hapee-registry.haproxy.com/haproxy-enterprise:3.2r1ports:- "80:80"volumes:- "./hapee-3.2:/etc/hapee-3.2"networks:my_custom_network:ipv4_address: 172.16.0.10container_name:hapee-3.2web1:image: httpdvolumes:- "./public-html-web1:/usr/local/apache2/htdocs/"networks:my_custom_network:ipv4_address: 172.16.0.11container_name:web1web2:image: httpdvolumes:- "./public-html-web2:/usr/local/apache2/htdocs/"networks:my_custom_network:ipv4_address: 172.16.0.12container_name:web2
Save and close this file. You have now created a Docker Compose YAML file.
Detailed explanation of this Docker Compose YAML file
What does each line of your YAML file do?
nixnetworks:
nixnetworks:
Docker Compose will set up a single network for your services to communicate with each other.
nixmy_custom_network:driver: bridge
Compose will create a bridge network named my_custom_network that will connect the load balancer and two web servers all on one network. A bridge network is a software bridge that allows containers connected to the same bridge network to communicate. In turn, that means it provides isolation from other containers that are not connected to the bridge network.
nixipam:config:- subnet: 172.16.0.0/16gateway: 172.16.0.1
ipam will specify a custom IPAM configuration in my_custom_network. config will contain a configuration element with a subnet in CIDR format to represent a network segment and a gateway of IPv4 for the subnet.
nixservices:hapee-3.2:image: hapee-registry.haproxy.com/haproxy-enterprise:3.2r1ports:- "80:80"volumes:- "./hapee-3.2:/etc/hapee-3.2"networks:my_custom_network:ipv4_address: 172.16.0.10container_name:hapee-3.2web1:image: httpdvolumes:- "./public-html-web1:/usr/local/apache2/htdocs/"networks:my_custom_network:ipv4_address: 172.16.0.11container_name:web1web2:image: httpdvolumes:- "./public-html-web2:/usr/local/apache2/htdocs/"networks:my_custom_network:ipv4_address: 172.16.0.12container_name:web2
The services section defines the three different containers Docker will create: a hapee-3.2 HAProxy Enterprise load balancer and two Apache web servers, web1 and web2.
The image lines will run services using a pre-built image, and you are specifying their image locations.
ports is used to map a container’s port to the host machine.
volumes is used to mount disks in Docker. In this development environment, the hapee-tutorial directory will contain the mounted disks.
networks connect the my_custom_network bridge network with each service on their own IP addresses as specified.
container_name is where you specify the name of the container for Docker.
Run Docker Compose from the hapee-tutorial directory:
nixdocker compose -f "docker-compose.yml" up -d --build
outputtext[+] Running 8/8web1 Pulled 4.9sweb2 Pulled 4.9sefc2b5ad9eed Pull complete 2.7sfc31785eb818 Pull complete 2.7s4f4fb700ef54 Pull complete 2.8sf214daa0692g Pull complete 2.9s05383fd8b2b4 Pull complete 3.3s88ad12232aa2 Pull complete 3.3s[+] Running 4/4Network hapee-tutorial_my_custom_network Created 0.0sContainer hapee-3.2 Started 0.9sContainer web1 Started 0.9sContainer web2 Started 0.7s
Verify that Docker Compose has created and started your containers:
nixdocker ps
nixdocker ps
outputtextCONTAINER ID IMAGE COMMAND CREATED STATUS PORTS NAMESe12f4825e548 httpd "httpd-foreground" 4 seconds ago Up 3 seconds 80/tcp web2e83f7965c044 hapee-registry.haproxy.com/haproxy-enterprise:3.2r1 "/init" 4 seconds ago Up 3 seconds 443/tcp, 0.0.0.0:80->80/tcp, 5555/tcp hapee-3.2d9e82d201a71 httpd "httpd-foreground" 4 seconds ago Up 3 seconds 80/tcp web1
Docker Compose has created a network and three containers as specified, and Docker is actively running the services.
Step 5 - Send request traffic to web servers through an HAProxy Enterprise load balancer Jump to heading
Launch your preferred web browser, and navigate to the following web address: http://localhost:80.

The web result is a request being sent to the HAProxy Enterprise load balancer, which in turn forwards the request to Web Server 1.
If you refresh the webpage on http://localhost:80, it will make a new request to the HAProxy Enterprise load balancer. Notice how it returns Web Server 2:

This development environment demonstrates an end-user making a request to port 80 and the HAProxy Enterprise load balancer relaying the traffic to the Apache web servers in the backend using the default round-robin algorithm. That means each subsequent request will be relayed to a different web server, effectively distributing the load across your two web servers evenly.

Refresh the webpage again to see the request go to a different web server:

Each subsequent refresh will relay the request traffic to the web servers in a round-robin fashion, thanks to the configuration you specified in the HAProxy Enterprise load balancer.

Congratulations! You have HAProxy Enterprise running after following these steps. HAProxy Enterprise is serving and load balancing end-user traffic with Docker.
That concludes your walkthrough in this development environment. When you’re done experimenting, run the following command from the hapee-tutorial directory to stop Docker services and remove the containers:
nixdocker compose -f "docker-compose.yml" down
outputtext[+] Running 4/4Container hapee-tutorial-web1 Removed 1.6sContainer hapee-tutorial-web2 Removed 1.5sContainer hapee-tutorial-hapee-3.2 Removed 3.9sNetwork hapee-tutorial_my_custom_network Removed 0.2s
Logging Jump to heading
Need help troubleshooting? Logs give you insight into issues and errors.
HAProxy Enterprise logs Jump to heading
HAProxy Enterprise generates two types of logs: access logs and administrative logs. See Manage HAProxy Enterprise logs.
Docker Compose logs Jump to heading
The following Docker Compose CLI command will show you the log output of Docker services and containers, helpful for troubleshooting if you run into any issues while building:
nixdocker compose logs
example outputtextweb1 | [Mon Jul 15 23:27:09.251161 2024] [mpm_event:notice] [pid 1:tid 1] AH00489: Apache/2.4.61 (Unix) configured -- resuming normal operationshapee-3.2 | [cont-init.d] executing container initialization scripts...hapee-3.2 | [cont-init.d] 01-hapee: executing...hapee-3.2 | [cont-init.d] 01-hapee: exited 0.hapee-3.2 | [cont-init.d] done.hapee-3.2 | [services.d] starting serviceshapee-3.2 | [services.d] done.hapee-3.2 | [WARNING] (227) : Failed to connect to the old process socket '/var/run/hapee-3.2/hapee-lb.sock'hapee-3.2 | [ALERT] (227) : Failed to get the sockets from the old process!hapee-3.2 | [NOTICE] (227) : New worker (258) forkedhapee-3.2 | [NOTICE] (227) : Loading success.hapee-3.2 | time="2024-07-15T23:27:09Z" level=info msg="Build date: 2024-07-03T11:54:03Z"web2 | [Mon Jul 15 23:27:09.250890 2024] [mpm_event:notice] [pid 1:tid 1] AH00489: Apache/2.4.61 (Unix) configured -- resuming normal operations
Conclusion Jump to heading
With this development environment setup, the end-users’ requests are sent to one HAProxy Enterprise load balancer. The requests are then forwarded to two web servers in a round-robin fashion. If one of the web servers were to go down, HAProxy Enterprise will keep your website available by automatically detecting the loss and routing request traffic to only the available web server.
Where to go from here? You can scale this use case by adding more web servers in the backend for higher availability, redundancy, and performance improvements. In addition, you can add another HAProxy Enterprise load balancer so that the load balancing layer also has higher availability and redundancy; having two load balancers is our recommended set up for production environments.
Do you have any suggestions on how we can improve the content of this page?