Single sign-on
Single sign-on (SAML) - legacy module
Deprecation notice
This module has been marked as deprecated and is scheduled for removal. HAProxy Enterprise 3.0 will be the last version to support it.
Commands and examples on this page specify 3.0 as the version number. However, the commands and examples apply equally to earlier versions.
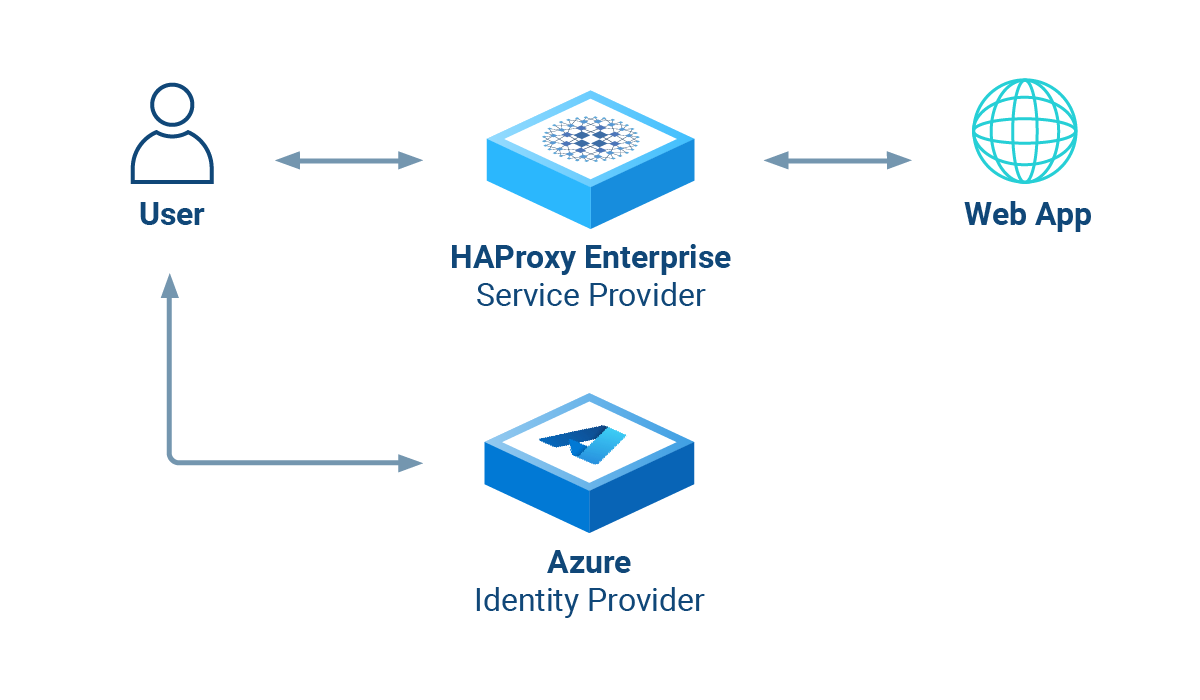
HAProxy Enterprise’s Security Assertion Markup Language (SAML) module acts as a SAML Service Provider, providing single-sign-on (SSO) to any web application located behind an HAProxy Enterprise server.
This section provides an overview of the SAML module.
About SAML 2.0 and the module Jump to heading
The XML-based Security Assertion Markup Language (SAML) 2.0 open-standard transfers identity data (assertions) between an Identity Provider (IdP) and a Service Provider (SP).
| Term | Definition |
|---|---|
| Identity Provider | Performs authentication on the Service Provider’s behalf. |
| Service Provider | Authorizes users to access the requested resource once they are authenticated by a trusted Identity Provider. |
The SAML module acts as a SAML Service Provider. It provides Service Provider-initiated, cross-domain, web-based single-sign-on (SSO) to any web application located behind the load balancer. You then don’t have to implement SAML directly in your application.
It works like this:
- A user visits a web application at its load balanced IP address.
- The SAML module creates an Authentication Request (AuthnRequest) and redirects the user’s browser to the IdP (for example, to Microsoft Entra ID).
- The user signs in via the IdP’s login page, and the IdP validates the credentials. Then the IdP redirects the user back to the load balancer.
- The SAML module verifies the SAML response from the IdP and then allows the user to proceed to the web application. An HTTP cookie ensures that the user will not need to log in again during their session.
Features:
- Implement SSO seamlessly, even for legacy web applications.
- Configure logging and grant access using ACLs.
- Check SAML assertions or attributes with XPath (via the
saml.inifile). - Retrieve SAML assertions and use them as variables in your load balancer configuration. For example, you can then enhance logs and pass user information to the application via HTTP headers.
You may find the following resources helpful for learning SAML concepts:
- Microsoft’s guide: SAML authentication with Microsoft Entra ID
- Okta’s SAML guide
Configure the Identity Provider Jump to heading
The Identity Provider (IdP) manages the user accounts and passwords, provides a login page, and validates credentials. The SAML module relies on you using a third-party IdP. In this section, we’ll describe how to set this up.
Use Microsoft Entra ID Jump to heading
This section describes how to configure Microsoft Entra ID (formerly Azure Active Directory) as the IdP.
-
Sign in to the Azure portal.
-
Search for and select Microsoft Entra ID. If you manage multiple tenants, then choose Manage tenants, select the tenant with which you would like to enable single sign-on, and click Switch.
-
From the Microsoft Entra ID Overview page, add a new Enterprise application.
-
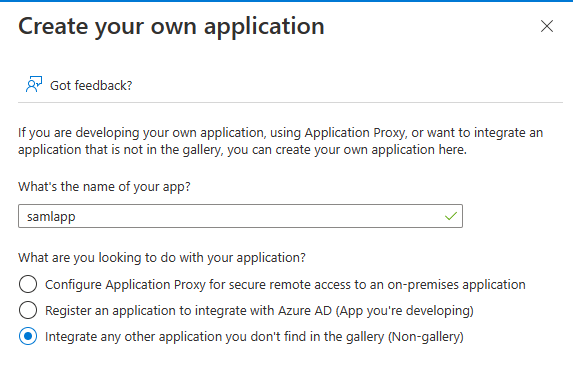
On the Browse Microsoft Entra Gallery screen, click Create your own application.
- Give the app a name, such as
samlapp. - Choose Integrate any other application you don’t find in the gallery (Non-gallery).
- Then click Create.
- Give the app a name, such as
-
Click Assign users and groups. Choose users and groups that should get sign-on access to your application. Then return to the Overview screen.
-
Click Set up single sign on, then choose SAML.
The Set up Single Sign-On with SAML page opens. Edit the Basic SAML Configuration:
Field Description Identifier (Entity ID) Choose a unique identifier for your application, such as samlapp.Reply URL (Assertion Consumer Service URL) Set the URL at which HAProxy Enterprise will receive the SAML authentication token. For example, https://example.com/saml/reply.Logout URL Set the URL at which HAProxy Enterprise will receive a logout message from Microsoft Entra ID. For example, https://example.com/saml/logout.Save and then close the basic SAML configuration panel.
-
Still on the Set up Single Sign-On with SAML page, edit the SAML Certificates.
- For the Signing option choose Sign SAML response and assertion and set Signing Algorithm to
SHA-256. - Save and close the SAML Signing Certificate panel.
- For the Signing option choose Sign SAML response and assertion and set Signing Algorithm to
-
You will need several properties of your Microsoft Entra ID enterprise application later when you configure HAProxy Enterprise. Save the following property values:
Property Where to find it Name On the enterprise application’s Overview page. Application ID On the enterprise application’s Overview page. Tenant ID On the Microsoft Entra ID Overview page.
Configure the SAML module Jump to heading
This section describes how to configure the SAML module on the load balancer.
-
On your HAProxy Enterprise load balancer, install the SAML module via your system’s package manager.
nixsudo apt-get install hapee-extras-spoa-saml20nixsudo apt-get install hapee-extras-spoa-saml20nixsudo yum install hapee-extras-spoa-saml20nixsudo yum install hapee-extras-spoa-saml20nixsudo zypper install hapee-extras-spoa-saml20nixsudo zypper install hapee-extras-spoa-saml20nixsudo pkg install hapee-extras-spoa-saml20nixsudo pkg install hapee-extras-spoa-saml20 -
This creates the folder
/etc/hapee-extras/saml_examples/azure. Copy the files from that folder to/etc/hapee-extras/. The files include:authn_request.xmllogout_request.xmlsaml.ini
-
Edit the copied file
saml.ini. At the top of the file, change the values of the following fields to match your Microsoft Entra ID enterprise application’s properties:Property Set it to {{ID_APP_NAME}}Your Microsoft Entra ID enterprise application’s Name. {{IDP_APP_ID}}Your Microsoft Entra ID enterprise application’s Application ID. {{IDP_TENANT_ID}}Your Microsoft Entra ID Tenant ID. {{APP_FQDN}}The fully qualified domain name where HAProxy Enterprise listens for requests, such as example.com. This should match the FQDN you used when setting the Reply URL and Logout URL in Azure. Be sure to add this record in your DNS server so that users can access your application at this domain. Note that if this uses HTTPS, then you should configure yourbindline in the load balancer configuration to also listen on HTTPS.An example portion of the
saml.iniconfiguration:saml.iniini[MySAMLApp]{{ID_APP_NAME}} = samlapp{{IDP_APP_ID}} = 0fbb284d-39ea-4fc6-9639-114b46b8dcb3{{IDP_TENANT_ID}} = abcdefg-1234-5678-abcd-efgh12345678{{CLAIM_PREFIX}} = http://schemas.xmlsoap.org/ws/2005/05/identity/claims{{APP_FQDN}} = example.com{{APP_LOGIN_URL}} = https://{{APP_FQDN}}/saml/reply{{APP_LOGOUT_URL}} = https://{{APP_FQDN}}/saml/logout{{APP_BACKEND}} = bk-{{APP_NAME}}saml.iniini[MySAMLApp]{{ID_APP_NAME}} = samlapp{{IDP_APP_ID}} = 0fbb284d-39ea-4fc6-9639-114b46b8dcb3{{IDP_TENANT_ID}} = abcdefg-1234-5678-abcd-efgh12345678{{CLAIM_PREFIX}} = http://schemas.xmlsoap.org/ws/2005/05/identity/claims{{APP_FQDN}} = example.com{{APP_LOGIN_URL}} = https://{{APP_FQDN}}/saml/reply{{APP_LOGOUT_URL}} = https://{{APP_FQDN}}/saml/logout{{APP_BACKEND}} = bk-{{APP_NAME}}Running multiple applications
Although the configuration in
saml.inidefines only one SAML app namedMySAMLApp, you can define multiple single sign-on apps. Copy all lines, except for theconfig_versionline, and paste them below the existing lines, but replaceMySAMLAppwith a new name such asApp2. Then change the properties to match your second application. -
Also in the
saml.inifile, add the following lines, changingmysecretto be your own, secret string. The module will use this to encrypt the sign-on cookie. If you ever need to change the secret, then store the new secret insaml_secret_2and setcurrent_saml_secretto2.saml.iniinisaml_secret_1 = mysecretcurrent_saml_secret = 1saml.iniinisaml_secret_1 = mysecretcurrent_saml_secret = 1 -
Edit the HAProxy Enterprise configuration file,
/etc/hapee-3.0/hapee-lb.cfg.Copy the SAML section below into the
frontendsection for your load balanced application. Modify the line that sets the variablesess.saml_appto match the app name insaml.ini(for example,MySAMLApp), and change theifstatement to use your fully qualified domain name. The rest does not need to be changed.Below, we add the directives to enable SAML single sign-on in the frontend:
hapee-lb.cfghaproxyfrontend fe_mainbind :80bind :443 ssl crt /etc/hapee-3.0/ssl/cert.pemmode httpoption http-buffer-requesttcp-request inspect-delay 5s# --------------------# ----SAML section----# --------------------# here, replace MySAMLApp and the if statement with correct FQDN, depending on your setuphttp-request set-var(sess.saml_app) str(MySAMLApp) if { hdr(host) -i example.com }filter spoe engine spoe-saml config /etc/hapee-extras/hapee-saml-spoe.cfghttp-request send-spoe-group spoe-saml spoe-group-reqhttp-request redirect location %[var(txn.saml.redirect_to)] code 302 if { var(txn.saml.redirect_to) -m found }http-request deny if ! { var(txn.saml.saml_auth_ok) -m bool } ! { var(txn.saml.saml_logout_ok) -m bool }http-response set-header Set-Cookie %[var(txn.saml.set_cookie)] if { var(txn.saml.set_cookie) -m found }http-response set-header saml-auth-error-text %[var(txn.saml.saml_auth_error_text)] if { var(txn.saml.saml_auth_error_text) -m found }http-response set-header location %[var(txn.saml.redirect_after_auth)] if { var(txn.saml.redirect_after_auth) -m found }http-response set-status 303 if { var(txn.saml.redirect_after_auth) -m found }# ------------------------# ----end SAML section----# ------------------------# The backend to send authenticated requests todefault_backend webservershapee-lb.cfghaproxyfrontend fe_mainbind :80bind :443 ssl crt /etc/hapee-3.0/ssl/cert.pemmode httpoption http-buffer-requesttcp-request inspect-delay 5s# --------------------# ----SAML section----# --------------------# here, replace MySAMLApp and the if statement with correct FQDN, depending on your setuphttp-request set-var(sess.saml_app) str(MySAMLApp) if { hdr(host) -i example.com }filter spoe engine spoe-saml config /etc/hapee-extras/hapee-saml-spoe.cfghttp-request send-spoe-group spoe-saml spoe-group-reqhttp-request redirect location %[var(txn.saml.redirect_to)] code 302 if { var(txn.saml.redirect_to) -m found }http-request deny if ! { var(txn.saml.saml_auth_ok) -m bool } ! { var(txn.saml.saml_logout_ok) -m bool }http-response set-header Set-Cookie %[var(txn.saml.set_cookie)] if { var(txn.saml.set_cookie) -m found }http-response set-header saml-auth-error-text %[var(txn.saml.saml_auth_error_text)] if { var(txn.saml.saml_auth_error_text) -m found }http-response set-header location %[var(txn.saml.redirect_after_auth)] if { var(txn.saml.redirect_after_auth) -m found }http-response set-status 303 if { var(txn.saml.redirect_after_auth) -m found }# ------------------------# ----end SAML section----# ------------------------# The backend to send authenticated requests todefault_backend webservers -
Add a
backendsection for the SAML module service. HAProxy Enterprise uses this when authenticating requests.Below, we add a backend for the SAML module service:
hapee-lb.cfghaproxybackend bk-spoemode tcptimeout connect 5stimeout server 30sserver auth-server-spoe 127.0.0.1:12345hapee-lb.cfghaproxybackend bk-spoemode tcptimeout connect 5stimeout server 30sserver auth-server-spoe 127.0.0.1:12345 -
Enable and start the SAML module service.
nixsudo systemctl enable hapee-extras-spoa-samlsudo systemctl start hapee-extras-spoa-samlnixsudo systemctl enable hapee-extras-spoa-samlsudo systemctl start hapee-extras-spoa-saml -
Restart the HAProxy Enterprise service.
nixsudo systemctl restart hapee-3.0-lbnixsudo systemctl restart hapee-3.0-lbYou can then make requests to your application at the FQDN you configured and you will be redirected to the IdP login page. Be sure to use HTTPS if that is what you set for the Reply URL.
Optional: Verify the signature of the SAML Response Jump to heading
When Azure sends its SAML response that contains the information HAProxy Enterprise needs to authorize a user to access an application, it is sending an XML token. To prove that it is the trusted issuer of that token, it digitally signs it with its secret key. You can verify that key using the key’s associated public X.509 certificate.
To enable signature verification:
-
Sign in to the Azure portal.
-
Search for and select Microsoft Entra ID. If you manage multiple tenants, then choose Manage tenants and then select the tenant with which you would like to enable single sign-on.
-
From the Microsoft Entra ID Overview page, choose Enterprise applications, select your application, then select Single sign-on in the left-hand menu.
-
From the Set up Single Sign-On with SAML screen, edit the SAML Certificates. Ensure that Signing Option is set to Sign SAML response and assertion and that Signing Algorithm is set to
SHA-256. -
From the SAML Certificates section, download the certificate (Base64 format). This downloads a file with a
.cerextension. Copy this file to your HAProxy Enterprise load balancer, such as to/etc/hapee-extras/. -
On the HAProxy Enterprise server, edit the file
/etc/hapee-extras/saml.ini.Uncomment (remove the preceding semicolon) the lines
idp_public_certandverify_signature. Setidp_public_certto the path of the certificate from your Microsoft Entra ID enterprise application.Below, we enable signature verification using your application’s certificate:
saml.iniiniidp_public_cert = /etc/hapee-extras/samlapp.cerverify_signature=1saml.iniiniidp_public_cert = /etc/hapee-extras/samlapp.cerverify_signature=1 -
Restart the SAML service.
nixsudo systemctl restart hapee-extras-spoa-samlnixsudo systemctl restart hapee-extras-spoa-saml
Log out Jump to heading
Users can log out of your application by visiting the /saml/logout URL path, such as https://example.com/saml/logout. This will send a LogoutRequest to the IdP, and then the IdP will send the user back to the application for local logout of the app. Successful logouts will set the variable txn.saml.saml_logout_ok to 1.
Considerations:
- If your browser blocks the logout cookie, which will often come from a different domain, then you can set the
saml_cookie_samesitedirective toNone.
SAML configuration reference Jump to heading
This section describes the syntax of the file saml.ini.
Directives Jump to heading
The saml.ini file configures how the SAML module integrates with the SAML identity provider. It supports the following configuration directives.
| Directive | Description | Type |
|---|---|---|
idp_login_url |
URL of the Web authentication portal of the Identity Provider. On Microsoft Azure, https://login.microsoftonline.com/{{IDP_TENANT_ID}}/saml2. |
string |
config_version |
The version of the configuration file. Maintains compatibility with future versions. | string |
idp_logout_url |
Single Logout URL: Endpoint which initiates the SAML Logout for all applications. On Microsoft Azure, https://login.microsoftonline.com/{{IDP_TENANT_ID}}/saml2. |
string |
idp_referer_url |
HTTP Referer value to check when receiving HTTP data from the Identity Provider. On Microsoft Azure, https://login.microsoftonline.com/. |
string |
app_login_url |
URL where the application expects to receive the SAML Response from the Identity Provider. The reply URL is also referred to as the Assertion Consumer Service (ACS). | string |
app_logout_url |
When the user browses this URL, initiate a LogoutRequest to the Identity Provider. |
string |
signing_algo |
Cryptographic algorithm used to sign the requests we send. Specify one of: ecdsa-sha1, ecdsa-sha256, ecdsa-sha384, ecdsa-sha512, rsa-sha1, rsa-sha256, rsa-sha384, or rsa-sha512. |
string |
idp_public_cert |
X509 public cert of the Identity Provider (in base64 form, .pem) used to verify SAML Response Response and Assertion attributes. |
string |
verify_signature |
Verify the signature of incoming SAML requests. Default: 0 | boolean |
require_signed_response |
Fail if the XML response is not signed. Default: 0 | boolean |
require_signed_assertion |
Fail if the XML assertion is not signed. Default: 0 | boolean |
signing_key |
Private key used to sign requests we send. | string |
sign_authn_requests |
Set to 1 if you want to sign Authn Requests. Default: 0 | boolean |
sign_logout_requests |
Set to 1 if you want to sign LogoutRequest requests. Default: 0 |
boolean |
saml_app_backend |
Backend name for this application. Default: bk-{{APP_NAME}} |
string |
saml_cookie_secure |
Set to 1 if you want cookies to be used for HTTPS connections only (not HTTP). For more information, see the Wikipedia page about Secure cookie. For a related troubleshooting tip, see Redirect loops. Default: 0 | boolean |
saml_cookie_samesite |
SameSite cookie attribute value. For more information, see the Wikipedia page about Same-site cookie. For a related troubleshooting tip, see Redirect loops. |
string |
saml_cookie_httponly |
HttpOnly cookie attribute value. For more information, see the Wikipedia page about HTTP-only cookie. Default: 1 |
boolean |
saml_cookie_time_offset |
Cookie time offset in seconds (used to build Expires cookie attribute). Default: 0 |
integer |
saml_cookie_lifetime |
Cookie lifetime in seconds (used to build Expires cookie attribute). Default: 36000 |
integer |
saml_cookie_domain |
Domain cookie attribute value. For a related troubleshooting tip, see Redirect loops. |
string |
saml_secret_1 |
Secret string used to cipher the SAML cookies. Required if current_saml_secret is 1. |
string |
saml_secret_2 |
Secret string used to cipher the SAML cookies. Required if current_saml_secret is 2. |
string |
current_saml_secret |
The current secret number ID used to cipher the SAML cookies. Select 1 to use saml_secret_1 or 2 to use saml_secret_2. Defaults to 1. |
integer |
authn_request_template_filename |
Authn Request template filename. |
string |
logout_request_template_filename |
LogoutRequest template filename. |
string |
Actions Jump to heading
In the saml.ini file, actions let you validate the schema, set variables, and other tasks.
| Action | Description |
|---|---|
on_saml_response check_attr |
Check an arbitrary attribute in a SAML Response. To store the attribute value in a load balancer variable txn.my_var_name, use XPath= set_var=. To set per application variables, use set_var=({{APP_NAME}}.my_var_name. {{APP_NAME}} is replaced with the application name (that is, the section name in saml.ini). The SAML Response validation fails if an attribute is not present unless you set the optional flag. |
on_saml_response check_attr entity_id |
Check that the audience attribute exists. The specific entity_id value to check in required. |
on_saml_response check_attr version |
Check that SAML protocol version is 2.0. |
on_saml_response check_attr status_code |
Check the SAMLResponse status code. The status to match, status_code, is optional. Otherwise, compare to urn:oasis:names:tc:SAML:2.0:status:Success. |
on_saml_response check_attr destination |
Check that the SAMLResponse Destination value matches this item. destination is required. To match the configured app_login_url, use <APP_LOGIN_URL>. On Microsoft Azure, it must match the URL Assertion Consumer Service (ACS). |
on_saml_response check_attr issuer |
Check the Issuer attribute of the SAMLResponse. The specific issuer value to check is optional. |
on_saml_response check_attr issue_instant |
Check that the IssueInstant attribute exists. To store it in a variable, use set_var. To store it in a timestamp variable, use set_var_as_timestamp. |
on_saml_response check_attr assertion |
Check that the Assertion attribute exists. |
on_saml_response check_schema |
Validate the SAML response against the SAML 2.0 xsd schema. |
on_saml_response check_conditions |
Check the XML attribute, including NotBefore and NotOnOrAfter values. |
on_saml_response check_subject_confirmation_data |
Check the XML attribute, including NotBefore and NotOnOrAfter values. |
on_logout_request check_attr |
Check an arbitrary attribute in a LogoutRequest. To put it in a load balancer variable, use XPath= set_var=. |
on_logout_request check_attr issuer |
Check the issuer attribute of the LogoutRequest. The specific issuer value to check is optional. |
on_logout_request check_attr name_id |
Check that the nameId attribute exists in the LogoutRequest. |
on_logout_request check_attr destination |
Check that the LogoutRequest Destination value matches this item. The destination to match is required. To match the configured app_logout_url, use <APP_LOGOUT_URL>. |
Action flags Jump to heading
Actions accept the following flags:
| Flag | Description |
|---|---|
optional |
This argument is not required. |
required |
This argument is mandatory. |
nofail |
For testing purposes. This action never fails, even if it returns an error. |
required_count=<count> |
Fail if the number of searched elements is different from <count>. |
xpath=<XPath expression> |
XPath expression to look for. Use with check_attr actions. |
expected=<expected_value> |
Fail if the result is different from this expression. |
set_var=<var_name> |
When one or more XPath results are found, store its value in this specific variable. The variable name is prefixed with the application name, then with a dot. |
set_var_once |
The variable is set only after the POST from the SAML Identity Provider. Otherwise, it is set each time we see the cookie again. |
set_var_cnt |
The number of XPath results is stored in the variable <APP_NAME>.<VAR_NAME>_cnt. |
set_var_as_timestamp |
When used with a value in ISO 8601 date and time format (for instance 2020-01-28T15:25:14.884Z), the variable is converted to a timestamp. |
set_var_sep=<separator> |
When multiple results are returned from the XPath query, separate them with this character. |
set_var_default=<default_value> |
Default value used if the XPath expression does not match. |
Troubleshooting Jump to heading
Show status of service Jump to heading
Check the status of the SAML module service, which will show any errors it encountered while validating SAML responses.
nix
nix
Cannot redirect to the IdP form, we already come from it…
-
There might be a protocol mismatch. If you have an HTTPS proxy in front of the load balancer, but the load balancer itself is not listening on HTTPS, then change it so that the load balancer listens on HTTPS.
-
The URI sent to the SAML service may be wrong, causing validation of the SAML response to fail. In older versions of the module, the configuration file
/etc/hapee-extras/hapee-saml-spoe.cfgpassed theuriargument with the wrong value It looked like this:iniuri=urliniuri=urlChange it to:
iniuri=pathqiniuri=pathq
Cannot find config for application “MySAMLApp”
- Ensure that your changes to the
saml.inifile took effect by restarting the saml service.
Debug mode Jump to heading
The SAML module can be launched in full debug mode:
nix
nix
When you are in debug mode, the SAMLResponse is printed in clear.
Caution
Be careful not to expose confidential information that may be included in debug output. SAML responses can include confidential information.
Testing XPath expressions Jump to heading
When you are in debug mode, you can save SAML responses to a text file. Then use xmllint (found in the libxml2 package) to test XPath expressions:
nix
nix
You may also find other useful XPath testers online.
Redirect loops Jump to heading
If you try to access a resource and get redirected back and forth between your application and the IdP, it could be that your browser is not sending back the cookie that the SAML component just set.
- Check your
saml_cookie_securesetting. If it is set to1, your browser will only use the cookie when using HTTPS, not plain HTTP. - Check your
saml_cookie_domainand make sure it matches the domain of your application. - In some situations, excessively strict security settings of your browsers can also prevent the cookie from being sent to your application. Also, you might need to set the
saml_cookie_samesitevalue toNone(which may also require settingsaml_cookie_secureto1on browsers).
Do you have any suggestions on how we can improve the content of this page?