Getting started
Firmware updates
This page applies to:
- HAProxy ALOHA - all versions
Learn how to check which version of the firmware you currently have and how to download and install a newer version.
Before you update Jump to heading
Before performing an update, follow the steps in this section.
Check for breaking changes Jump to heading
When a new version introduces breaking changes to the configuration syntax, it can cause the haproxy service to fail after an upgrade. Even if the service is performing as desired before the upgrade, the upgrade could introduce changes that cause a failure afterward. However, breaking changes are never introduced suddenly. For several versions prior to a breaking change, the upcoming syntax change will prompt a warning, giving you time to address it.
The haproxy service validates its configuration file when it starts or reloads. Follow these steps:
-
Go to the Services tab.
-
Reload the haproxy service to trigger validation.
-
Go to the Logs tab.
-
In the console logs section, look for config : parsing alerts and warnings. The following example output shows an alert for the obsolete
tune.chksizeparameter and a warning for theoption httplogdirective.console logstextApr 7 22:34:37 ALOHA1 user.warn admin[2136]: [NOTICE] (2664) : haproxy version is 2.5.0-aloha-bb8aa2ca-flx2.14_albvaApr 7 22:34:37 ALOHA1 user.warn admin[2136]: [NOTICE] (2664) : path to executable is /usr/sbin/haproxyApr 7 22:34:37 ALOHA1 user.warn admin[2136]: [ALERT] (2664) : config : parsing [/tmp/haproxy.conf:2]: option 'tune.chksize' is not supported any more (tune.bufsize is used instead).Apr 7 22:34:37 ALOHA1 user.warn admin[2136]: [WARNING] (2664) : config : parsing [/tmp/haproxy.conf:31] : backend 'webfarm' : 'option httplog' directive is ignored in backends.Apr 7 22:34:37 ALOHA1 user.warn admin[2136]: [ALERT] (2664) : config : Error(s) found in configuration file : /tmp/haproxy.confApr 7 22:34:37 ALOHA1 user.warn admin[2136]: [ALERT] (2664) : config : Fatal errors found in configuration.console logstextApr 7 22:34:37 ALOHA1 user.warn admin[2136]: [NOTICE] (2664) : haproxy version is 2.5.0-aloha-bb8aa2ca-flx2.14_albvaApr 7 22:34:37 ALOHA1 user.warn admin[2136]: [NOTICE] (2664) : path to executable is /usr/sbin/haproxyApr 7 22:34:37 ALOHA1 user.warn admin[2136]: [ALERT] (2664) : config : parsing [/tmp/haproxy.conf:2]: option 'tune.chksize' is not supported any more (tune.bufsize is used instead).Apr 7 22:34:37 ALOHA1 user.warn admin[2136]: [WARNING] (2664) : config : parsing [/tmp/haproxy.conf:31] : backend 'webfarm' : 'option httplog' directive is ignored in backends.Apr 7 22:34:37 ALOHA1 user.warn admin[2136]: [ALERT] (2664) : config : Error(s) found in configuration file : /tmp/haproxy.confApr 7 22:34:37 ALOHA1 user.warn admin[2136]: [ALERT] (2664) : config : Fatal errors found in configuration.-
An alert is a fatal condition and prohibits the service from starting. A warning indicates a condition that isn’t fatal now but may become fatal in a future release. Fix both types of conditions before proceeding.
-
HAProxy ALOHA also indicates an invalid haproxy configuration file in the LB Layer7 tab by displaying This configuration is not valid in the notification bar at the bottom of the display.
-
-
If you run two HAProxy ALOHA instances in active-standby mode, ensure that your current load balancer configuration has been pushed to the standby instance. Go to the Services tab and click the push button next to each service where it is shown.
Check your firmware version Jump to heading
To obtain the current version of the firmware that you have installed:
- In the web user interface, go to the Setup tab and find the firmware version number in the System information, where it is labeled Version.
Alternatively:
-
Log in to the HAProxy ALOHA command-line interface.
-
Read the file
/usr/share/factory/versionto see the version.nixcat /usr/share/factory/versionnixcat /usr/share/factory/versionoutputtextProduct: alohaModel: albvaBranch: 17.5Version: 17.5.2Build: 1707Date: 2025-10-29 04:59:47URL: http://www.haproxy.com/download/aloha/17.5outputtextProduct: alohaModel: albvaBranch: 17.5Version: 17.5.2Build: 1707Date: 2025-10-29 04:59:47URL: http://www.haproxy.com/download/aloha/17.5The firmware version number is composed of three digits separated by dots,
<major version>.<minor version>.<patch version>. Major and minor versions include new features and bug fixes, while patch versions include only bug fixes.
Check your disk size Jump to heading
This section applies to:
- HAProxy ALOHA 17.5 and newer
When upgrading the virtual appliance to version 17.5 and newer, ensure that your virtual appliance has a disk size of at least 8 GB. Failing to do so will result in a warning. Check your hypervisor documentation for how to change your VM’s disk size. Customers who have continuously upgraded their firmware may have never increased their disk size before.
Install the new firmware Jump to heading
Follow these steps to install the new firmware.
Required upgrade flows Jump to heading
Some firmware versions require you to upgrade to one or more intermediate versions first, typically because the newest firmware is too large for older HAProxy ALOHA systems to download. The intermediate versions expand the buffer size, allowing your system to download and install the newer firmware. For end-of-life versions for which we no longer provide firmware, you’ll need to do a fresh install of a supported version, since there isn’t an upgrade path for your system.
HAProxy ALOHA ALB3200 hardware model
You can’t upgrade the HAProxy ALOHA ALB3200 hardware appliance’s firmware version to 18.0 because its flash disk is too small. To upgrade the hardware, please contact HAProxy Technologies Support.
To migrate to the latest 18.0 version, follow the migration path for your current version as described below.
Upgrading from version 17.5 Jump to heading
- Virtual appliances must increase disk size to at least 8 GB before proceeding. Failing to do so will result in a warning, and you will stay on version 17.5.
- Upgrade the firmware to the latest minor 17.5.x version.
- Upgrade to version 18.0.
Upgrading from version 17.0 Jump to heading
- Upgrade the firmware to the latest minor 17.0.x version, no lower than 17.0.8. That version allows you to upload larger firmware packages, up to 35 MB.
- Virtual appliances must increase disk size to at least 8 GB before proceeding. Failing to do so will result in a warning, and you will stay on version 17.5.
- Upgrade to the latest minor 17.5.x version.
- Upgrade to version 18.0.
Upgrading from version 14.5 - 16.5 Jump to heading
- Upgrade the firmware to the latest 16.5.x version, no lower than 16.5.21. That version allows you to upload larger firmware packages, up to 35 MB.
- Virtual appliances must increase disk size to at least 8 GB before proceeding. Failing to do so will result in a warning, and you will stay on version 17.5.
- Upgrade to the latest minor 17.5.x version.
- Upgrade to version 18.0.
Upgrading from version 13.5 and older Jump to heading
-
If upgrading from version 11.x or older, execute this command to increase the size of the
/varpartition:nixsudo mount -o remount,size=64M /varnixsudo mount -o remount,size=64M /var -
Upgrade the firmware to the latest 13.5.x version, no lower than 13.5.16. That version raises the temporary partition to 64MB and prevents a filesystem size issue.
-
Upgrade the firmware to the latest 16.5.x version, no lower than 16.5.21. That version allows you to upload larger firmware packages, up to 35 MB.
-
Virtual appliances must increase disk size to at least 8 GB before proceeding. Failing to do so will result in a warning, and you will stay on version 17.5.
-
Upgrade to the latest minor 17.5.x version.
-
Upgrade to version 18.0.
Download the firmware Jump to heading
Follow these steps to download the latest version of the firmware.
-
Obtain your credentials for accessing HAProxy ALOHA downloads. You can create a new support ticket in the HAProxy Technologies Customer Portal to request your credentials.
For virtual appliances, when updating to a new major version (for example 13.0, 14.0, 15.0), you will be given a new license key to install prior to the update. This will prevent the appliance from starting in evaluation mode. The new license will appear as invalid until you update the firmware. Licenses for hardware appliances are valid for all firmware versions.
-
Browse to the website https://www.haproxy.com/download/aloha/. To access one of the version folders, you’ll need to enter your credentials.
-
Inside the target version folder, find the
.binfile with the highest number and download it. The virtual appliance and hardware appliance use different files.Appliance type File to download virtual appliance file with albvaprefixhardware appliance file with alb<MODEL>prefix
You can update the HAProxy ALOHA firmware via user interface or the command line.
Install the firmware in the UI Jump to heading
If you run two HAProxy ALOHA instances in active-standby mode, then updating one at a time is preferable to avoid downtime. Start with the standby instance, then once completed switch it into active mode so that you can update the current active instance.
To update the standby instance:
-
Export and save the existing configuration by going to the Setup tab, and in the Configuration section, click Export.
-
Begin the update by going to the Setup tab, and in the Firmware section, click Choose File to select the
.binfile. -
Click Update next to the
.binfile name. The new version is added to the Next boot image list and selected. You could also roll back to a previous version. -
Click Update next to the Next boot image list.
-
Click Reboot.
-
Promote the standby instance to be the active instance:
-
From the Services tab, click the Setup icon on the network service line.
-
Update the
vrrp prionumber to be greater than the current primary instance’s value. This will configure the VRRP group so that the system with the higher priority number will become the new primary instance, avoiding network disruptions during the firmware update process. -
Click OK then Close.
The standby becomes the new active instance and handles the traffic. We recommend monitoring HAProxy ALOHA until you are confident that it is functioning correctly.
You can still swap the active and standby back by lowering the instance’s
vrrp prionumber to its original value. You can also revert by following the steps in the Roll back section below.
-
To update the other HAProxy ALOHA instance:
-
Go to the Setup tab, and in the Firmware section, click Choose File to upload the
.binfile. -
Click Update.
-
Click Reboot.
-
If you are running two HAProxy ALOHA instances, you can change the original standby instance to be on standby again:
-
On the standby instance, go to the Services tab, click the Setup icon on the network service line.
-
Lower the
vrrp prionumber to the value before the update. -
Click OK then Close.
At this stage, HAProxy ALOHA has been updated to the new firmware. During this update, the load balancer configuration may have been migrated to use newer keywords if older keywords were obsoleted.
However, these configuration changes won’t persist after a reboot. To make them persist, go to the Setup tab and click Save in the Configuration section. Do this when you are confident that you won’t need to roll back the firmware.
-
Upload and install the firmware in the CLI with scp or Winscp Jump to heading
This section applies to:
- HAProxy ALOHA 13.0 and newer
If you run two HAProxy ALOHA instances in active-standby mode, then updating one at a time is preferable to avoid downtime. Start with the standby instance, then once completed switch it into active mode so that you can update the current active instance. The text editor available in ALOHA via the CLI is vi.
On the host machine:
-
Download the updated firmware binary file as outlined in Download the firmware.
-
Copy the updated firmware binary file to
/tmpon the standby ALOHA instance usingscpor Winscp:nixscp example-firmware-file.bin admin@FIRST_ALOHA_IP:/tmpnixscp example-firmware-file.bin admin@FIRST_ALOHA_IP:/tmp -
Copy the updated firmware binary file to
/tmpon the other ALOHA instance usingscpor Winscp:nixscp example-firmware-file.bin admin@OTHER_ALOHA_IP:/tmpnixscp example-firmware-file.bin admin@OTHER_ALOHA_IP:/tmp
Log in to the standby ALOHA instance:
-
Become the root user.
nixsudo sunixsudo su -
In the
/etc/config.rcfile, update thevrrp prionumber to be greater than the current primary instance’s value. For example:config.rctextservice network eth0######### Interface eth0ip autoconfigip address 192.168.0.200/255.255.255.0ip route default 192.168.0.1vrrp inst default prio 100config.rctextservice network eth0######### Interface eth0ip autoconfigip address 192.168.0.200/255.255.255.0ip route default 192.168.0.1vrrp inst default prio 100 -
Apply the change with:
nixservice network restartnixservice network restart -
Install the firmware using
update-boot-image; replaceexample-firmware-file.binwith the name of the file:nixupdate-boot-image /tmp/example-firmware-file.binnixupdate-boot-image /tmp/example-firmware-file.bin -
Ensure the changes are saved:
nixconfig savenixconfig save
The standby becomes the new active instance and handles the traffic. You can still swap the active and standby back by lowering the instance’s vrrp prio number to its original value. We recommend monitoring HAProxy ALOHA until you are confident that it is functioning correctly before moving on to the next steps.
Log in to the other ALOHA instance:
-
Become the root user.
nixsudo sunixsudo su -
Install the firmware using
update-boot-image; replaceexample-firmware-file.binwith the name of the file:nixupdate-boot-image /tmp/example-firmware-file.binnixupdate-boot-image /tmp/example-firmware-file.bin -
Ensure the changes are saved:
nixconfig savenixconfig save
Once done, you can change the original standby instance to be on standby again by editing the /etc/config.rc file and lowering the vrrp prio number to the value before the update. To do so, log back in to the first ALOHA instance:
-
Become the root user.
nixsudo sunixsudo su -
In the
/etc/config.rcfile, update thevrrp prionumber back to its original value. For example:config.rctextservice network eth0######### Interface eth0ip autoconfigip address 192.168.0.200/255.255.255.0ip route default 192.168.0.1vrrp inst default prio 1config.rctextservice network eth0######### Interface eth0ip autoconfigip address 192.168.0.200/255.255.255.0ip route default 192.168.0.1vrrp inst default prio 1 -
Apply changes:
nixservice network restartnixservice network restart -
Ensure the changes are saved:
nixconfig savenixconfig save
Install the firmware in the CLI from a host machine with cat and ssh Jump to heading
This section applies to:
- HAProxy ALOHA 13.0 and newer
If you run two HAProxy ALOHA instances in active-standby mode, then updating one at a time is preferable to avoid downtime. Start with the standby instance, then once completed switch it into active mode so that you can update the current active instance. The text editor available in ALOHA via the CLI is vi.
Log in to the standby ALOHA instance:
-
In the
/etc/config.rcfile, update thevrrp prionumber to be greater than the current active instance’s value. For example:config.rctextservice network eth0######### Interface eth0ip autoconfigip address 192.168.0.200/255.255.255.0ip route default 192.168.0.1vrrp inst default prio 100config.rctextservice network eth0######### Interface eth0ip autoconfigip address 192.168.0.200/255.255.255.0ip route default 192.168.0.1vrrp inst default prio 100 -
Apply the change with:
nixservice network restartnixservice network restart -
Ensure the changes are saved:
nixconfig savenixconfig save
On the host machine:
-
Download the updated firmware binary file as outlined in Download the firmware.
-
Concatenate and redirect the contents of the updated firmware binary file to the standby instance to run the
update-boot-imageprocess.nixcat example-firmware-file.bin | ssh admin@FIRST_ALOHA_IP 'sudo update-boot-image -'nixcat example-firmware-file.bin | ssh admin@FIRST_ALOHA_IP 'sudo update-boot-image -' -
Ensure the changes are saved.
nixssh admin@ALOHA_IP 'config save'nixssh admin@ALOHA_IP 'config save' -
The standby becomes the new active instance and handles the traffic. We recommend monitoring HAProxy ALOHA until you are confident that it is functioning correctly before moving on to the next step. You can still swap the active and standby back by lowering the instance’s
vrrp prionumber to its original value. -
Concatenate and redirect the contents of the updated firmware binary file to the other ALOHA instance to run the
update-boot-imageprocess.nixcat example-firmware-file.bin | ssh admin@OTHER_ALOHA_IP 'sudo update-boot-image -'nixcat example-firmware-file.bin | ssh admin@OTHER_ALOHA_IP 'sudo update-boot-image -' -
Ensure the changes are saved.
nixssh admin@OTHER_ALOHA_IP 'config save'nixssh admin@OTHER_ALOHA_IP 'config save'
Once the new firmware has been installed on all ALOHA instances, you can change the original standby instance to be on standby again by editing the /etc/config.rc file and lowering the vrrp prio number to the value before the update. To do so, log back in to the first ALOHA instance:
-
Become the root user.
nixsudo sunixsudo su -
In the
/etc/config.rcfile, update thevrrp prionumber back to its original value. For example:config.rctextservice network eth0######### Interface eth0ip autoconfigip address 192.168.0.200/255.255.255.0ip route default 192.168.0.1vrrp inst default prio 1config.rctextservice network eth0######### Interface eth0ip autoconfigip address 192.168.0.200/255.255.255.0ip route default 192.168.0.1vrrp inst default prio 1 -
Ensure the changes are saved:
nixconfig savenixconfig save -
Apply changes:
nixservice network restartnixservice network restart
Validate the haproxy configuration file Jump to heading
As before, validate the LB Layer7 haproxy service configuration file. Conditions noted as warnings in the configuration file could become alerts (fatal errors) in a future release.
-
Go to the Services tab.
-
Reload the haproxy service to trigger validation.
-
Go to the Logs tab.
-
In the console logs section, look for config : parsing alerts and warnings. Fix both types of conditions before proceeding.
-
Ensure changes are saved.
nixsudo config savenixsudo config save
Update additional modules Jump to heading
This page applies to:
- HAProxy ALOHA 13.0 and newer
If you previously installed any additional modules, then you should update them too to be compatible with version 18.0 of the firmware. Module updates may also contain new features and bug fixes.
Follow these links to find instructions for updating each of the modules:
Roll back an update Jump to heading
A rollback won’t revert the load balancer configuration if you have saved it on the Setup tab. In rare cases, it may be incompatible with the older firmware.
By default, HAProxy ALOHA stores two firmware images:
- The current running firmware.
- The firmware that was running before the last update.
Follow these steps to revert to the firmware that was running before the last update:
-
On the Setup tab, scroll down to the Firmware section.
-
Look for the Next boot image list. The box checked indicates the currently running firmware.
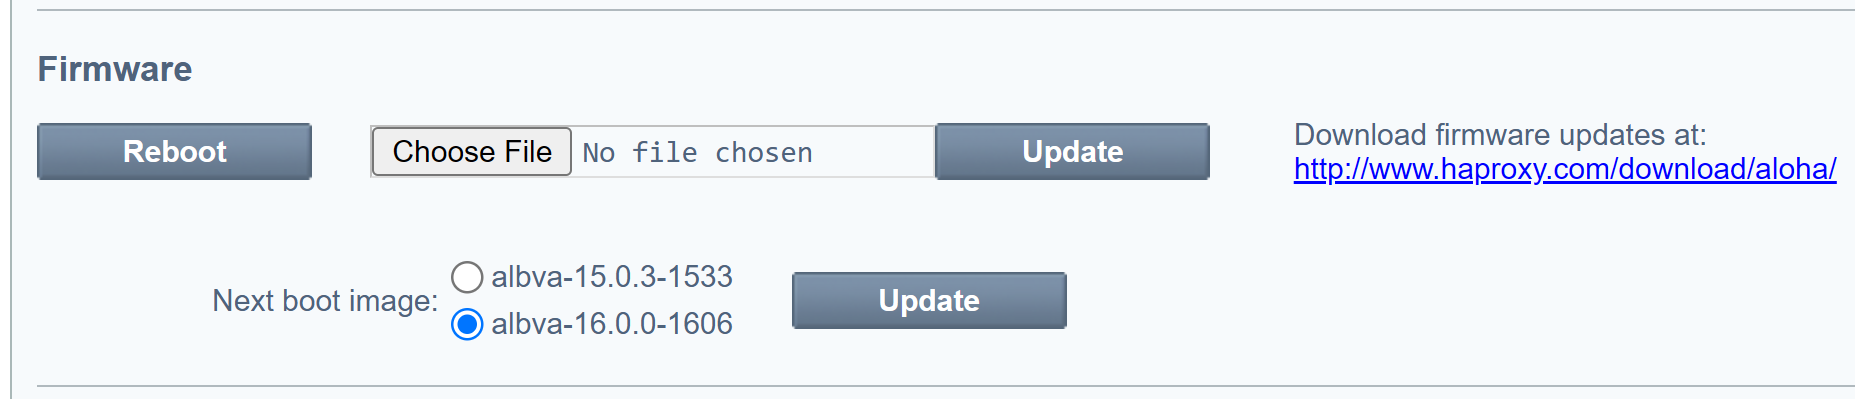
-
Check the other box pointing to the previous image you want to rollback to.
-
Click Update next to the Next boot image list.
-
Click Reboot in the Firmware section.