Performance
Performance optimization for large systems
This page applies to:
- HAProxy Enterprise 2.4r1 and newer
- HAProxy 2.4 and newer
This information we present here explores tuning the load balancer for use on large machines, or those that have large numbers of cores. Keep in mind that HAProxy is designed to be deployed in clusters and therefore scales well horizontally. It may be more cost effective for you to deploy the load balancer on many small machines instead of deploying on a small number of large machines.
Using HAProxy Enterprise or HAProxy ALOHA?
If you’re using HAProxy Enterprise or HAProxy ALOHA and have questions about optimizing the performance of your load balancer, please contact HAProxy Technologies Support. We can help you determine the best settings for your specific system.
Version 3.3 is supercharged for performance
Starting in version 3.3, the default behavior is to use all available CPU cores and threads, even on massively-multicore systems. HAProxy leverages optimized multithreading and provides automatic CPU binding to deliver both unparalleled efficiency and speed, ensuring your load balancing is faster than ever. If you are using version 3.3, chances are, you don’t need to tune any of the settings on this page. However, depending on the nature of your traffic, there may be some options you can tune to best suit your system. HAProxy Enterprise offers some additional kernel tuning settings that are easy to enable and HAProxy Technologies support team can help you tailor your settings to your specific hardware and workloads.
The load balancer runs in multithreaded mode automatically. What this means is that it is able to take advantage of systems with multiple CPUs by performing many processing tasks concurrently, distributing its computational load across many CPUs.
By default since version 2.4, the load balancer analyzes your system to determine how it should configure itself for your specific hardware so that it performs most optimally on your machine. We’ve found in testing that the settings it determines provide the best performance out of the box on most systems, no additional configuration or tuning required! We strongly recommend that you run with automatic settings first before you try any of the configuration changes on this page.
However, if your system has:
- more than 64 threads across CPUs that have only a few unified L3 caches
- multiple physical CPU sockets
- CPUs having multiple CCXs or core complexes
- CPUs having different types of cores, for example, “performance” cores and “efficiency” cores
Then you could potentially see better load distribution across your CPUs, better throughput, and ultimately more optimized performance by tuning how the load balancer interacts with your hardware. Keep in mind, though, that the configuration changes required are not something to implement lightly and without in-depth analysis of your system and traffic. They also require you to perform substantial benchmarking on your system with production-level traffic to ensure the settings are optimal for your system.
Test any performance tuning changes you make before you deploy them to your production environment, as some settings could cause performance degradation. Before making changes, ask these questions:
- Are you running in a virtualized environment?
- What are the characteristics of your traffic?
- What are the specifics of your system’s hardware?
In sections that follow, we’ll explain how the load balancer automatically applies the performance optimization settings it determines are the most appropriate for your hardware and the implications for those settings. We’ll also cover the following:
- How the load balancer uses multithreading to make the best use of system resources.
- An overview of common CPU architectures and what they mean for the load balancer.
- How to find more information about your specific hardware.
- How you can tune the load balancer’s automatic CPU binding.
- What to consider when adjusting the load balancer’s process management settings.
- When to consider different configurations to optimize for performance.
Concepts Jump to heading
In the subsections that follow, we’ll walk you through what being a multi-threaded application means for HAProxy, how it adapts based on CPU architecture, and how you can examine your system to determine how best to configure the load balancer.
Multithreading and the load balancer Jump to heading
The load balancer is a multi-threaded application. This means that it uses multiple threads within a single process to run tasks concurrently, with the threads sharing the same memory space. Because of this shared memory, the load balancer must ensure thread safety by coordinating access to memory through synchronization, which adds latency. This latency is dependent on the characteristics of your CPU topology. Ranked in order from fastest to slowest, the distances between locations of threads sharing data dramatically affect the latency, depending on whether this communication occurs between two threads:
- of the same core (this is the fastest)
- of different cores, but belonging to the same CCX or node
- of two cores of a unified L3 cache
- of two cores belonging to different CCX or node
- of two cores belonging to different CPU sockets (this is the slowest and should be avoided)
To illustrate these different distances between threads, the diagram below represents a NUMA system with 8 CCX and 32 hyperthreaded cores. NUMA (Non-Uniform Memory Access) is a computer memory design where subsets of memory and CPUs co-located physically are grouped into nodes, reducing memory access time by preferring that the CPUs access the memory closest to them, or within the same node.
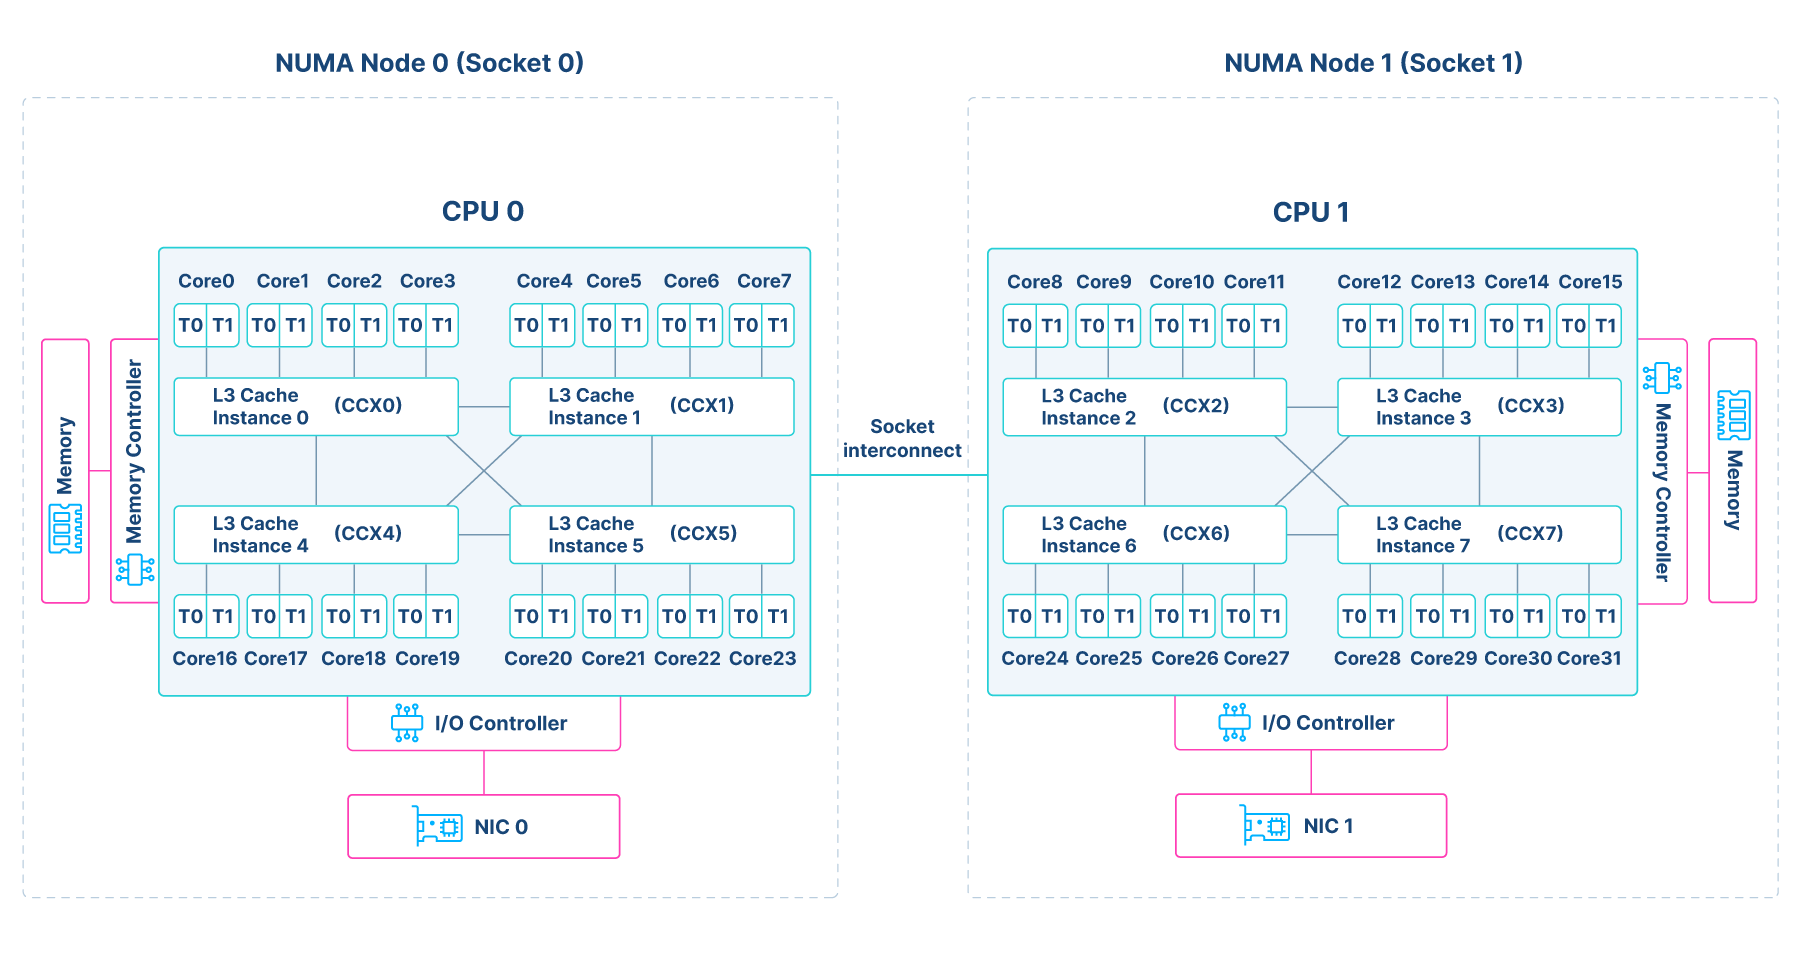
For each of the different distances, let’s consider the locations of threads in the diagram:
- Two threads of the same core.
- This is
T0andT1most closely located next to each other on each of the cores.
- This is
- Two threads of the same CCX.
- These are any two threads that belong to cores that share an L3 cache. For example, for
L3 Cache Instance 0, these would be threads running on cores 0, 1, 2, and 3. Though not on the same core, they are still physically close.
- These are any two threads that belong to cores that share an L3 cache. For example, for
- Two threads of different CCX.
- In this diagram, each node has 4 CCX. Any two threads running on cores on different CCX on the same node, for example, core 0 and core 4, though each having a different L3 cache, are still closely located, though not as closely located as those within the same CCX.
- Sometimes multiple CCX can make up a CCD (core complex die). In this arrangement, two threads on cores of different CCX but the same CCD have less latency than threads of different CCDs, but more latency than threads of the same CCX.
- Two threads running on cores of different CPU sockets.
- These would be any two threads that must communicate between Node 0 and Node 1 over a socket interconnect.
- As this is a very expensive operation and should be avoided, you could consider assigning an additional NIC to the second socket (this is shown as
NIC1on this diagram, which is an optional configuration) to ensure that all communication between the load balancer threads and a NIC happen on the same CPU socket. This requires additional configuration, and we touch on this in more detail when we discuss considerations for a heavy SSL load. - As for DRAM memory, there is much higher latency associated with accessing a different node’s memory than accessing the memory local to the node. A thread running on Node 0 would experience much greater latency accessing the memory local to Node 1 than it would accessing the memory local to Node 0.
- As this is a very expensive operation and should be avoided, you could consider assigning an additional NIC to the second socket (this is shown as
- These would be any two threads that must communicate between Node 0 and Node 1 over a socket interconnect.
In regards to threads running on cores of a unified L3 cache, which is a scenario this diagram does not show, all cores share one L3 cache on such systems instead of being divided into clusters or CCX.
The load balancer’s architecture allows it to minimize sharing data between threads where possible. Huge development efforts have been underway since version 2.4 to optimize the load balancer’s operations to avoid process-wide data sharing. A more preferable scenario even to this is that data should be shared only between very close threads, that is, threads that share an L3 cache, or those that belong to the same CCX or node. The most optimal scenario is not sharing data at all between threads, though some, though few, operations require it.
Introduced in version 2.7, the load balancer’s thread groups assign threads by locality into independent groups. By default, the load balancer operates with a single thread group in versions 2.4 to 3.2. Using thread groups, the load balancer can limit communication between distant threads by keeping operations within each thread group.
This concept of latency between threads is not universal across all systems. The load balancer behaves differently on different CPU architectures, as we’ll discuss next.
CPU architectures and automatic CPU binding Jump to heading
Differences in CPU architectures affect the latencies incurred when synchronizing memory access across threads. The load balancer’s automatic settings adjust based on the characteristics of the system.
The load balancer takes into account the following, ensuring that its threads are grouped in the most performant arrangement possible for your system:
- On NUMA systems, the load balancer configures itself to use the cores of a single NUMA node in versions 2.4 to 3.2. This avoids communicating across nodes, or worse, across CPU sockets. In our testing, we’ve found that the load balancer generally performs best when constrained to a single node, specifically the same one to which the NIC is assigned.
- This effectively limits inter-CCX communication where possible, which otherwise introduces latency.
- The load balancer tries to arrange threads per locality. The closer the threads, per the CPU on which they execute, the less latency there will be in inter-thread communication. Threads that share an L3 cache experience the lowest latency.
- As of version 3.3, the load balancer configures itself to use all available cores and all NUMA nodes to achieve the best performance.
- On systems that have a single, unified L3 cache, or in the case of very large systems that use multiple physical CPUs, each which its own unified L3 cache, the load balancer will use all available cores on a single physical CPU, and it defaults to using one thread per available core and assigns all threads to the same thread group. Thread groups have a limit of 64 threads, and as such, using more than 64 threads requires defining multiple thread groups.
Since version 2.4, the load balancer implements these automatic settings on your specific system using a mechanism called automatic CPU binding. CPU binding, or CPU affinity, is the assignment of specific thread sets to specific CPU sets with the goal to optimize performance on some systems. The load balancer determines the NUMA settings, that is, whether your system is NUMA-aware and how many nodes it has, for your specific system, and limits itself to a single node.
As of version 3.2, the load balancer’s automatic CPU binding mechanism analyzes the entire CPU topology of your specific system in detail to determine how it should most optimally assign its threads. CPU topology includes CPU packages, the arrangement of NUMA nodes, CCX, L3 caches, cores, available threads, and related settings. The load balancer considers all of these things when it determines its settings.
Taking those considerations into account, there are a few things to note:
- As of version 3.2, there are options for easily tuning the automatic behavior using configuration directives that are portable across different systems.
- In terms of networking sockets, the load balancer creates a single socket per thread group per listener. In the cases where you have large numbers of threads per thread group, a single socket per thread group per listener could cause contention between threads, so there are options for using more than one socket for the same address and port.
- In versions 2.4 to 3.2, we’ve determined in our tests that the load balancer generally performs best when its threads execute on a single NUMA node, and as such, the default is to arrange the threads in this way. This means that for a system that has several NUMA nodes and/or CPU sockets, the load balancer is probably not using all available hardware resources. While, in general, the performance costs associated with sharing data across nodes and CPU sockets are not worth what you might gain with additional threads and cores, there may be some cases where this may not be true depending on your system and traffic characteristics. We explore these cases in subsequent sections.
- Starting in version 3.3, where additional improvements have been made to optimize the load balancer’s multithreading, we’ve determined that you can achieve the best performance using all available cores and NUMA nodes.
Prior to making adjustments, you must examine your system, as this information will inform what specific options you should use.
Tip
As of version 3.2, if you determine through examining your system that your CPUs have multiple L3 caches, you may benefit from using a cpu-policy other than the default. See tuning the load balancer’s automatic CPU binding for more information about these options.
Examine your system Jump to heading
Use the following commands and utilities to learn more about your system and configuration.
Learn more about your hardware Jump to heading
These commands return the hardware details of your system.
-
Retrieve details about your system’s available CPUs, cores, caches, and their arrangement.
nixlscpu -enixlscpu -e -
Show the number of NUMA nodes on your system, which indicates whether your system is NUMA-aware.
nixlscpu | grep -i numanixlscpu | grep -i numa -
Show which NUMA node a NIC is bound (nodes numbered starting at 0). Replace
<NIC name>with the name of your interface, such aseth0.nixcat /sys/class/net/<NIC name>/device/numa_nodenixcat /sys/class/net/<NIC name>/device/numa_node -
Show the NUMA-related system log entries. It logs these initialization details on startup.
nixdmesg | grep -i numanixdmesg | grep -i numa -
Show kernel configuration settings related to NUMA.
nixcat /boot/config-$(uname -r) | grep NUMAnixcat /boot/config-$(uname -r) | grep NUMA -
Show the online NUMA nodes.
nixsudo cat /sys/devices/system/node/onlinenixsudo cat /sys/devices/system/node/online -
Show the CPUs associated with each NUMA node as well as the distances between nodes. You may need to install the
numactlutility.nixsudo numactl --hardwarenixsudo numactl --hardwareInstall the numactl utility
The
numactlutility can help gather information about the NUMA nodes on your system. Install it using the package manager for your system:nixsudo apt-get install numactlnixsudo apt-get install numactlnixsudo yum install numactlnixsudo yum install numactlnixsudo zypper install numactlnixsudo zypper install numactlnixsudo pkg install numactlnixsudo pkg install numactl
Examine the load balancer’s automatic configuration for your hardware Jump to heading
To see what settings the load balancer has determined are best for your system, you can run the load balancer with the -vv option:
nix
nix
Example for HAProxy Enterprise 3.3r1:
nix
nix
nix
nix
outputtext
outputtext
You can also use the Runtime API command show info :
nix
nix
outputtext
outputtext
View automatic CPU binding Jump to heading
Available since:
- HAProxy 3.2
To see the results of the load balancer’s automatic CPU binding in action, run the load balancer with the -dc command line option. It will log the arrangement of threads, thread groups, and CPU sets that it has determined is optimal based on your CPU topology. Here is an example from version 3.2:
text
text
Here the load balancer created a single thread group with 32 threads assigned the group to CPUs numbered 0-15 and 64-79.
For more information including a full example with corresponding output from the lscpu -e command and explanations for why the load balancer applied this particular configuration, see tuning the load balancer’s automatic CPU binding.
When to consider a thread configuration other than the default Jump to heading
You may need additional settings to tune the load balancer’s configuration for your specific system. Or you may want to manually control how threads sets are mapped to CPU sets, though we do not recommend it, as it is easy to misconfigure and is not portable between machines.
Case #1: You probably don’t need to do anything Jump to heading
We recommend that you try using the default, automatic settings first before you implement any of the options on this page. In our testing, the settings the load balancer determines automatically and specifically for your system generally provide the best performance. However, you can tune certain behaviors for your system if benchmarks show that the defaults do not meet your needs. Here are some indications that you may benefit from tuning the load balancer configuration for your specific system:
- Your throughput is not sufficient due to thread contention at the socket level.
- Your system has a large number of cores with a unified L3 cache and the load balancer is not utilizing all cores.
- Your traffic is SSL/TLS-heavy and is therefore using a lot of CPU resources.
- You want to use only one type of cores, either the most performant or the most efficient.
There’s an additional case where the default, automatic settings may not be the most performant for your system. If your system has multiple CCX or L3 caches, you may see performance gains via some additional options to optimize how the load balancer distributes threads among the CCX.
Case #2: Insufficient throughput under heavy load Jump to heading
If you are experiencing packet loss and insufficient throughput under heavy load, use the perf tool to see where your CPU utilization is high. For example:
nix
nix
outputtext
outputtext
In this example, high CPU usage in the kernel’s native_queued_spin_lock_slowpath function indicates resource contention, which in this case could be the contention at the thread-level on the listener sockets. If this is the case, you could consider using shards to ease this contention.
If the results of sudo perf top show high CPU usage in ksoftirqd, and packet loss is occurring at the NIC-level, there are some additional configuration considerations to keep in mind when configuring your network rules and NICs.
Use shards to reduce socket-level contention Jump to heading
Prerequisite - OS compatibility
Linux versions 3.9 and greater, or versions that otherwise support SO_REUSEPORT, are able to take advantage of binding multiple sockets to the same address and port.
Shards create identical sockets that enable multiple listeners, that is, bind directives, on the same address and port. By doing this, you’re using a feature of Linux that enables you to offload to the kernel the load balancing of connections among multiple sockets. This allows the load balancer’s threads to then work in parallel, processing connections across many sockets, rather than all threads competing for work from one socket. Using multiple sockets could potentially reduce contention between threads and increase performance.
NUMA best practice
Prior to version 3.2, our benchmarks determined that in most cases, a single socket per thread group per bind directive incurs less overhead than having multiple sockets for the same bind when run on a single NUMA node, and as such, this is the default behavior. Version 3.2 includes significant updates that allow for better scaling of the load balancer’s subsystems across multiple NUMA nodes to improve performance for CPU-intensive workloads, such as high data rates.
In versions 2.4 to 3.2, the load balancer’s default configuration creates a single thread group of threads that will run on the CPUs of the first NUMA node. In version 3.3 by default, it will use all NUMA nodes, and enable all cores, arranging its thread groups accordingly. If you decide to change these default settings for shards, be sure to thoroughly test on your system. The characteristics of your specific system and of your traffic will affect how changing these settings impacts performance.
To change the load balancer’s default shards settings, add the shards argument to your bind directive. For example, if you want to create exactly two listeners on the same address and port, specify 2 as the number of shards for that bind directive:
The work from both listeners will then be evenly distributed across all threads available to this frontend.
You can achieve the same effect as shards by manually replicating your bind directives instead of using the shards keyword, as long as your system supports binding multiple sockets to the same address and port, which also enables this functionality for earlier versions of the load balancer. For each additional, identical bind directive, the load balancer will create an additional socket (file descriptor), producing another listener for that address and port. Your configuration would then look something like:
haproxy
haproxy
You may want to use this syntax if there are additional bind options you wish to enable per listener.
Caution
Do not use shards in conjunction with port ranges. Each additional shard requires at least one additional file descriptor per port. If you specify that you want one shard per thread, the number of file descriptors then becomes number of shards x number of threads x number of ports. This could quickly use up all available file descriptors.
Also, if you set shards to a hardcoded number, as the example above shows, be sure to set this value to a number higher than the number of thread groups. By default, in version 3.2, the load balancer creates a single thread group, and starting in version 3.3, it may automatically create many thread groups; changing the default settings could result varying numbers of thread groups. As of version 3.2, view the automatic CPU binding by running the load balancer with the -dc option to determine how many thread groups it is using.
The shards option has additional arguments you can use to further tune its behavior:
- Available since HAProxy 2.8: Set
shards by-groupto create a number of shards equal to the number of thread groups. This is the default. We recommend this option if you are not defining a specific number of shards. This creates an identical listener socket per thread group that’s shared among all threads of that group. It’s computationally expensive for distant threads to access the same listener socket, so each thread group having its own is beneficial. Each new connection is handled by the least-loaded thread of the shard. This effectively load balances the connections across the threads, which helps to better distribute the load across CPUs, which is particularly important for SSL/TLS connections that are CPU intensive at connection initialization. - Available since HAProxy 2.8: You can also set your shards policy globally with the global directive
tune.listener.default-shards. This setting applies to all listeners (binds). You can override this setting perbinddirective if you have a listener that requires different settings.
Tip
If you are using version 2.5 or 2.6, use caution when using the shards keyword, as the load balancer cannot take advantage of thread groups (introduced in version 2.7). Be sure to test on your system to find the optimal configuration.
There is an option by-thread for shards to indicate that you want one shard per thread. The load balancer will automatically create a number of listener sockets that matches the number of threads available to that listener. Use caution with this option, as a large number of threads will result in a large number of listener sockets, and therefore file descriptors, and some operating systems have limits on the number of sockets that you can bind to the same address and port. You should probably use by-group instead, as there is also no load balancing of connections across the threads when you set shards by-thread. That means that some threads may be more loaded than others.
Additional considerations for your network configuration Jump to heading
If the results of sudo perf top show high CPU usage in ksoftirqd, which is a kernel process that queues soft interrupts, such as those produced by the NIC, this may indicate that ksoftirqd is not able to keep pace with packets incoming from the NIC. When this happens, packets may be lost, as they cannot be processed quickly enough to allow for more packets to come through. Here are some things you can consider for your network configuration:
- Reduce the amount of
iptablesrules or VLAN configurations you have in place. Each rule, lookup, or any other processing that occurs per packet incurs additional CPU expense. - Make sure you are using the latest drivers for your NIC provided by the manufacturer.
- Use
irqbalanceonly if you are not manually setting affinity for interrupts (smp_affinity), as these can conflict with each other. - Upgrade to HAProxy version 3.2 or later. Version 3.2 includes significant performance enhancements that allow it to make more efficient use of your hardware.
Case #3: Your system has many cores and only a few unified L3 caches Jump to heading
The load balancer supports using a maximum of 64 threads by default without further configuration. On larger system Intel x86 or ARM, you can make use of more cores and threads by manually setting the global directive nbthread, which allows you to manually specify how many threads the load balancer should use, and by defining thread groups. Thread groups, introduced in version 2.7, allow you to split threads into independent groups that can contain a maximum of 64 threads each. Once you have defined your thread groups, assign them to the appropriate CPU sets using cpu-map).
NUMA best practice
As of the latest versions on NUMA-aware systems, the load balancer intelligently determines the appropriate values for the number of threads (nbthread), and the number of thread groups for your system. As of version 3.3, it will use all available threads and cores and all NUMA nodes and create its thread groups as is best for your CPU topology. On versions 2.4 to 3.2, by default it limits itself to the first NUMA node to limit inter-CCX communication. We don’t recommend that you change these settings, as defining a value for nbthread in your configuration disables the load balancer’s automatic configuration that best optimizes the values for NUMA on your specific system.
Consider an example system where examination showed 128 CPUs that share L3 caches as follows:
| CPU | L3 Cache |
|---|---|
| 0-63 | 0 |
| 64-127 | 1 |
This means that half of the CPUs share one L3 cache (0), and the other half share a different L3 cache (1). For the sake of simplicity of this example, this example system does not have hyperthreading.
We can define thread groups and assign them to sets of CPUs using cpu-maps while keeping the following in mind:
- Group CPUs by locality.
- In this example, half of the CPUs share one L3 cache and the other half share a different cache. In this case we could consider the CPUs to be grouped by L3 cache, which then gives us two groups:
- Group 1: 0-63
- Group 2: 64-127
- Note that there is not a directive specifically for defining these groups of CPUs, but rather, this step is more conceptual and will help you visualize how best to define your thread groups. Assigning threads to CPU sets using
cpu-mapdenote the actual definition in the configuration.
- In this example, half of the CPUs share one L3 cache and the other half share a different cache. In this case we could consider the CPUs to be grouped by L3 cache, which then gives us two groups:
- Define thread groups such that they reflect the groups of CPUs (CPU sets).
- Assuming that the CPUs are split into two groups, the minimum number of thread groups we would need is two, one for each group.
thread-group 1 0-63thread-group 2 64-127
- More than two groups of CPUs will require as many thread groups. If you grouped the CPUs such that there were four distinct groups, you would need four thread groups.
- Assuming that the CPUs are split into two groups, the minimum number of thread groups we would need is two, one for each group.
- Assign no more threads to a CPU set as there are CPUs in that set, as that would cause some threads to compete for the same CPU. The load balancer will log a warning in this case:
This configuration binds 96 threads to a total of 64 CPUs via cpu-map directives. This means that some threads will compete for the same CPU, which will cause severe performance degradation. Please fix either the 'cpu-map' directives or set the global 'nbthread' value accordingly.- As there are 128 CPUs in this example, the maximum number of threads we can use is 128.
- Since we created two thread groups, we can now assign them to CPU sets with the same number of CPUs, using the conceptual CPU grouping we determined earlier:
cpu-map 1/1-64 0-63cpu-map 2/1-64 64-127
This example details a case where we wanted to use all cores on the system, and as such, needed to use more than 64 threads. Depending on whether you intend to use all available threads and all available cores or subsets of either affects how many threads you should put in each thread group. You will need to test different configurations on your system to determine the optimal configuration. Generally, you can put as many threads in a thread group as there are CPUs per CPU set for them to run on.
Caution
If your system uses hyperthreaded cores, be sure to arrange your cpu-maps such that threads of the same thread group have the opportunity to run on the same core. For an example configuration on a system with hyperthreaded cores, see Example: Use cpu-policy to enable more threads.
As of version 2.8, all threads are available to all listeners, so you don’t have to add configuration settings to your listeners to enable the thread groups. However, to further refine how thread groups are applied to your listeners, or to use thread groups in version 2.7, you must reference the specific thread groups with your bind directives to assign the thread groups that should handle processing for each listener. For example, to use two thread groups in a single frontend, reference each of them on a separate bind directive:
haproxy
haproxy
Want to enable multiple sockets per the same address and port?
If after defining thread groups and cpu-maps you also want to enable multiple sockets per the same address and port, you can add the shards keyword in conjunction with the thread keyword. Exercise caution with this, as it will create more file descriptors.
For example, if you want one of your listeners to create two sockets:
haproxy
haproxy
This example also shows how to map specific thread groups to specific listeners (binds). Of the two thread groups, the frontend web1 will use threads from the first, and the frontend web2 will use threads from the second. The frontend web1 will use two listener sockets, as denoted by shards 2, and the frontend web2 will use one, which is the default. You can assign any combination of thread groups and shards to your listeners, just be sure to test on your system for optimal performance depending on each listener’s traffic load.
Please note that this example is for illustrative purposes only, and you must create a custom configuration including an appropriate value for nbthread, thread groups, and cpu-maps that is tailored for your specific machine, or let the load balancer do it for you. Keep in mind as well that the arrangement of your NIC(s), may inform your configuration, as we’ve found that generally, except in cases where CPUs are saturated with NIC traffic, the load balancer sees the best performance when it runs on the same node as the NIC.
Case #4: You have a heavy SSL load Jump to heading
If you have a dual-socket CPU, we don’t recommend that you split processing across the physical sockets, and instead use all cores on a single physical CPU. This is because there’s significant overhead that results from communicating between the two physical CPUs. If, along with your dual-socket CPU, you also have a heavy SSL load, you could see an increase in performance by defining multiple thread groups, and assigning thread groups intentionally to each physical CPU using cpu-map, where thread groups on one CPU will handle SSL/TLS operations, and the other thread groups on the other CPU will handle non-SSL/TLS operations.
Keep in mind the following when defining your thread groups and cpu-maps:
- You may see better performance assigning only the threads that will process SSL/TLS traffic to the node to which the NIC is assigned. That way, that node is dedicated to NIC operations and SSL operations. The rest of the threads can run on another node and not be impacted by these expensive operations.
- Examine your system to see which node(s) the NIC(s) are assigned to. This may inform how you configure the threads.
- You may see a performance increase when using multiple NICs, with each assigned to only one node or physical CPU socket. In this configuration, group your load balancer threads such that they will process only the traffic for a particular node’s NIC.
- The goal with this is to avoid cross-NIC traffic. For example:
- One listener uses threads bound to the first node. You should configure your listener to only process traffic for the addresses associated with the NIC bound to the first node.
- Another listener uses threads bound to the second node. You should configure this listener to only process traffic for addresses associated with the NIC bound to the second node.
- The goal with this is to avoid cross-NIC traffic. For example:
Be sure to test this on your system to see if the performance gain of having additional CPUs available for SSL/TLS operations outweighs the performance cost of inter-socket or inter-CCX communication.
Case #5: Your system has multiple types of cores Jump to heading
This section applies to:
- HAProxy 3.2 and newer
If your system is heterogeneous, in that it has multiple types of cores, you may want the load balancer to use only one type of core. For example, your system may have both performance cores and efficiency cores, or “big” and “little” cores. Performance cores are designed for demanding workloads, whereas efficiency cores are designed to prioritize power savings for light-weight tasks.
Set cpu-policy to performance to use only performance cores, or set it to efficiency to use only efficiency cores. As of version 3.3, performance is the default cpu-policy.
You could see a performance boost on such systems by adding the following to your global configuration section:
haproxy
haproxy
For more information about cpu-policy, see tuning the load balancer’s automatic CPU binding.
Case #6: Your system has multiple CCX or L3 caches Jump to heading
If your system has multiple CCX, such as with AMD EPYC, or multiple L3 caches, you could see performance gains by defining a thread group per CCX. In other words, you can pin thread groups, using cpu-map, to cores that share the same L3 cache to optimize performance.
This is much easier in version 3.2
To accomplish this in version 3.2, simply add one of the following cpu-policy to your global configuration section:
Either performance, the default in versions 3.3 and later, where the load balancer will enable all available threads and organize them into efficient thread groups (grouping them by shared L3 cache):
haproxy
haproxy
Or group-by-ccx, where the load balancer will group threads per CCX.
haproxy
haproxy
As this could then use multiple nodes on your system, and though thread groups help to reduce data sharing latency between threads, be sure to test the change to make sure that it’s more performant, as inter-CCX communication between threads could introduce latency.
For versions 2.7 to 3.1, you will need to define your configuration manually. Keep in mind the following when defining your thread groups and cpu-maps:
- You should group threads such that they reflect the arrangement of your CCXs. For example, if your system has four CCX, you should probably have four thread groups.
- You should assign the thread groups to CPU sets that are grouped by CCX.
- Be sure to create no more threads than there are CPUs, as that would cause some threads to compete for the same CPU.
Tuning the automatic CPU binding Jump to heading
This section applies to:
- HAProxy 3.2 and newer
In this section, we’ll walk through an example that explains how to gather information about your system and use it to inform how you can tune the load balancer’s automatic CPU binding behavior. Consider the case where you’re running the load balancer on a NUMA-aware system and have decided that you’d like the load balancer to use the CPUs from more than one NUMA node, which is the default.
Prior to version 3.2, accomplishing this required very specific management and mapping of threads and cores using cpu-maps, thread groups, and other process-management-related directives like nbthread. The drawbacks for configuring the binding manually are:
- Each system requires very specific settings.
- It’s dangerously easy to configure the CPU bindings in ways that detrimentally impact performance.
- The configuration becomes more complex.
- The configuration may not be portable across all of your machines.
Version 3.2 introduced a middle ground between the default, automatic configuration and complex manual configurations, allowing you to use simple configuration directives to tune how you would like the load balancer to apply the automatic CPU binding. These simple configuration directives introduced in version 3.2 are cpu-policy and cpu-set.
The global directive cpu-policy, which defaults to performance in version 3.3, offers you flexibility in how the load balancer arranges its threads across CPUs. When set to performance, the load balancer will use all available threads and cores on all NUMA nodes, and it arranges them intelligently by locality into thread groups that align with the topology of your system.
In version 3.2, the default setting is first-usable-node where it uses the first NUMA node with all its available CPUs, and it creates a matching number of threads in a single thread group. This behavior was introduced as the default in version 2.4 and remained the default behavior through version 3.2. However, if you have more than one node on your system, you may want the load balancer to create threads that will run on those nodes as well. We recommend that on version 3.2, you try cpu-policy performance.
There are some additional options that you may find are more performant for your system, depending on the architecture of your system and the needs of your traffic:
group-by-cluster: The load balancer will create one thread group for each CPU cluster. We recommend this option for taking advantage of multiple NUMA nodes and for systems having multiple CPU sockets.- There are three more options,
group-by-2clusters,group-by-3clusters, andgroup-by-4clusters, which could potentially show better thread grouping for your system thangroup-by-cluster. In each case, threads are grouped by numbers of clusters, either 2, 3, or 4, which could potentially spread the load across clusters. Be sure to benchmark this on your system, as communication between clusters could have negative effects. We recommend you trygroup-by-clusterfirst.
On most large server systems, cluster and CCX are synonymous. However, there may be some systems where this is not the case. On such a system, grouping CPUs by CPU cluster may be detrimental to performance if the CPUs are not grouped by their shared L3 caches. In this case, you can set cpu-policy instead to:
group-by-ccx: This is similar togroup-by-cluster, except that CPUs are grouped by shared last level cache, usually the L3 cache.- Similarly to the group by cluster options, you can also group by two, three, or four CCX using
group-by-2-ccx,group-by-3-ccx, andgroup-by-4-ccx, respectively.
Additional policies are available to further restrict which CPUs the load balancer will use:
resource: Use this option when you need to restrict the load balancer to the smallest and most efficient CPU cluster for cost or power savings.efficiency: Use this option when you’re running on a system that has distinct performance and efficiency cores. In this case, the load balancer doesn’t use the most performant and powerful cores, saving them for other CPU-intensive operations.performance: This is the default starting in version 3.3. Use only the performance cores, which are the ones providing superior performance. By excluding efficiency cores, you can achieve equal and optimal performance across cores. On systems without distinct P&E cores, the load balancer will enable all cores across all NUMA nodes and group its threads accordingly when set toperformance.none: This disables all of the automatic detection and enables as many threads, in a single thread group, as there are available CPUs. We don’t recommend using this option without careful consideration and analysis of your system, as it could have dramatically negative impacts on performance, as threads won’t be grouped by locality and could share data across CCXs, or worse, CPU sockets.
There may be cases where you don’t want the load balancer to use specific CPUs, or you want the load balancer to run only on specific CPUs. You can use cpu-set for this. It allows you to symbolically notate which CPUs you want the load balancer to use. It also includes an option reset that will undo any limitation put in place on the load balancer, for example by taskset.
Use drop-cpu <CPU set> to specify which CPUs to exclude or only-cpu <CPU set> to include only the CPUs specified. You can also set this by node, cluster, core, or thread instead of by CPU set. Once you’ve defined your cpu-set, the load balancer then applies your cpu-policy to assign threads to the specific CPUs.
For example, if you want to bind only one thread to each core in only node 0, you can set cpu-set as follows:
haproxy
haproxy
You can then use the default cpu-policy or choose which one you want the load balancer to use.
Info
If you include nbthread, thread groups, or cpu-maps in your configuration, the automatic behaviors are disabled and the load balancer ignores cpu-policy and cpu-set.
Example: Use cpu-policy to enable more threads Jump to heading
To see the automatic CPU binding in action, run the load balancer with the -dc command line option, also introduced in version 3.2. By setting this argument, the load balancer will log the arrangement of threads, thread groups, and their associated CPUs that it has determined is optimal based on your CPU topology. Changing the values of cpu-policy and cpu-set should show changes in the arrangement, depending on the policy and/or the specific CPU sets. Keep in mind cpu-set acts first to eliminate cores you want to exclude and then cpu-policy arranges threads onto the remaining CPUs.
Here is the output the load balancer logs when run with the -dc option on our example system:
text
text
Without additional configuration, on version 3.2, the load balancer uses the default cpu-policy, first-usable-node, creates a single thread group with 64 threads (the maximum number of threads for a single thread group), and assigns the group to all of the available CPUs of the first node. As all of these CPUs are part of the same node and physical socket, this arrangement of threads should be sufficient for our needs, but we’ll examine our system using the lscpu -e command to see if there are other configurations we could consider.
nix
nix
outputtext
outputtext
This output shows that our system has:
- One NUMA node (numbered 0)
- One physical CPU socket (numbered 0)
- CPUs grouped in groups of eight each sharing an L3 cache (the caches numbered 0-7)
- 64 hyperthreaded cores, supporting two threads per core to total 128 CPUs.
- In order, CPUs 64-127 belong to cores 0-63.
The arrangement of the CPUs per their L3 cache is as follows:
| CPU | L3 Cache |
|---|---|
| 0-7, 64-71 | 0 |
| 8-15, 72-79 | 1 |
| 16-23, 80-87 | 2 |
| 24-31, 88-95 | 3 |
| 32-39, 96-103 | 4 |
| 40-47, 104-111 | 5 |
| 48-55, 112-119 | 6 |
| 56-63, 120-127 | 7 |
With this information, we could consider some adjustments to the settings the load balancer has determined automatically, if testing shows that we are experiencing uneven or high CPU load.
These adjustments include:
- Create multiple thread groups such that they are organized by CPUs that share an L3 cache.
- This should reduce the communication latency between threads, as this will help minimize sharing data between distant threads.
- It will also allow the load balancer to user more than 64 threads.
- Assign the thread groups to CPUs such that the threads can make the best use of the hyperthreaded cores.
- The communication latency between threads is the lowest between two threads of the same core.
We can add this line to the global section of the load balancer configuration to change the cpu-policy:
haproxy
haproxy
The load balancer now applies the group-by-cluster policy which creates as many threads as there are CPUs and divides the threads into one thread group per each CPU cluster. Each CPU cluster in this case is a group of CPUs that share an L3 cache. From what we saw in our system analysis, we would now expect to see that the load balancer creates 128 threads divides them into groups of CPUs that share L3 caches. The load balancer logs the change in the thread arrangement:
text
text
Indeed, the load balancer created 128 threads and divided them among 8 thread groups, where each thread group will execute on sets of CPUs that share an L3 cache. This arrangement also takes advantage of the hyperthreaded cores, as CPUs of the same cores are placed together in the groups. This means that when the threads share data within the group, there is a good chance that two threads sharing data are executing on the same physical core.
Automatic behavior in version 3.3
There are cases, such as this one, where cpu-policy performance and cpu-policy group-by-cluster will produce similar results. This is dependent upon the CPU topology. In this example, in version 3.3 where the default cpu-policy is performance, the load balancer would configure itself the same way, with 128 threads enabled and grouped per shared L3 cache, without you having to specify any additional configuration at all.
Tip
Though this configuration appears that it will be more performant, be sure to test it on your system if you decide to use it.
All of this is accomplished by the addition of a single line to the configuration. Expand the following example to see the corresponding manual configuration for this specific system. A configuration such as this would be required instead on versions 2.7-3.1 which can’t use the cpu-set and cpu-policy directives.
Example: Manually configure cpu-maps
In the example above, we used a single global configuration directive to change the automatic CPU binding behavior on our system. On previous versions (2.7-3.1), the same changes would require the following:
haproxy
haproxy
This configuration includes the following:
- Our system analysis showed we can use 128 threads, as we have 128 CPUs. We set the number of threads to 128 using
nbthread. - As there are 8 groups of 16 CPUs that share a cache (for example CPUs 0-7 and 64-71 use L3 cache 0), we define 8 thread groups of 16 threads each.
- We define CPU sets using
cpu-map:- Each
cpu-mappins 16 threads to as many CPUs. The 16 threads can run on any of the CPUs in the set. - The CPUs in each set share an L3 cache. This also groups the CPUs by core, which ensures that the threads that run on those CPUs make the best use of the hyperthreaded cores.
- Each
Troubleshooting and pitfalls Jump to heading
Keep in mind the following when manually changing the load balancer’s process management settings:
- In the vast majority of cases, the configuration the load balancer determines automatically for your system will provide the best performance.
- We’ve observed the best performance when assigning thread sets, defined in thread groups, to CPU sets versus assigning one particular thread to one particular CPU. This is because if the single CPU on which a thread is allowed to run is otherwise occupied by another operation outside of the load balancer, the thread may have to wait.
- If you define a value for
nbthread,thread-groupsorcpu-mapin your configuration, this disables the load balancer’s automatic configuration that best optimizes its settings for NUMA. - Only threads in the same thread group can work together. Threads in the same group should not be split across multiple NUMA nodes or CPU sockets, as this would cause performance degradation.
- If you don’t explicitly define your thread groups, that is, which threads belong to each group, and instead let the load balancer distribute them equally, the number of thread groups you define must be a divisor of the value you specify for
nbthreadin order for the threads to divide equally among the groups. - The load balancer can use a maximum of 64 threads automatically without further configuration. A thread group can, at maximum, consist of 64 threads, with a maximum of 16 thread groups. This enables you to use more threads on systems that support it.
- The number of threads you define for
nbthreadand assign to thread groups must be at most the same number of CPUs to which you assign them in your cpu-maps, as discrepancies, such as defining a number of threads larger than the number of cores, can cause a significant decrease in performance. - If you’re using more than 32 CPUs and are also using Lua scripts, you must use
lua-load-per-threadinstead oflua-load. When usinglua-load, the script is run on a single CPU at a time and because it can share state, must lock, which stalls the other CPUs. - In the case of hyperthreaded cores or vCPUs, threads should be grouped by physical CPU, that is, a thread should be able to run on either a physical core or its virtual counterpart, as the communication between two threads of the same core has the lowest latency.
See also Jump to heading
- For complete information on the
shardsbind option including syntax and options, see shards - For complete information on the
cpu-mapglobal directive including syntax, options, and more examples, see cpu-map - For complete information on the
thread-groupsglobal directive including syntax and options, see thread-groups - For complete information on the
thread-groupglobal directive, see thread-group - For complete information on the
threadbind option, see thread - For complete information on the
nbthreadglobal directive, see nbthread - For complete information on the
tune.listener.default-shardsglobal directive, see tune.listener.default-shards - For complete information on the
lua-load-per-threadglobal directive including syntax and options, see lua-load-per-thread - For complete information on the
lua-loadglobal directive syntax and options, see lua-load