Users and passwords
LDAP authentication
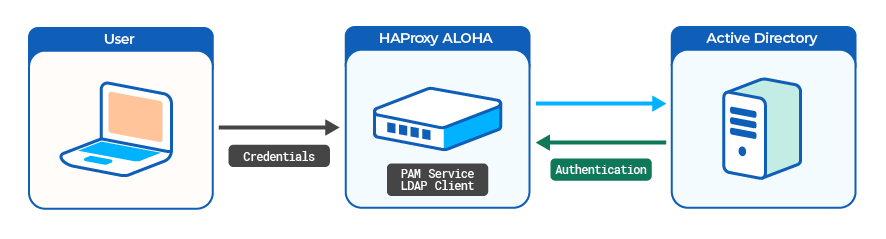
System administrators can authenticate to HAProxy ALOHA with a user account defined in an external LDAP server, such as Active Directory Domain Services. You can give each user either administrative access (read/write access) or monitoring access (read-only).
Caution
Before proceeding, connect to the HAProxy ALOHA appliance through SSH, or launch a terminal from the web UI’s Tools tab to avoid being locked out.
Set up the DNS Jump to heading
HAProxy ALOHA must be able to query the Active Directory DNS server.
-
In the Services tab, click system setup.

-
Enter the name of your AD Domain, and the IP address of the corresponding DNS server.
Option Description dns_domainName of your AD Domain dns_serversIP address of the AD DNS haproxyservice systemhostname ALOHA1rtc utcdns_domain mydomain.comdns_servers 192.168.1.65haproxyservice systemhostname ALOHA1rtc utcdns_domain mydomain.comdns_servers 192.168.1.65You can also launch the following command from a terminal:
nixsudo config set system dns_domain mydomain.comsudo config set system dns_servers 192.168.1.65nixsudo config set system dns_domain mydomain.comsudo config set system dns_servers 192.168.1.65 -
Reload the
systemservice. -
Launch a terminal from the web UI’s Tools tab or SSH to your HAProxy ALOHA appliance.
-
Check that HAProxy ALOHA can communicate with the DNS server by querying for a DNS hostname within your domain.
nixnslookup dc1.mydomain.comnixnslookup dc1.mydomain.comoutputtextServer: 192.168.1.65Address: 192.168.1.65:53outputtextServer: 192.168.1.65Address: 192.168.1.65:53
Enable the LDAP authentication module Jump to heading
-
In the Services tab, click pam setup.

-
Add LDAP support to the PAM service.
haproxyservice pamautostartldap_auth 1haproxyservice pamautostartldap_auth 1Tip
To get more verbose logs for easier troubleshooting, specify
debug 1as well. -
Apply your changes to the PAM configuration.

-
Restart the PAM service.

You can also launch the following commands from a terminal:
nixsudo config set pam ldap_auth 1sudo config set pam autostartsudo service pam restartnixsudo config set pam ldap_auth 1sudo config set pam autostartsudo service pam restart
Configure the local LDAP name service daemon Jump to heading
The HAProxy ALOHA nslcd daemon queries LDAP based on the nslcd.conf configuration file.
-
Create a user account in Active Directory that HAProxy ALOHA will use to connect to the credentials store. This user should have a password that never expires. For example, you could create a user with the account name
alohalogin. -
On the HAProxy ALOHA, from the Services tab, click nslcd setup.

-
Allow the
nslcddaemon to start automatically.haproxyservice nslcdautostarthaproxyservice nslcdautostartYou can also launch the following command from a terminal:
nixsudo config set nslcd autostartnixsudo config set nslcd autostart -
In the Services tab, click the [advanced mode] link, then edit the
nslcdservice.
The content of the
/etc/nslcd.confNTP configuration file displays. -
Adapt the
nslcdconfiguration to your LDAP context.For example, below is an Active Directory with a schema level from 2008 to 2016.
nslcd configurationtextuid nobodygid nobodylog syslognss_initgroups_ignoreusers ALLLOCALuri ldap://dc1.mydomain.com/base dc=mydomain,dc=comfilter passwd (objectClass=posixAccount)filter group (objectClass=posixGroup)binddn cn=alohalogin,cn=Users,dc=mydomain,dc=combindpw mypassword# To use LDAP over SSL (first, you have to import your CA file through the Web UI)# tls_cacertfile /etc/ssl/frontends/AD2008/crt.pempagesize 1000referrals offidle_timelimit 800filter passwd (&(objectClass=user)(objectClass=person)(!(objectClass=computer)))map passwd uid sAMAccountNamemap passwd uidNumber objectSid:S-1-5-21-1608350394-2850411632-306912843map passwd gidNumber objectSid:S-1-5-21-1608350394-2850411632-306912843map passwd homeDirectory "/home/$sAMAccountName"map passwd gecos displayNamemap passwd loginShell "/bin/bash"filter group (|(objectClass=group)(objectClass=person))map group gidNumber objectSid:S-1-5-21-1608350394-2850411632-306912843nslcd configurationtextuid nobodygid nobodylog syslognss_initgroups_ignoreusers ALLLOCALuri ldap://dc1.mydomain.com/base dc=mydomain,dc=comfilter passwd (objectClass=posixAccount)filter group (objectClass=posixGroup)binddn cn=alohalogin,cn=Users,dc=mydomain,dc=combindpw mypassword# To use LDAP over SSL (first, you have to import your CA file through the Web UI)# tls_cacertfile /etc/ssl/frontends/AD2008/crt.pempagesize 1000referrals offidle_timelimit 800filter passwd (&(objectClass=user)(objectClass=person)(!(objectClass=computer)))map passwd uid sAMAccountNamemap passwd uidNumber objectSid:S-1-5-21-1608350394-2850411632-306912843map passwd gidNumber objectSid:S-1-5-21-1608350394-2850411632-306912843map passwd homeDirectory "/home/$sAMAccountName"map passwd gecos displayNamemap passwd loginShell "/bin/bash"filter group (|(objectClass=group)(objectClass=person))map group gidNumber objectSid:S-1-5-21-1608350394-2850411632-306912843Important
Enter a newline at the end of the configuration.
Each LDAP context is specific. You can apply the following template for a standard LDAP deployment:
-
uri: URI referring to the LDAP server. Use theldapsprefix for LDAP over SSL. -
base: AD search base. -
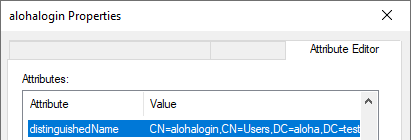
binddn: Distinguished Name used to bind to the LDAP directory. You do not need to escape the space character. On Windows Server, you can use thedquerycommand to get the value:powershellPS C:\Users\admin> dsquery user -samid 'alohalogin'powershellPS C:\Users\admin> dsquery user -samid 'alohalogin'outputtext"CN=alohalogin,CN=Users,DC=mydomain,DC=com"outputtext"CN=alohalogin,CN=Users,DC=mydomain,DC=com"You can also get this value by displaying the Distinguished Name of the account: turn on Advanced Features in the AD Users and Computers View menu, and display its attributes in the Attribute Editor tab.
Tip
- To log
nslcdactions to syslog, specifylog syslog. - To ensure that
nslcddoes not fail at startup when the LDAP server is down, specify the AD search base (for example,base dc=mydomain,dc=com). - To minimize latency when a user uses
sudoand the LDAP server is offline, specifynss_initgroups_ignoreusers root,admin,monitor.
-
-
Restart the
nslcdservice.Tip
Launch
nslcdin debug mode in an HAProxy ALOHA terminal to view troubleshooting information:nixsudo service nslcd stopsudo nslcd -d -nnixsudo service nslcd stopsudo nslcd -d -n -
Verify that HAProxy ALOHA can connect to the LDAP server by testing the connection with the
ldapsearchcommand. This command will prompt you to enter the user’s password.nixldapsearch -x -H dc1.mydomain.com -D alohalogin@mydomain.com -W -b 'CN=Users,DC=mydomain,DC=com'nixldapsearch -x -H dc1.mydomain.com -D alohalogin@mydomain.com -W -b 'CN=Users,DC=mydomain,DC=com'text# extended LDIF## LDAPv3# base <dc=mydomain,dc=com> with scope subtree# filter: (objectclass=*)# requesting: ALL## mydomain.comdn: DC=mydomain,DC=comobjectClass: topobjectClass: domainobjectClass: domainDNSdistinguishedName: DC=mydomain,DC=cominstanceType: 5whenCreated: 20211202085814.0Z[...]text# extended LDIF## LDAPv3# base <dc=mydomain,dc=com> with scope subtree# filter: (objectclass=*)# requesting: ALL## mydomain.comdn: DC=mydomain,DC=comobjectClass: topobjectClass: domainobjectClass: domainDNSdistinguishedName: DC=mydomain,DC=cominstanceType: 5whenCreated: 20211202085814.0Z[...]Option Description -xUse simple authentication. -hURI referring to the LDAP server. -DDistinguished Name used to bind to the LDAP directory. -WPrompt for password. -bAD search base. If the
ldapsearchcommand fails, check your network configuration.
Enable login for LDAP users Jump to heading
You can, for example, implement the following list of access rights:
| Alice | Bob | Carol | Dave | |
|---|---|---|---|---|
| Web interface | admin |
admin |
admin |
monitor |
| SSH | admin |
admin |
||
| Serial port | admin |
We assume that the four users in the table above have an account created on the AD domain.
-
Launch a terminal from the web UI’s Tools tab or SSH to your HAProxy ALOHA appliance.
-
Edit the file
/etc/security/users.confthrough the File Manager.Add users that have an account on the LDAP server, specifying the following for each:
Option Description userThe Active Directory user account name. auth_typeldap. servicewui,sshd, orlogin. This restricts how a user can log in.allowordenyEnable or disable user’s login. map_to_useradminfor read/write access, ormonitorfor read-only access.For example, these directives implement the example access rights listed earlier in this section.
/etc/security/users.confuser=alice auth_type=ldap : allow map_to_user admin user=bob auth_type=ldap service=wui,sshd : allow map_to_user admin user=carol auth_type=ldap service=wui : allow map_to_user admin user=dave auth_type=ldap service=wui : allow map_to_user monitor :deny/etc/security/users.confuser=alice auth_type=ldap : allow map_to_user admin user=bob auth_type=ldap service=wui,sshd : allow map_to_user admin user=carol auth_type=ldap service=wui : allow map_to_user admin user=dave auth_type=ldap service=wui : allow map_to_user monitor :denyYou can also allow access to all users in an AD group:
textgroup=aloha-admins auth_type=ldap : allow map_to_user admingroup=aloha-monitor auth_type=ldap : allow map_to_user monitor:denytextgroup=aloha-admins auth_type=ldap : allow map_to_user admingroup=aloha-monitor auth_type=ldap : allow map_to_user monitor:denyCaution
The
:denyentry must be the last in the file.HAProxy ALOHA evaluates entries from top to bottom. All entries after
:denyare ignored.
Save your configuration Jump to heading
Select the Setup tab and click Save to save your configuration. The “Configuration was successfully saved” message displays.

You can also launch the following command from a terminal:
nix
nix
Test your configuration Jump to heading
Before you allow your LDAP users to log in, you should test a PAM configuration before you apply it.
-
Check that your configuration is parsed correctly:
nixsudo test_pam_user_map check_config -f /etc/security/users.confnixsudo test_pam_user_map check_config -f /etc/security/users.confoutputChecking config file /etc/security/users.conf Config file /etc/security/users.conf parsed successfullyoutputChecking config file /etc/security/users.conf Config file /etc/security/users.conf parsed successfully -
Simulate a local user logging in through
ssh:nixsudo test_pam_user_map check_pam_auth \-f /etc/security/users.conf check_config -u alice -s sshd -t ldapnixsudo test_pam_user_map check_pam_auth \-f /etc/security/users.conf check_config -u alice -s sshd -t ldapoutputtextChecking PAM access for user aliceResult: auth_type=ldap allow=1 matched=1 map_to_user=adminPAM: access grantedoutputtextChecking PAM access for user aliceResult: auth_type=ldap allow=1 matched=1 map_to_user=adminPAM: access granted -
Test your LDAP configuration with a real user and a real password:
nixsudo test_pam_user_map check_login_pass -f /etc/security/users.conf \-u alice -p Hello123Hello123 -s sshd -t ldapnixsudo test_pam_user_map check_login_pass -f /etc/security/users.conf \-u alice -p Hello123Hello123 -s sshd -t ldapoutputtextValidating user=alice password=*** service=sshdPAM user has been set to adminuser/password validated successfullyoutputtextValidating user=alice password=*** service=sshdPAM user has been set to adminuser/password validated successfullyCaution
Clear your terminal history after running this command.
Limitations Jump to heading
- When using SCP, user remapping does not work.
- When using SSH keys, user remapping does not work (but key-based authentication does).
- You cannot change the password of an LDAP user using HAProxy ALOHA. If you need to do so, use the tools provided with your LDAP server.
Troubleshooting Jump to heading
If the message # access denied using ssh, allowed when using login, displays, check the following:
-
The
AllowGroupsdirective is commented out in/etc/ssh/sshd_config.nixsudo grep -i AllowGroups /etc/ssh/sshd_confignixsudo grep -i AllowGroups /etc/ssh/sshd_configoutput# AllowGroups adm usersoutput# AllowGroups adm usersIf this directive is not commented out, check that your users’ groups are allowed:
nixsudo getent groupnixsudo getent group -
Check that
UsePAMis set toyesin/etc/ssh/sshd_config.nixsudo grep UsePAM /etc/ssh/sshd_confignixsudo grep UsePAM /etc/ssh/sshd_configoutputUsePAM yesoutputUsePAM yes
See also Jump to heading
Do you have any suggestions on how we can improve the content of this page?