HAProxy config tutorials
DNS resolution
A resolvers section lists DNS nameservers that the load balancer will query when it needs to resolve a hostname to an IP address. A resolvers section is followed by a label, such as mynameservers, to differentiate it from others.
haproxy
haproxy
Each nameserver line indicates the IP address and port of a DNS nameserver. The load balancer sends a query to all of the nameservers and uses the first, valid response that it receives.
Resolve server hostnames Jump to heading
The most common way to use this feature is to configure backend servers with hostnames instead of IP addresses.
In the following configuration sample, each server defined in the backend webservers is using the resolvers argument to reference the resolvers section named mynameservers:
haproxy
haproxy
Adjust DNS resolver settings Jump to heading
Various options in the resolvers section exist to adjust how the load balancer queries nameservers and caches the responses.
The following sample configuration contains a resolvers section with all available options configured. The parse-resolv-conf directive became available in HAProxy version 1.8.
haproxy
haproxy
Delay DNS resolution with init-addr Jump to heading
Available since
- HAProxy 1.7
- HAProxy Enterprise 1.7r1
- HAProxy ALOHA 9.0
Resolution happens when the load balancer starts or reloads. However, in some cases, the DNS records may not be available yet, such as in dynamic environments that leverage DNS-based service discovery for populating DNS records. This would result in the load balancer failing to start since failure to resolve an address is fatal.
To control this behavior, use the init-addr argument on the server line, followed by comma-separated resolution methods:
haproxy
haproxy
In this example:
- By setting the first method to
last, the process first tries to get the IP address from a state file (set with theserver-state-filedirective). - Next, it tries to resolve the DNS name by using its internal
libcresolver. - If that fails, it moves on to the
nonemethod, which indicates that the load balancer can start without resolving the name with the expectation that the name will be resolved later at runtime.
You can also set a hardcoded IP address as a fallback:
haproxy
haproxy
DNS service discovery Jump to heading
You can populate server addresses and ports in your configuration by querying your DNS server.
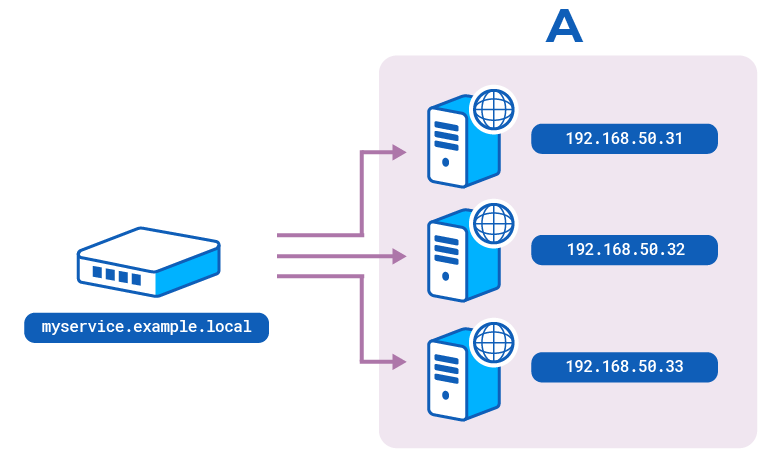
Service discovery with A records Jump to heading
DNS A records map hostnames to IP addresses. You can configure the load balancer to query for these records and populate server lines from the information that returns.
To configure service discovery:
-
Update your DNS nameserver to resolve a hostname, such as
myservice.example.local, to one or more IP addresses usingArecords.You can then query the nameserver directly, for example with the
digtool, to ensure that it returns the correct records:nixdig @192.168.50.30 -p 53 A myservice.example.localnixdig @192.168.50.30 -p 53 A myservice.example.localoutputtext;; QUESTION SECTION:;myservice.example.local. IN A;; ANSWER SECTION:myservice.example.local. 90 IN A 192.168.50.31myservice.example.local. 90 IN A 192.168.50.32myservice.example.local. 90 IN A 192.168.50.33outputtext;; QUESTION SECTION:;myservice.example.local. IN A;; ANSWER SECTION:myservice.example.local. 90 IN A 192.168.50.31myservice.example.local. 90 IN A 192.168.50.32myservice.example.local. 90 IN A 192.168.50.33If you configured multiple
Arecords, multiple IP addresses should return for the same hostname. -
In your load balancer configuration, add a
resolverssection.- Add one or more
nameserverlines to specify the IP addresses and ports of your DNS nameservers. - Set the
accepted_payload_sizeto 8192 to allow larger DNS payloads, which is required to receive more server IP addresses within a single DNS response.
For example:
haproxyresolvers mydnsnameserver dns1 192.168.50.30:53accepted_payload_size 8192haproxyresolvers mydnsnameserver dns1 192.168.50.30:53accepted_payload_size 8192 - Add one or more
-
Use a
server-templatein abackendto set the template for theserverlines. When the load balancer queries your DNS servers, these will be populated with IP addresses.haproxybackend webserversbalance roundrobinserver-template web 5 myservice.example.local:80 check resolvers mydns init-addr nonehaproxybackend webserversbalance roundrobinserver-template web 5 myservice.example.local:80 check resolvers mydns init-addr noneIn this example, the
server-templatedirective:- Adds the specified number of servers (5) to the backend.
- Their names will have
webas a prefix. - The hostname
myservice.example.localis queried. - Port 80 is hardcoded.
- The
resolverssectionmydnsis specified. - The
init-addr noneargument means that the load balancer can initialize without having to resolve the IP addresses at startup. They can be resolved during runtime.
How it works: Server templates
Using DNS service discovery with
server-templateis equivalent to defining abackendthat looks like this:haproxybackend webserversbalance roundrobinserver web1 192.168.50.31:80 checkserver web2 192.168.50.32:80 checkserver web3 192.168.50.33:80 checkserver web4 192.168.50.34:80 check disabledserver web5 192.168.50.35:80 check disabledhaproxybackend webserversbalance roundrobinserver web1 192.168.50.31:80 checkserver web2 192.168.50.32:80 checkserver web3 192.168.50.33:80 checkserver web4 192.168.50.34:80 check disabledserver web5 192.168.50.35:80 check disabledWhen you add more DNS records to your nameserver, they will automatically go into the backend to fill in the
web4andweb5slots.
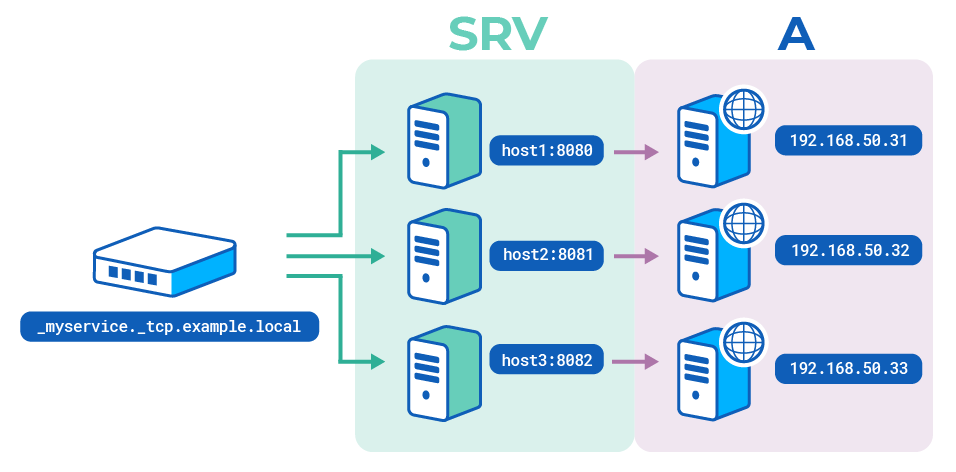
Service discovery with SRV records Jump to heading
DNS SRV records specify the host and port that a service listens on. You can configure the load balancer to query for these records and populate the IP addresses and ports of server lines in a backend section.
DNS SRV records are resources used to identify computers that host specific services. They are contained in the ANSWER section of DNS responses and have the following structure:
text
text
where:
_serviceis the standard network service name (taken from/etc/services) or a port number_protois the standard protocol name (tcporudp)nameis the name of the service, i.e. the name used in the queryTTLis the validity period for the response (the load balancer ignores this field because it maintains its own expiry data defined in the configuration)classis the DNS class (IN)SRVis the DNS record type (SRV)priorityis the priority of the target host. Lower value = higher preference (the load balancer ignores this field but may use it later to indicate active / backup state)weightis the relative weight in case of records with the same priority. Higher number = higher preferenceportis the port where the service is configuredtargetis the hostname of the machine providing the service, ending in a dot
Configure service discovery Jump to heading
-
Update your DNS nameserver to resolve a service name, such as
myservice.example.local, to one or more hostnames and ports viaSRVrecords. Those hostnames should resolve to IP addresses usingArecords.- Add DNS
Arecords that resolve multiple hostnames, such as host1, host2 and host3, to different IP addresses. - Add the same number of
SRVrecords that resolve a service name, such as_myservice._tcp.example.local, to the hostnames you defined and the port on the host where the service listens.
You can query the nameserver directly with the
digtool to ensure that it returns the correct records.For example:
nixdig @192.168.50.30 -p 53 SRV _myservice._tcp.example.localnixdig @192.168.50.30 -p 53 SRV _myservice._tcp.example.localoutputtext;; QUESTION SECTION:;_myservice._tcp.example.local. IN;; ANSWER SECTION:_myservice._tcp.example.local. 0 IN SRV 0 0 8080 host1._myservice._tcp.example.local. 0 IN SRV 0 0 8081 host2._myservice._tcp.example.local. 0 IN SRV 0 0 8082 h;; ADDITIONAL SECTION:host1. 0 IN A 192.168.50.31host2. 0 IN A 192.168.50.32host3. 0 IN A 192.168.50.33outputtext;; QUESTION SECTION:;_myservice._tcp.example.local. IN;; ANSWER SECTION:_myservice._tcp.example.local. 0 IN SRV 0 0 8080 host1._myservice._tcp.example.local. 0 IN SRV 0 0 8081 host2._myservice._tcp.example.local. 0 IN SRV 0 0 8082 h;; ADDITIONAL SECTION:host1. 0 IN A 192.168.50.31host2. 0 IN A 192.168.50.32host3. 0 IN A 192.168.50.33 - Add DNS
-
Add a
resolverssection in your configuration file to set the DNS nameservers to watch for changes.- Add one or more
nameserverlines to specify the IP addresses and ports of your DNS nameservers. - Set the
accepted_payload_sizeto 8192 to allow larger DNS payloads, which is required to receive more server IPs within a single DNS result.
For example:
haproxyresolvers mydnsnameserver dns1 192.168.50.30:53accepted_payload_size 8192haproxyresolvers mydnsnameserver dns1 192.168.50.30:53accepted_payload_size 8192 - Add one or more
-
Use a
server-templatein abackendto set the template for theserverlines:haproxybackend webserversbalance roundrobinserver-template web 5 _myservice._tcp.example.local resolvers mydns check init-addr nonehaproxybackend webserversbalance roundrobinserver-template web 5 _myservice._tcp.example.local resolvers mydns check init-addr noneIn this example, the
server-templatedirective:- Adds the specified number of servers (5) to the backend.
- Appends
webas a prefix to their names. - Queries the service name
_myservice._tcp.example.local. - Have the
SRVrecords fill in the ports. - Specifies the
resolverssectionmydns - The
init-addr noneargument means that the load balancer can initialize without having to resolve the IP addresses at startup. It can resolve them during runtime.
How it works: Server templates
This is equivalent to adding a
backendthat looks like this:haproxybackend webserversbalance roundrobinserver web1 192.168.50.31:8080 checkserver web2 192.168.50.32:8081 checkserver web3 192.168.50.33:8082 checkserver web4 192.168.50.34:80 check disabledserver web5 192.168.50.35:80 check disabledhaproxybackend webserversbalance roundrobinserver web1 192.168.50.31:8080 checkserver web2 192.168.50.32:8081 checkserver web3 192.168.50.33:8082 checkserver web4 192.168.50.34:80 check disabledserver web5 192.168.50.35:80 check disabledWhen you add more records to your nameserver, they will automatically go into the backend to fill in the
web4andweb5slots.
See also Jump to heading
Do you have any suggestions on how we can improve the content of this page?