Load balancing
WebSocket
There is almost nothing needed to proxy WebSocket connections, other than to set timeouts and enable connection closing. The load balancer knows how to upgrade an HTTP connection to a WebSocket connection and once that happens, messages will travel back and forth through a WebSocket tunnel.
However, you must design your system for scale if you plan to load balance multiple WebSocket servers. Each client connects to one of your servers, where it then opens a persistent WebSocket connection. Because each server has only its own list of connected clients, messages passed to one server must be shared with the other servers somehow. Similarly, when you want to broadcast a message to all clients, all servers must receive and relay it. A typical way to solve this is to store messages in a shared database like Redis or pass messages between servers using a Publish/Subscribe framework like Kafka or RabbitMQ.
Configure WebSockets Jump to heading
-
List your WebSocket servers in a
backendsection and add afrontendthat receives HTTP traffic and relays it to the backend:haproxyfrontend fe_mainbind :80default_backend websocket_serversbackend websocket_serversoption http-server-closetimeout tunnel 1hserver s1 192.168.0.10:3000 checkserver s2 192.168.0.11:3000 checkhaproxyfrontend fe_mainbind :80default_backend websocket_serversbackend websocket_serversoption http-server-closetimeout tunnel 1hserver s1 192.168.0.10:3000 checkserver s2 192.168.0.11:3000 checkIn this example:
option http-server-closecloses connections to the server immediately after the client finishes their session rather than using Keep-Alive. This promotes faster reuse of connection slots.timeout tunnelsets how long to keep an idle WebSocket connection open.
-
Optional: Route WebSocket clients to the backend by using a
use_backenddirective with a conditional statement. In the following example, thefrontendsection sends requests that have a URL beginning with/wsto thewebsocket_serversbackend:haproxyfrontend fe_mainbind :80use_backend websocket_servers if { path_beg /ws }default_backend http_servershaproxyfrontend fe_mainbind :80use_backend websocket_servers if { path_beg /ws }default_backend http_serversYou may also want to add
option logasapto the frontend so that connections are logged immediately, rather than logging them only after they close.
Example WebSocket client and server Jump to heading
This example uses Node.js to run a simple WebSocket application, which you can then load balance.
-
On a server separate from your load balancer, use the WebSocket Javascript API to create a client application. Below is an example web page named
index.html. Change the WebSocket URLws://[LOAD BALANCER IP]/ws/echoto use your load balancer’s IP address:index.htmlhtml<!DOCTYPE html><html lang="en"><head><title>WebSocket Example</title></head><body><h1>WebSocket Example</h1><form><label for="message">Message:</label><br /><input type="text" id="message" name="message" /><br /><input type="button" id="sendBtn" value="Send" /></form><div id="output"></div><script type="text/javascript">window.onload = function() {// connect to the serverlet socket = new WebSocket("ws://[LOAD BALANCER IP]/ws/echo");socket.onopen = () => socket.send("Client connected!");// send a message to the servervar sendButton = document.getElementById("sendBtn");var message = document.getElementById("message");// user clicks 'send'sendButton.onclick = () => {socket.send(message.value);}// user presses entermessage.onkeypress = (evt) => {if (evt.keyCode === 13) {evt.preventDefault();socket.send(message.value);}}// print a message from the serversocket.onmessage = (evt) => {var output = document.getElementById("output");output.innerHTML += `<div>${evt.data}</div>`;}}</script></body></html>index.htmlhtml<!DOCTYPE html><html lang="en"><head><title>WebSocket Example</title></head><body><h1>WebSocket Example</h1><form><label for="message">Message:</label><br /><input type="text" id="message" name="message" /><br /><input type="button" id="sendBtn" value="Send" /></form><div id="output"></div><script type="text/javascript">window.onload = function() {// connect to the serverlet socket = new WebSocket("ws://[LOAD BALANCER IP]/ws/echo");socket.onopen = () => socket.send("Client connected!");// send a message to the servervar sendButton = document.getElementById("sendBtn");var message = document.getElementById("message");// user clicks 'send'sendButton.onclick = () => {socket.send(message.value);}// user presses entermessage.onkeypress = (evt) => {if (evt.keyCode === 13) {evt.preventDefault();socket.send(message.value);}}// print a message from the serversocket.onmessage = (evt) => {var output = document.getElementById("output");output.innerHTML += `<div>${evt.data}</div>`;}}</script></body></html> -
Create the WebSocket server. The following node.js application file is named
index.js. It serves the web page from the previous step and hosts the/ws/echoWebSocket function:index.jsjavascriptconst express = require('express');const app = express();const path = require('path');const expressWs = require('express-ws')(app);// Serve web page HTMLapp.get('/ws', (req, res) => {res.sendFile(path.join(__dirname + '/index.html'));});// WebSocket functionapp.ws('/ws/echo', (ws, req) => {// receive a message from a clientws.on('message', msg => {console.log(msg);// broadcast message to all clientsvar wss = expressWs.getWss();wss.clients.forEach(client => client.send("Received: " + msg));})});app.listen(3000);index.jsjavascriptconst express = require('express');const app = express();const path = require('path');const expressWs = require('express-ws')(app);// Serve web page HTMLapp.get('/ws', (req, res) => {res.sendFile(path.join(__dirname + '/index.html'));});// WebSocket functionapp.ws('/ws/echo', (ws, req) => {// receive a message from a clientws.on('message', msg => {console.log(msg);// broadcast message to all clientsvar wss = expressWs.getWss();wss.clients.forEach(client => client.send("Received: " + msg));})});app.listen(3000); -
Add the following node.js
package.jsonfile to your project:package.jsonjavascript{"name": "websocket-server","version": "1.0.0","description": "Example WebSockets application","main": "index.js","scripts": {"start": "node index.js"},"author": "Your Name","license": "ISC","dependencies": {"express": "^4.17.1","express-ws": "4.0.0"}}package.jsonjavascript{"name": "websocket-server","version": "1.0.0","description": "Example WebSockets application","main": "index.js","scripts": {"start": "node index.js"},"author": "Your Name","license": "ISC","dependencies": {"express": "^4.17.1","express-ws": "4.0.0"}} -
Start the application with the
npm installandnpm startcommands:nixnpm install && npm startnixnpm install && npm start -
Configure your load balancer with this configuration, replacing
[SERVER IP]with the IP address of your node.js application server:haproxyfrontend fe_mainbind :80use_backend websocket_servers if { path_beg /ws }backend websocket_serversoption http-server-closetimeout tunnel 1hserver s1 [SERVER IP]:3000 checkhaproxyfrontend fe_mainbind :80use_backend websocket_servers if { path_beg /ws }backend websocket_serversoption http-server-closetimeout tunnel 1hserver s1 [SERVER IP]:3000 check -
Go to
http://[LOAD BALANCER IP]/ws. A web page displays a text box that the user types a message into to send to the WebSocket server. The server then echoes that message back to all connected clients.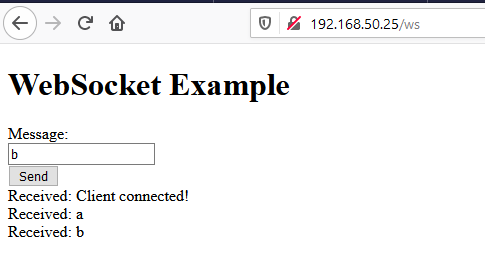
Do you have any suggestions on how we can improve the content of this page?