Integrations
NS1
When you run the load balancer in more than one availability zone, you may direct traffic to the geographically closest load balancer node. For example, you may use Anycast network routing to send clients to the nearest node. But where should a client be sent when the closest load balancer is experiencing high latency or is down?
Load shedding is a mechanism that allows you to send clients to a more distant load balancer if the closest one is too busy. Here you will learn how to configure load shedding at the DNS layer. You will use the NS1 DNS service to monitor your load balancers and shed load to an alternate load balancer when the closest node becomes too busy or is down.
Prerequisites Jump to heading
- An NS1 account
- A domain name to add DNS records for
- Two or more geographically dispersed load balancer nodes
Configure the NS1 records Jump to heading
When there are several IP addresses (answer) for a given zone, NS1 must choose the best one based on metadata associated with each answer. Set up metadata to inform this decision.
-
In the NS1 Customer Portal, set up a DNS zone (for example,
www.foo.com) and create A records within it for each of your load balancers. -
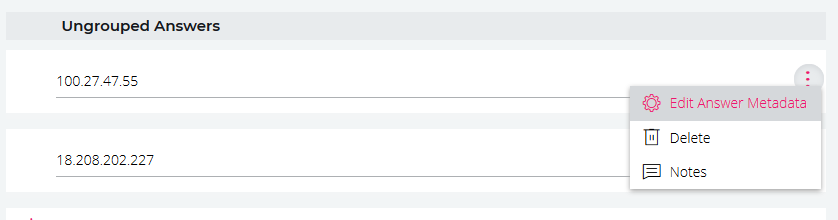
For each answer, click Edit Answer Metadata to display a settings window.
-
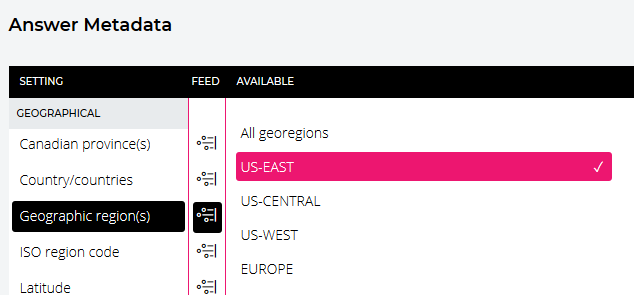
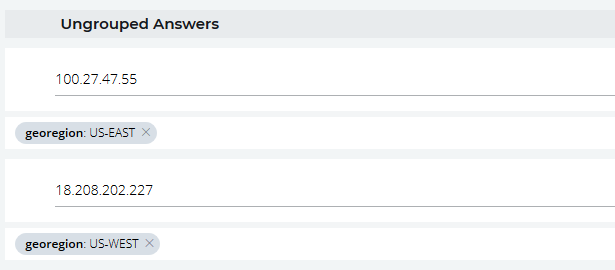
Set the appropriate Geographic region (for example, “US-EAST”).
-
Check that you associate each answer with a region.
-
Add metadata for the Up/down status and set it to
Up. This takes into consideration the status of the load balancer in addition to its geographic location.
Configure data feeds for the load balancer Jump to heading
Use the NS1 API to create data feeds where the load balancer can push data.
-
Go to the NS1 portal and generate an API key. This key needs the following permissions:
- push to datafeeds
- manage datasources
- manage datafeeds
-
Create a new data source with
curlto call the/v1/data/sourcesNS1 API endpoint. Make sure you set your API key for theX-NSONE-KeyHTTP header:nixcurl -sH 'X-NSONE-Key: <API_KEY>' \-X PUT 'https://api.nsone.net/v1/data/sources' \-d '{"sourcetype": "nsone_v1", "name": "HA_PROXY_CONNECT"}'nixcurl -sH 'X-NSONE-Key: <API_KEY>' \-X PUT 'https://api.nsone.net/v1/data/sources' \-d '{"sourcetype": "nsone_v1", "name": "HA_PROXY_CONNECT"}'outputtext{"status": "ok", "name": "HA_PROXY_CONNECT", "feeds": [], "config": {}, "id": "760e670096f4f59dec045bed383aac5c", "sourcetype": "nsone_v1"}outputtext{"status": "ok", "name": "HA_PROXY_CONNECT", "feeds": [], "config": {}, "id": "760e670096f4f59dec045bed383aac5c", "sourcetype": "nsone_v1"} -
Create a new data feed for each of your load balancers:
- Call the
/v1/data/feeds/[id]NS1 API endpoint. - Set
idin the URL to theidreturned from the previous step.
In the following example, we set
nameandlabelto “us-east”, but you can choose any value. NS1 uses this when it selects the data feed to monitor for the current number of connections:nixcurl -sH 'X-NSONE-Key: <API_KEY>' \-X PUT 'https://api.nsone.net/v1/data/feeds/760e670096f4f59dec045bed383aac5c' \-d '{"name": "us-east", "config": {"label": "us-east"}, "destinations": []}'nixcurl -sH 'X-NSONE-Key: <API_KEY>' \-X PUT 'https://api.nsone.net/v1/data/feeds/760e670096f4f59dec045bed383aac5c' \-d '{"name": "us-east", "config": {"label": "us-east"}, "destinations": []}' - Call the
-
Repeat the previous step to create a data feed for each load balancer, but change the name and label for each (for example, “us-east”, “us-west”).
-
Verify that the data feeds are listed in the NS1 Customer Portal on the Integrations window.
Associate DNS answers with data feeds Jump to heading
Add metadata to associate your A record answers with the data feeds.
-
In the NS1 Customer Portal, edit the A records for the zone.
-
Click Edit Answer Metadata for each answer and select Active connections.
-
Click the Feed
 button to toggle the source of the data to become a feed.
 -
Choose the appropriate data feed for the current answer.

-
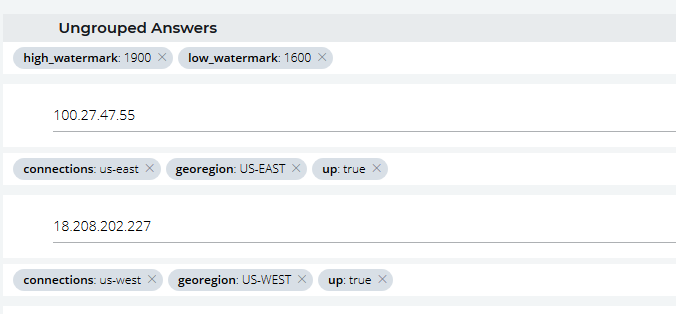
Add record metadata that applies to all answers:
- Specify a Low watermark that sets the threshold for when NS1 can begin shedding traffic away from a load balancer.
- Specify a High watermark that sets the threshold for when NS1 must completely stop sending traffic to a load balancer.
Configure a filter chain Jump to heading
When NS1 decides which IP address to return for a DNS query, it bases its decision on a chain of filters. Each filter discards answers that fail to match some criteria. Set a filter chain to inform NS1 on how to make its decision.
-
In the NS1 Customer Portal, edit your A records and click Edit Filter Chain.
-
Add the following filters:
- Up
- Geotarget Regional
- Shed Load
- Select First N
-
In the Active Filters window, select:
- the Shed Load filter and choose connections from the drop-down list.
- the Select First N filter and set its value to
1.
-
Save the filter chain. Verify that the filters are listed in the correct order as shown in the image below.

Configure HAProxy Enterprise to send data Jump to heading
Use the HAProxy Enterprise Send Metrics module to send the count of active connections for each load balancer to NS1.
-
Log into each load balancer server and install the Send Metrics module.
-
Edit the load balancer configuration file to send connection information to NS1 by adding the following to the
globalsection:haproxyglobal# ...module-path /opt/hapee-2.8/modulesmodule-load hapee-lb-send-metrics.sosend-metrics-url POST https://api.nsone.net/v1/feed/760e670096f4f59dec045bed383aac5c xdelay 1m 5s 1s 1s timeout 100ms retries 3 log verify nonesend-metrics-header 'X-NSONE-Key: <API_KEY>'send-metrics-content-type application/jsonsend-metrics-data '{ "us-east": { "connections": "%ac" }}'haproxyglobal# ...module-path /opt/hapee-2.8/modulesmodule-load hapee-lb-send-metrics.sosend-metrics-url POST https://api.nsone.net/v1/feed/760e670096f4f59dec045bed383aac5c xdelay 1m 5s 1s 1s timeout 100ms retries 3 log verify nonesend-metrics-header 'X-NSONE-Key: <API_KEY>'send-metrics-content-type application/jsonsend-metrics-data '{ "us-east": { "connections": "%ac" }}' -
Be sure to update the URL with your data source ID, the
X-NSONE-Keyheader with your API key, and the label sent with thesend-metrics-dataline. -
Reload the load balancer.
nixsudo systemctl reload hapee-2.8-lbnixsudo systemctl reload hapee-2.8-lb -
Verify that the load balancer access logs show that the Send Metrics module sent data successfully:
nixSend Metrics: metrics data successfully updated (1/0).nixSend Metrics: metrics data successfully updated (1/0). -
Repeat this procedure for each load balancer.
Do you have any suggestions on how we can improve the content of this page?